Posts

Showing posts with the label diecuts

Cool Summer

Image
Hello friends! We are in the middle of June and it is full summer here in Florida, the humidity is thick right now. One definitely needs sunglasses when going outside here, its bright! Are you ready for a super fun Taylored Expressions release? This week its all about summer, and staying cool.  For this bright and bold green and pink card, I started by stamping the Suns Out Background stamp onto lime zest cardstock, then stenciled in the sunglass shades in a few sunglasses. The large sunglasses were diecut and stamped in sugar cube, lollipop, and lime zest. On the solid pink sunglasses, at the top glue was adhered then glitter was adhered. Both sunglasses were adhered to the card using foam adhesive. The sentiment was stamped onto sugar cube cardstock, cut out and then adhered with foam adhesive. To embellish, black drippy drops were added.       This was a fun card to create. Using the misti tool, I was able to create fun ombre stamped sentiments using pin...

Interactive Thank You

Image
Do you like interactive cards? Taylored Expressions has made this theater fold interactive die kit, so so easy. You will need to diecut the outer layer, and two inside pieces. But included are pieces already diecut and scored, ready to use.  After die cutting sugar cube cardstock to create the top layer. Using watermelon, candy corn and pinapple inks, the diecut panel was ink blended to create a gradient of red/orange/yellow. A stencil was placed over the panel and ink blended again to create a design.  The thank you sentiment was stamped, then diecut to place over the pre cut and scored diecut pieces. Then using the same stencil and ink colors, to create the same pattern.  When you pull the sides of the card apart, there is a secret area to place another sentiment/image. So fun! I am loving these big bold sentiments with coordinating dies. They really can add that extra zing to a card when you stamp the sentiment onto colored cardstock and diecut it out.  To start,...

Happy Birthday Technique Tuesday

Image
How fun to help celebrate Technique Tuesday's birthday ! Since its a birthday, we need birthday cards. Up first I have a bold and graphic card. The card front has tone on tone stamping with the balloons to create a subtle background. Then the "happy" image was stamped in black ink, colored in with copic markers, cut out and adhered to the cardfront using foam adhesive. Little half pearls were added with glue to embellish the card, and ground it a little bit.  The card base was created with a light blue cardstock, then stamped a few times using a watermark ink. A white panel was trimmed, "happy birthday" was stamped in black ink, and the panel was adhered to the card front using foam adhesive. The image was stamped in black ink onto white cardstock, colored in with copic markers, then cut out with scissors before being adhered above the sentiment with foam adhesive. If you cannot send flowers to someone for their birthday, the next best thing is a handmade card w...

Hello & Thinking of You

Image
Hello friends! Taylored Expressions is releasing new stencils and blender brushes today! The blender brushes are smaller, to fit into all the nooks and crannies of your stencils. Which is perfect for stencils where you use a multitude of colors.  Sometimes when creating a stenciled background, I want a muted color and not something as bold and bright as white cardstock. Once the card base and diecut "hello" were created using plum punch cardstock. The process of going through my TE cardstock to find a color that coordinated, started. From past cards, plum punch & peaches and cream go so well together and have been some of my personal favorites, it was an easy decision to make. The stencil was secured over the panel using purple tape. Then using a variety of ink colors and blender brushes, the gradient rainbow was created. Once finished inking a background, the "hello" diecut was adhered to the card using foam adhesive. The crystals were added for a final embell...

Background Stamps oh my!

Image
  Hello friends! It is April 6th and here we are on another Tuesday and I have some fun cards to share with you today. Taylored Expressions is bringing you some incredible stamp sets this month. Y'all they are soooo good! For this On The Block Mom card, I started by stamping the lollipop card base with the In Bloom background stamp in Cherry Pop ink, using a MISTI tool. On the top left and bottom right using the clear stamps from In Bloom, the flowers and leaves were stamped with lollipop and cherry pop ink. On white cardstock the "mom" was stamped and then die cut using the On The Block stamp and coordinating die and adhered using a foam adhesive for added dimension. The bottom sentiment was created with the You're the Best mini strips stamp and die. By using a bright and colorful card base it elevates the card but also while being a really simple card to create! I love the stamp and stencil combos, they really elevate a card in a simple way, especially if coloring...

Social Butterflies

Image
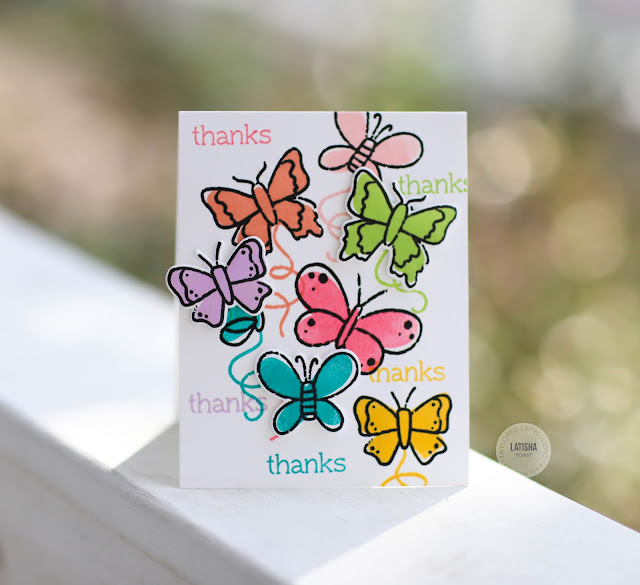
Stamp Joy is a multi day stamping and card making event hosted by Taylored Expressions . Attendees receive a goody bag, and some of the items are exclusive to Stamp Joy, meaning they are not available for purchase. Today, TE is opening up the vault so to speak and releasing previous Stamp Joy exclusive stamps and dies. How cool is that?!  This stamp set is called Social Butterflies. The set comes with red rubber images and sentiments as well as clear stamps. There is also a coordinating die set that is available as well.  To start, the butterfly outline images were stamped in black ink, then stamped again with the coordinating clear stamp that fills in the outline. I used several different colors to create a rainbow of butterflies. For added dimension, some butterflies were stamped onto a separate piece of white cardstock, then diecut with the coordinating die, and adhered to the card using foam adhesive.  Head on over to the Taylored Expressions site today, click on wha...

Concord & 9th

Image
  I recently guest designed for Concord & 9th . To me they represent clean and graphic. They have stamps for the stamper who loves to diecut and as well as line images for those who like to color. Here are some of my favorite cards that I made using their February release! Concord and 9th also has a beautiful line of cardstock as well as coordinating inks, which makes creating that much easier. Currently they are releasing their March release, and it looks amazing!!

St. Paddy's Day

Image
  Hello Friends! Here we are at another month. Can you believe it? Its February 2021! I am so ready for spring and warm weather. Here in Florida we have had cold, grey, rainy weather for months now. Not a typical warm winter at all. So, when I saw the Taylored Expressions releases for February, I was so excited!  Today's post is all about St Patrick's Day, green, shamrocks, luck and rainbows. All things that I love. Let's dig in to the details of this card. The background was created by ink blending 3 different green inks onto a green card base. By using different tones of the same color, it creates a nice depth to a simple card. The diecuts were layered with foam adhesive and twine was added to embellish.  What is St Patrick's Day without a rainbow? I knew I wanted to create a subtle rainbow on one of my cards. It took me a little bit of playing around with this stamp and stencil combo but I figured it out. I would use the stencil a little differently to get more sham...

Mini Slim Release

Image
  Here we are, the very last Tuesday of January of 2021. Anyone else feel like this month went by extremely fast or just me? I do have to admit that parts of January did feel never-ending due to the fact that I was extremely ill with Covid-19. Luckily I was working a few weeks ahead, and was able to have the majority of these cards finished before I ever got sick. I will blog about my sickness another time, but in short it was beyond horrible. Now on to the Mini Slim Release that will be sure to set your crafty soul on fire. The mini slim line card base was already done so, I started by ink blending hearts onto the cardfront. Next I diecut white cardstock using the Mini Slim Circle Window Cutting Plate (whew say that 3 times fast lol) and ink blended clouds onto the panel using a stencil. Before adhering the panel to the card front using foam adhesive, the sentiment was stamped in black ink, and the "hi" was added. The critters were stamped, colored in, cut out and adhered to...

Sentiment Strips

Image
  Hello friends, just a few cards to share with you today using new sentiments from Taylored Expressions . For my first card, I started by scoring confetti cake cardstock, then applying a background with ink and a stencil. I was making a clean and simple card so a monotone background elevated the card a bit. Next, I stamped and colored in Gus & Gertie with copic markers, then adhered to the card using foam tape. The sentiment was stamped and diecut in black ink then adhered to the card with foam adhesive as well.  For this card, I started by creating a monotone stenciled background with green inks and cardstock. Once the ink was dry, the image was stamped, diecut and colored in with copic markers, then adhered using foam adhesive. What I love about the simple strips is how easy it is to stamp and diecut sentiments. I picked a sentiment that matched the image hahaha. "I'm done with people" seemed appropriate.

Hex Kit from Taylored Expressions

Image
  Thank goodness for stamping and creating, because it is such a wonderful way to spend my time. Trying to focus on being grateful everyday, and finding small joys. It isn't easy, but I like living in gratitude, it forces yourself to look at the world differently. January is wilding out, thinking its December 43rd, 2020. Nah dawg, its 2021, time to be better lol.  Anyhow, today I am sharing a few cards using the new Hex Kit from Taylored Expressions .  Since I was using 3 different inks on a red rubber stamp, using a MISTI was so beneficial to perfect placement each time. Once the outline of the hexagons were stamped, I grabbed the coordinating hex stencil and ink blended inside the hexagons using blender brushes and the same exact inks. A sentiment and few roses were stamped in the center positions.  Inside of the Hex Kit, there is a clear stamp set. Using the outline image of the hexagon, I stamped the image in multiple colors, then stamped the inside with one of...