Posts

Showing posts from October, 2015

A few projects to share

Image
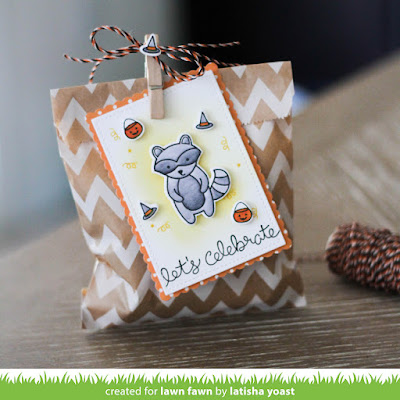
I have a few projects posted on different blogs this week.  So I will share the photo, then the link on where you can get all of the details of my project. This week Lawn Fawn and Chameleon Pens are teaming up.  I created this fun treat bag with Halloween in mind.  Head on over to the Lawn Fawn Blog for more details! I made a "Boo" treat bag.  It is featured over on the Fancy Pants Designs Blog .  Head on over there for the full list of supplies that I used. I created this simple card, and it is featured on the Scrapbook Adhesives by 3L blog . This shaped card and a full tutorial are on the Spellbinders Paper Arts Blog .

Lawn Fawn: Finishing Up October Inspiration Week

Image
Hello there! For some reason my last two posts did not go live when they were supposed to.  I apologize for that.  So here are a few more of my Lawn Fawn projects for October. Make sure you check out all of the great inspiration the design team created over at the Lawn Fawn Blog , there really are some spectacular projects!! For the cheers card, I diecut the mini snowflakes in different colors, then picked out coordinating ink to match.  I added the ink to the card front and then adhered the snowflakes.  To add some contrast I diecut the scripty cheers in black and finished it off by adding twine. So, Lawn Fawn finally created a die set that coordinates with the Cozy Christmas stamp set.  This is such a fun set to work with, especially now that I don't have to fussy cut all of these cute images out!

Lawn Fawn: I Love You a Latke

Image
Hello there! Today I am sharing a shaped oval card, created with the new stamp set from Lawn Fawn called, I Love You a Latke.  This is a great set to make Hanukkah cards with. Head on over to the Lawn Fawn blog, to see more great projects using this stamp set, along with a chance to win it. Instructions: 1.  Die cut yellow cardstock using the stitched oval dies, you will need two pieces to create this card base. 2.  Die cut white cardstock using a smaller stitched oval die. 3.  Add blue ink to the oval using a sponge tool. 4.  Stamp the menorah in gold ink, then clear emboss, same with the candles. 5.  Stamp the sentiment. 6.  Stamp the stars in blue ink. 7.  Adhere the stamped oval diecut to the card front using foam adhesive. 8.  Add twine.

Lawn Fawn: Snowy Backdrops Stamps & dies

Image
Hello there! Do you know what is a great feeling as a crafter?  When you envision an idea, then you are able to execute it.  It is not often that this phenomena happens to me, but it did with todays project. Make sure you head on over to the Lawn Fawn blog , where you can see more great projects using this stamp and die set! Instructions: 1.  Using white cardstock cut/emboss with the Starry Backdrops die. 2.  Then using a stitched banner, layer the banner die over the starry backdrops diecut. 3.  Using ink and a sponge tool, start layering the ink.  I like to start from the edge and go in a circle motion. 4.  With the left over starry backdrop diecut, die cut stars.  And ink them up as well. 5.  Adhere the stars to the banner using foam adhesive. 6.  Stamp a sentiment onto white cardstock, add ink the the panel.  Adhere using foam adhesive. 7.  Apply one more star to the banner using foam adhesive. 8.  Apply the banner to a card front. 9.  Add gold trim.

Lawn Fawn: Winter Scripty Saying & Scalloped Rectangles Stackables

Image
Hello there! Today is the start of the October inspiration week for Lawn Fawn.  Today, I am sharing a card using the latest stamp set called Winter Scripty Sayings with the Scalloped Rectangle dies. Can you believe that it is mid October already?  Before I know it the holidays will be fast approaching...and I am not ready!  The card I am sharing today, is pretty simple to execute but it has some fun techniques that makes it not so clean and simple.  The great thing about this stamp set are all of the great sentiments!  Since I am making a Christmas card, I settled on the "season's greetings" sentiment. Instructions: 1.  Die cut white cardstock, using a scalloped rectangle die. 2.  At a diagonal apply a strip of washi tape across the diecut. 3.  Using a sponge tool and red ink.  Apply red ink below the washi tape. 4.  Using a darker red ink, stamp the season's greeting sentiment repeatedly to create a fun background. 5.  Remove the washi tape.