Posts

Showing posts from August, 2011

CPS 233 using Clearsnap & Lawn Fawn

Image
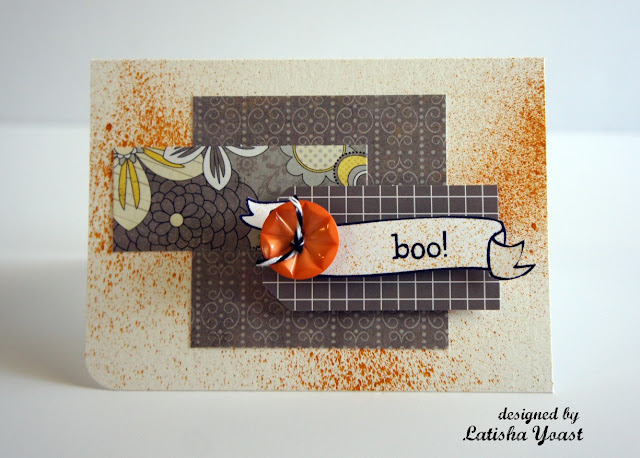
The sponsor over at CPS this week is Clearsnap.  I got to work with some Smooch Spritz, and I actually liked doing something different & getting super inky.  What I like about the spritz a little better than other "sprays" is that I had more control over where I would be spritzing ink.  Some sprays, you have no idea where ink will land.  If you play along with this week's sketch you have a chance to win a prize from Clearsnap (super cool!) . Once, the spritz dried I added some paper (American Crafts & Authentique), then stamped a banner from Lawn Fawn's banneriific set, and added a "boo" sentiment from the Heebie Jeebies set .  To finish off the card I added a Jenni Bowlin button (that I have been hoarding forever lol) , tied with bakers twine.  I followed the CPS sketch #233 for my card.

Avocado Arts: Thankful for You

Image
The September, Thankful for You stamp set from Avocado arts is now available.  So today the design team is showcasing cards/projects using this fun fall set.  It has cute images, a few background builders, and great sentiments.  For my card, I kept it clean and graphic, using the chevron/ric rac background builder, and sentiment paired with some October Afternoon paper.  Looking at the card now, I probably should have added some twine, or even another button/bling in one of the corners so that the card "flows" better.  But, all in all, I still like the card.  I used my favorite color combination (red/yellow) , and it will still make a great thank you card.   Visit the rest of the design team to see their projects, and if you want to see this set in full head on over to the Avocado Arts website. AJ OTTO BECKY OEHLERS JULIA STAINTON KIMBERLY CRAWFORD AVOCADO ARTS BLOG materials used: American Crafts white textured cardstock Avocado Arts Thankful for You stamp set

Lawn Fawn: Turkey Day

Image
It is the last day of sneaks for this Inspiration Week from Lawn Fawn, and today the design team is showcasing the Turkey Day stamp set.  For my card, the layout/sketch is fairly simple, but I did incorporate some super cute Amy Tangerine paper from American Crafts.  The paper I chose below seemed fallish/masculine, especially with the cool woodgrain pattern.  I cut/embossed white cardstock using a Spellbinders Picot Edge Circles die template, stamped the turkey, then colored it in using Copic markers.  Before I adhered the die cut down with foam tape, I ran satin ribbon around the panel & tied a bow.  To finish off the card, the sentiment was stamped & black rhinestones were added underneath.  A lot of times in my cards, you may notice I add three little rhinestones and/or buttons.  For me, that "spot" just seems off, so by adding a small embellishment it will complete a visual triangle (not to talk fancy lol...but I don't know how else to explain it). Make sure

Lawn Fawn: Harvest Season re-visited

Image
It's day #3 on the Lawn Fawn August Inspiration week, and today the designers are showcasing a few sets that came out last year, Heebie Jeebies & Harvest Season .  So half of the designers are playing with the Heebie Jeebies set and the other half are playing with Harvest Season.  I am in the half using Harvest Season.  This set has a fall/Thanksving theme to it, but you really get creative with it, when you combine it with other Lawn Fawn sets. When I sat down to create my card, I wanted to use the set in a different way, not shown before.  So, I started to go through older sets, and immediately stopped in my tracks when I saw the smiley faces in the   On The Mend set.  I decided right then and there, that this pumpkin was going to be smiling...it even whispered it to me...true story. (your stamps talk to you right?  Whew I was starting to feel a little crazy lol)  After the pumpkin was colored in, I inked up the smiley face that is on the tissue box, and stamped it in the c

Lawn Fawn: Many Thanks

Image
We are on day #2 for the Lawn Fawn Inspiration Week.  Today, the design team is showcasing a set called Many Thanks.  I really like to have an arsenal of "thank you" stamps, so I was delighted to add this to my collection :) Head on over to the Lawn Fawn blog , for a chance to win this set, and visit the rest of the design team to see how they used this set. Chan Vuong Julie Campbell Lea Lawson Lynnette Kauffman Nichol Magouirk Teri Anderson Tiffany Johnson Materials Used: Lawn Fawn stamps: Many Thanks Spellbinders die templates MME pattern paper Versamark ink Versafine ink palette ink foam tape clear embossing powder black satin ribbon

Lawn Fawn: Heebie Jeebies

Image
Today starts Inspiration Week for Lawn Fawn , and today the Lawn Fawn Design Team, known as the Fawnies are showcasing the Happy Haunting stamp set.   I decided to make a long card (6 x 3 3/4 inches).  I originally started out using a cream/ivory cardstock layered on the black, but it looked too stark, so I changed it up and went with kraft.  Before, I started stamping, I inked the edges of the kraft cardstock to give it a more dirty/not so clean/kind of distressed look.  I stamped the tree, and colored it in with a brown copic marker (E57), then stamped a few leaves onto the tree (orange ink).  I love the fence in this set, so I knew I wanted to use the fence somehow, so I stamped the fence in front of the tree, then colored in the tops using a black pen.   Below the fence looked weird and kind of bare, so using a C1 & C3 Copic markers I tried to make a sidewalk.  It needed something else, so I added a few more leaves on the ground, and a few bats flying around the tree.   The top

One layer card

Image
Did any of you play along with the Dare to Get Dirty challenges on SCS ?  I think the challenges are fantastic, some make you think and get out of the comfortable box we keep ourselves in.  It's fun to stretch yourself.  The card below, was a card I created for the 1 layer card challenge...  Yep, no extra layers of paper or card stock except for the card base (I kind of actually love one layer cards).   I embossed around the sentiment (Waltzingmouse Stamps) using a Spellbinders die template, and then I cut/embossed the bottom border of the card using some Spellbinders Edgeabilites.  To finish the card, I added Want2Scrap heart shaped rhinestones, oh and on some of the swirly parts of the sentiment. I really am happy with the way this card turned out, I am thinking about making a few more cards similar, then giving them away as a gift set.  One can never have too many thank you notes hanging around.

Halloween Adventure

Image
If you are like me, you are wondering to yourself, "summer went by fast!"  It is hard to believe that my children start school Tuesday morning.  Before I have time to think about it, the holidays are going to be here.  So, I'm thinking a little ahead this year.  My children are a little older (10 & 15), and I think the days of them dressing up may be over (for the 15yr old for sure lol).  My son, may just surprise me, who knows?  Here is a cute gift card idea I am thinking about giving my daughter.   This year, I think I might take them to Universal's Halloween Horror nights.  I will give them a gift card with the admission ticket, then a little bit of cash to buy some treats, inside of the gift card.  Hopefully they like it!  I hear it is pretty scary, but so much fun.  I'm not even going to lie, I get scared easy, but I love scary movies & getting a little freaked out.  After the gift card was scored & adhered together, it was time to decorate the fr

CPS 230...Be Unique

Image
Here is my take on this weeks sketch over at CPS .  Head on over and play along, this week the sponsor is Flower Soft.   I used the Clear to See stamp set from Lawn Fawn. Paired with some fabulous plaid paper by The Girls Paperie.  I know the company is no longer, but I really love that plaid.  Plaid for me is timeless, kind of like damask & polka dots. I stamped the glasses onto a Spellbinders Classic Circles die cut, and added pink pearls (Want2scrap) on the edges of the glasses, and stamped the "be unique" sentiment.  I may write my daughter a little note about being true to herself.  She will be going into the 10th grade this year, and it is so easy for teenagers to lose themselves trying to seek approval of others.  I am really proud of her, and the young lady she is becoming.  Just my way of giving her a little attention and positive reinforcement.  

Denami & Lawn Fawn blog hop

Image
Okay, are you ready for some fun?  Lawn Fawn & Denami Designs are having a mash up blog hop, today and tomorrow.  The designers, are creating projects using stamps from both companies...so. much. fun!  Scroll down, and you will find the blog list of designers participating today.  Make sure to leave a comment for a chance to win a gift certificate from Lawn Fawn & Denami Designs . For my first card the cute owl & sentiment are from Denami, then the graduation cap is from the Hats Off to You set from Lawn Fawn. Your next stop on the blog hop is to Michelle . For my next card, I used the clouds and helicopter from Denami, then the sentiment from Lawn Fawn.  I had asked my husband what I should use as a sentiment (being he is a helicopter pilot) , and he said I should use, "you spin me right round baby, right round, like a helicopter baby", I love how he added helicopter to that lyric.  He also said, I should use "fly away with me".  I settled on the bo

I love You

Image
August 1st?  Holy moly, summer is almost over, and soon my children will be heading back to school.  Buck holy moly, I still cannot believe it is August already.  Well today, the Avocado Arts crew is posting projects using the August stamp set, Zipnby to Say Hi.  It is such a fun, happy set, and is my favorite set so far (if I had to pick a favorite lol) .   Make sure to visit the rest of the designers, too see their projects. AJ OTTO BECKY OEHLERS JULIA STAINTON KIMBERLY CRAWFORD AVOCADO ARTS BLOG I used some new (to me) Authentique pattern paper, paired with a label from the Spellbinders Orchard Harvest die template set, and the Classic Peta l set..  I really cannot resist woodgrain paper, especially with a pretty floral background on the "b" side.  After I stamped the sentiment and image, I filled in the paper airplane with a red Spica Glitter pen, and went over the black with a black Spica Glitter pen.  In real life it makes the ink look super glittery and shimmery