Posts

Showing posts from December, 2009

Happy New Year's eve

Image
Happy New Year's Eve!!  No big plans for us tonight.  I'm going to make some rib-eye steaks, baked potatoes, a nice salad and maybe some pasta.  We will play board games (me, hubby and our two children), and watch movies.  The kids will have Martinelli's Sparkling Apple Cider in champagne glasses when the time hits midnight.  We do live in the south, so we will hear many fireworks going off. I plan on staying in my pajama's all day, crafting, watching movies, and catching up on college football.  For those of you going out, be safe!!  Bring on 2010!!

For you

Image
Happy New Year's Eve Eve :)  Can you believe in just a few short days we will go into a new decade and year!  2009 was really amazing, and I cannot wait to see what 2010 brings.  My Dad left yesterday, so since I don't have to play hostess today, I actually got to sit down and make a card just for fun.  I need to make a bunch of thank you cards, so is my first one done.  The images are from Waltzingmouse stamps (LOVE them!!) and the designer paper is from the new Sugar Rush line from Basic Grey, and the polka dotted paper is from Bo Bunny. My house is so quiet right now, love that.  My children are engrossed in the new things that they received for Christmas.  I hope you all have a wonderful day! "for you"

From the Funny Farm

Image
Now that Christmas is over, its time to start making thank you cards.  This week I plan on sitting down with my children, to help them make and send out with their thank you cards.  Next month is winter CHA and all of the stamp & paper companies (well anything to do with the crafting industry) roll out their new lines of stuff.  So, that means I need to start using up my stash of paper.  This card is using some of my favorites, its the Early Bird line from Cosmo Cricket.  The stamps are from Artistic Outpost (love them!) Today, we are off to Savannah, Georgia.  Its a beautiful southern city.  My Dad has never been there before so it should be a fun trip, plus the drive is gorgeous.   Happy Sunday yall!

Merry Christmas thoughts

Merry Christmas I hope you and your family have a wonderful Christmas today.  Today brings me thoughts and feelings of gratitude.  Here are a few thoughts... That the excitement and joy I have always had for Christmas, my children have too. Watching my children open their presents is my favorite gift. Listening to the Nutcracker cd makes me wish I took ballet for more than 5 lessons (I liked gymnastics better) Watching my son go around the house searching for evidence that Santa was here. That my children love to give to charity, just like my husband and myself. That we are not affected by the economy, can pay our bills, have a home and can provide food for our children. That I get to eat some of my favorite food today. That the real 12 days of Christmas is starting today. That my children think their best present this year, is their Papa visiting them. My husband is home, and we get to make new memories. Thankful for all of the wonderful online fri

recap of the last few days

Image
Sorry I have not been blogging the last few days.  My Dad flew in from California, and we have not seen him in over a year.  The kids are so happy to have a grandparent here for Christmas, it just makes it extra special.  This week, we have ate lots of food, hung out, went to see Avatar at the Imax in 3d, and yesterday we took my Dad to the Magic Kingdom (Walt Disney World).  He has never been to any Disney park.  He was amazed at how much detail Disney puts into everything. Anyhow, I have lots of dt work and deadlines I'm trying to meet, so hopefully I can have a new project posted soon.  I hope you have a wonderful Christmas!! hugs Latisha

Cute and quick circle card

Image
Making circles are so fun to make, and pretty easy too.  Cut and score your card stock as you usually do.  If you don't have any die cuts to cut out your shape, go grab a bowl, a jar, a mug or a cup... really anything round that is the size you want.  When using dies, place the die just a tad over the score line, this will keep the fold and the card together.  If you are using a cup, just put the edge of the cup a little over the fold (trace the circ. of the cup with a pencil and then cut out with scissors).  After my card base is cut out, repeat the process with double sided pattern paper.  Cut a couple of strips of the cut out pattern paper, and adhere to the card.  The paper I used, is by October Afternoon, and lucky for me, I had coordinating stickers.  So I applied a sticker toward the bottom corner.  To add ribbon, punch two holes at the top, run your ribbon through it, and tie a knot (add a button for added cuteness).  For a little more dimension I put a couple buttons on th

White space card

Image
Stacy challenged us to make a card that has a lot of white space (clean and simple).  Which is right up my alley, a quick and simple card right before the holidays.  Stacy has a tutorial and samples over on the Flourishes Newsletter . So do you have all of your Christmas cards done?  If not, take a little blog hop to get some inspiration on how the design team, made different clean and simple cards.  Sometimes a clean card is the way to go, especially if you have to make a lot of them.  Well I'm off to finish making cookies, fudge & brownies for my children's Christmas parties (I'm typing this Thursday night). Warm Wishes check the design team out with their white space cards Christine Cindy Julie Laura Leslie

Believe

Image
Only 10 days until Christmas!!  My Dad gets here in just a few days, and things are busy in my house.  The holidays always seem jam packed, but I really like it.  All the hustle and bustle, wearing jackets, drinking hot cocoa, the excitement of opening presents.  I love love love Christmas, its probably my favorite holiday.  Plus with both of my children in Christmas plays and choral performances, listing to the children sing, really make you feel warm inside.  Just last night my daughter has a Winter Choir concert, and I got goosebumps.  She was asked to sing with the High School Chorus, and they have beautiful voices.  Anyhow, here is a Christmas card I made a while back and never posted to my blog.  The paper and chipboard are from Basic Grey and the sentiment is from the Flourishes Santa set.  I hope you have a wonderful Tuesday.  I'm going to go have lunch with a good friend at a place that has good guacamole (so she says, and I trust her). "Believe"

Day 3, Year of Flowers

Image
Today is the last day of peaks, so the design team will be showing the Year of Flowers calender set 3.  Which is months September, October, November and December.  With fall just behind us, I wanted to make a rich fall card.  So I inked up the October flowers which are Chrysanthemums.  I colored the flowers in with copic markers, then distressed the edges of the panel with Tim Holtz distress ink.  The designer paper is from SEI, the Julliete line of paper.  Its very beautiful paper, and feels like velvet.  For your chance to win this stamp set, head on over to the Flourishes Newsletter , they are having a one day only blog candy.  Tonight is the power hour release party over on SCS , so if you don't have any plans, come and visit.  There will be games, prizes and the full reveal of the set. For more inspiration and sneaks, visit the rest of the Design Team Christine Okken Cindy Lawrence Julie Koerber Laura Fredrickson Leslie Miller Stacy Morgan

Day 2 of sneaks

Image
Hey there, today brings us the Year in Flowers Calender set 2.  Which includes the months May, June, July & August.  For my project, I made a tag using the Iris flower, and the printable calender that Flourishes will be offering.  You can buy the downloadable calender for $2 or get it free if you buy all three stamp sets.  So, I printed out the calender and then cut it down to the size I wanted.  I then stamped the Iris flower and colored it in with Copic markers.  I took some Tim Holtz distress inks and inked up the white card stock with Green and a Walnut stain color.  After I applied the ink, I coated the tag with some Rock Candy Crackle paint.  To speed up the process of the crackle paint drying I used a heat gun, you don't need to use a heat gun, I just didn't want to wait.  I then wanted to age it just a little more, so I took the script stamp that is in the Thank You set, and inked it with some green ink again and just stamped directly over the crackle paint.  To fin

December release Day 1

Image
Can you believe its that time of month again for a Flourishes release!!  Today I'm showing you a sneak of the Year of Flowers calendar set 1.  I chose to use the March Pansy.  Did you know you can eat the leaves and flowers of a pansy plant?!?  The flowers can be dipped in sugar to decorate cakes, or just wash the blossoms and use them to garnish soups and salads, or whatever.  One of my cousins wives, she makes cakes and on my bridal shower cake, she put pansies on it, boy was that cake beautiful and tasty. Anyhow, onto the card. I was inspired by this photo of this pansy (isn't it beautiful!) I didn't color in my image exactly the same, I was just more inspired by the colors.  The really rich oranges, yellows and reddish pinks.  I colored the image on white card stock, then cut it out and adhered it to a kraft card base.  I'm trying (really trying) to make a complete set of cards with this months releases.  So there will be 12 cards, one for each month.  I plan o

Christmas in the Old Country challenge & blog candy winner

Image
Happy Monday!  With December in full effect, that means lots of Christmas parties, chorus performances, children's parties, finishing up and mailing out Christmas cards...yep I'm busy.  We had a wonderful weekend which started on Thursday.  My husband and I went to an All Hands Christmas party for the Squadron he is stationed at.  Then on Friday, my daughter had a Holiday Chorus performance at her school.  After the program, we went and ate at a Japanese hibachi restaurant.  We always have such a good time, plus its fun to get to know the rest of the people at your table.  Saturday, my husband and I got dressed up to go to the Change of Command dinner.  I have to say, I had a lot of fun and enjoyed some Christmas Spirit (belvedere vodka, cranberry juice with a twist of lime lol).  Good times, good times. Anyhow, well I am just making the deadline, but I am playing along with the Christmas in the Old Country challenge over at Moxie Fab World.  You have until midnight to submit

March of the Snowman Blog hop & Blog Candy

Image
A group of us decided to get together and have a fun Snowman blog hop.  All of the blogs will feature Snowman projects.  Be sure to visit all of the ladies blogs, most of them are giving away blog candy!!  How fun is that!  I decided to make a Snowman tag, I got my inspiration from Tim Holtz 12 days of Christmas tags (from day 1).  The Snowman and sentiment are from the Unity Stamp Company. Here is an up close picture of the tag.  It doesn't show very well, but I had put some Tim Holtz rock candy crackle paint over the tag, its a really cool effect, I'm so glad I bought some of the paint, its one of the coolest techniques I have done in a while.  I loosely followed Tim's directions on how he did his tag, so head over here to see how he made his. Links : Angella Crockett - http:// bodymindspiritandstamps. blogspot.com/   Barb Foster -  http://fosterdesignhouse. blogspot.com/   Deb Felts -  http://withastampandasong. blogspot.com/   Jen Carter -  http://jensinkspot.bl

Pre-release challenge

Image
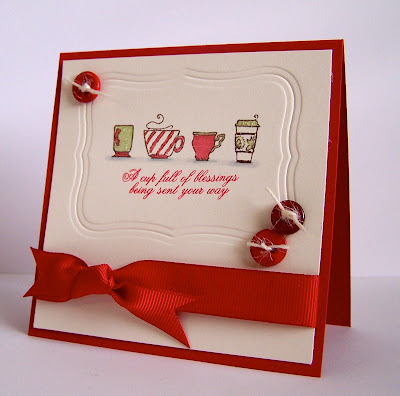
Wow, can you believe next week is the December release of stamps for Flourishes!!  There are three new sets being released, and I have to say, I have not seen sets like this in a while.  Versatile is the perfect word to describe them.  Anyhow, the Sr. Design team is having a pre-release challenge, where you use the colors of your favorite flower to lead the way in making a card.  I was inspired by the colors of a red tulip.  The only colors in my card are red, ivory and green all colors you would find in the flower and stem of a red tulip.  If you choose to play along, you could win all three releases next week.  For more details, head on over to the Flourishes Newsletter . For my card, the sentiment and image are both from the Christmas Tea stamp set.  I still have quite a few more Christmas cards to make, so clean and simple is the way I'm going!!  I colored in the cups using the Spica Glitter pens by Copic, they color in your image and sparkle!! What more can you want than tha

Simple Merry Christmas

Image
Wow December 2nd!!  Boy has this year just flown by.  I have been busy trying to finish up my Christmas cards, getting dt work done and just having fun creative time, not to mention Christmas shopping, recovering from Thanksgiving and getting ready for my Dad to come for 10 days.  Anyhow, I have a sick child home this morning, so Home Alone the movie is on right now, and that gave me a little time to whip this little ditty up.  I started out my embossing the card front using a Spellbinders Impressabilities die, I love love love these and you really get a deep impression.  The kraft label looking thing, was on a sheet of Hambly Screen Prints journaling spots, that I decided to cut out.  The sentiment is a rub on from K & Co.  Before I adhered the label down, I ran some red satin ribbon around the front of the card and tied a bow.  The gems are from a Kaiser Crafts red jewel pack. Well I hope you all are having a wonderful day!  Are you doing the December Daily album?  I am, but I&#