Posts

Showing posts with the label holiday

Taylored Expressions Snowman kits

Image
  Hello friends! In the last few weeks, I have sold a house, bought a house, and lived in an Airbnb during a tropical storm. These candy capsuled were created while I was in an airbnb with limited supplies. That is how easy these are to create. This is a fun new Snowman Capsule Candy Kit from Taylored Expressions . I wished I had had orange cardstock to create a carrot nose, but kraft worked just as great.  These snowman capsules are very similar to the pumpkin capsules. You get the plastic containers with red and green tops, fuzzy pom poms in red, green and white colors, a die to create the nose, and vinyl stickers to rub onto the plastic for the faces. I was able to find red and green jelly beans to put into the containers for added festiveness. To adhere the pom pom, glue dots were used. 

Into The Woods Remix

Image
Hello there! Today, I am sharing a few project using the Into The Woods Remix. I have a card, some pillow boxes and tags! It was such a popular paper collection Lawn Fawn had to bring it back! The pillow boxes were created using the pillow box die. You can use the 6x6 or 12x12 paper. This is a brand new tag set that I was itching to create with. Thank you so much for joining me! Please visit the Lawn Fawn blog to see more wonderful projects, chances to win product and details on the release!!

25 Days of Christmas Tags, Technique Tuesday

Image
Today is day 13 of the 25 Day of Christmas Tags.  Head on over to Tracey's Blog , for a chance to win a $20 gift certificate from Technique Tuesday, as well as see all of the different tags the design team created.  Every day is a different sponsor and different prize! I decided to watercolor most of my tag, starting with the deer & snowflakes from the Dani The Deer Stamps set and the sentiment from Perfect Poinsettia .

Warm Wishes

Image
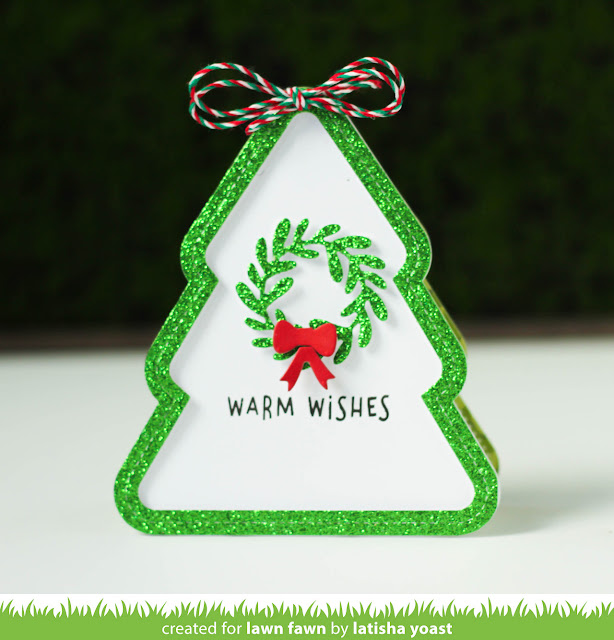
Hello friends! Making a shaped card is so much fun! I know it confuses a lot of people on how to make them, but it really is so easy. If shaped cards are not your thing, then you can always make tags, put the dies onto a card, or make a banner. Options are really limitless when it comes to using shaped dies. For todays card, I created the base of the card using the Stitched stackable tree die from lawn fawn. One for the front and the back. For the back of the card, score a line 1.5 inches down from the top of the tree die, and place adhesive above the score line. Adhere the front die. Stamp the sentiment in black ink onto the card front. Next die cut glittered green cardstock using the Stackable tree frame die and wreath. Adhere both to the card front using foam adhesive. Die cut the bow using red cardstock and adhere using the glue tube. Most of this card involves die cutting so it was super quick to create. If shaped cards are not your forte, use the tree di...

Seasons Greetings

Image
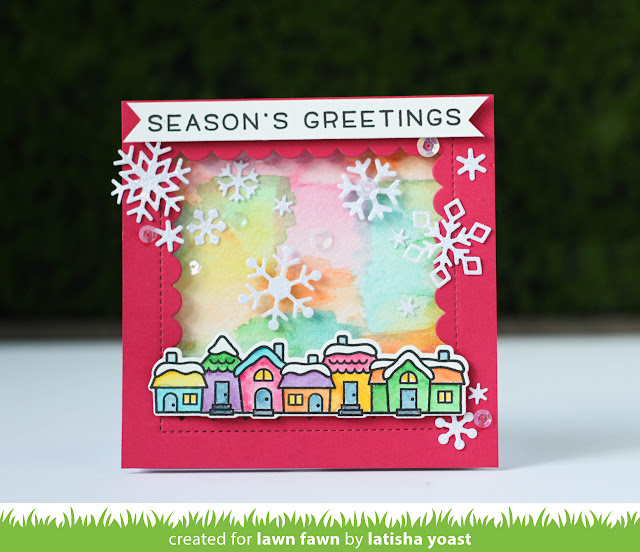
Hello friends! Today I am showcasing the die set from Lawn Fawn called the Reversed Stitched Scalloped Square Window die (whew that is a mouthful).  Lawn Fawn has these in squares, rectangles and circles.  You place the die onto cardstock, run it through a die cut machine, and what you have is a panel, that has an outside stitch and then a scalloped diecut center.  I love how this adds fun drama to any card and is perfect for creating window cards or shaker cards. This is a fun square card, with a colorful winter scene. The background was watercolored along with the village image. The snowflakes were diecut using white glitter paper for added interest and sparkle, because who doesn't love something sparkly. For more great projects using this die set head on over to the Lawn Fawn blog !!

Tangle Free Holiday

Image
Hello Friends! The process of making this card, was extensive, only because I messed up a few times and had to start over.  FYI don't ever put clear glaze on part of a card and then let it stand up, the glaze will drip down the front of your card lol. I started by stamping the String Lights image onto white cardstock, then coloring in the bulbs using red and green copic markers, then coloring around the lights in a blue green. Clear wink of stella was used to put a little bit of shimmer over the lights, and then Nuvo clear glaze was placed on top.  It gives each bulb, a shimmery glaze and a lot of dimmension which is pretty neat for a one stamp card. The front panel was adhered to the red card base using foam adhesive, and Nuvo drops were applied under the string lights for an embellishment. For a full image of this stamp set head on over to the Technique Tuesday blog !

Cream To My Coffee

Image
Friends. Like many of you, I love coffee. It is my most desired beverage of choice in the mornings, its just kind of magic. For those of you who do not drink coffee, never fear, there are cocoa and marshmallow sentiments included, you are not forgotten. Just looking at this stamp set, and knowing all of the different ways I can decorate these mugs, makes me insanely happy. This is the Thanks A Latte stamp se t from Lawn Fawn, and I love it. I started by ink blending aqua ink onto the cardbase, then stamping the sentiment in black ink, and the bottom of the card. The images were stamped onto white cardstock, then colored in using Copic Markers. The latte art was created by coloring in the coffee mug with a copic marker then stamping over it with a brown ink.  All of the images were hand cut, and then applied to the card using foam adhesive. To finish the card, red hearts were stamped at a diagonal, and a red satin bow was added.  It is time to bring bows back frie...

Watercolored Seasons Greetings

Image
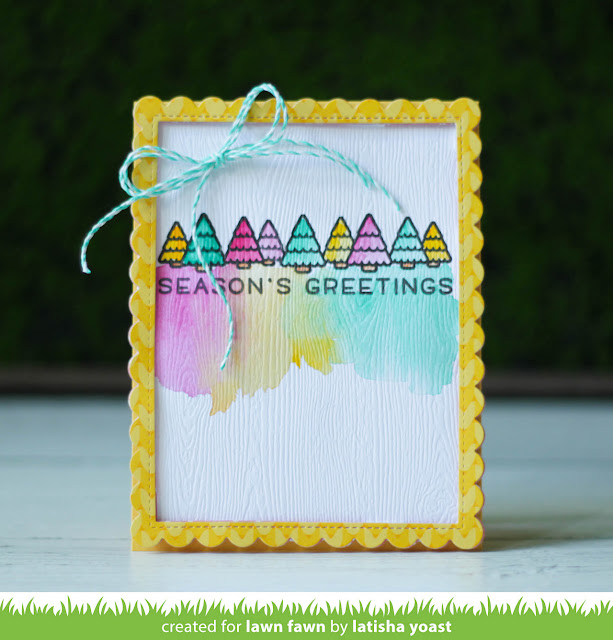
Hello Friends. The September Inspiration Week from Lawn Fawn continues! Today my card is using the stamp set called Simply Celebrate Winter . The images from Simply Celebrate Winter, are close to 4 inches wide, which makes them perfect to stamp on a card front, as well as the "season's greetings" sentiment. I started by stamping the image and sentiment with black pigmented ink, onto the white woodgrain cardstock. Once the ink was dry, I started to watercolor the trees.  I then did a wash of each of the colors down below the sentiment. Since the color was wet, as well as the cardstock, a wet on wet effect came into play. That is how each of the colors slightly blend into each other. For more great projects and inspiration, as well as a chance to win this stamp set. Head on over to the Lawn Fawn Blog . 

Have YoursELF a Merry Little Christmas

Image
  Hello friends! The September Lawn Fawn Inspiration Week starts today, and today the focus is on the stamp set called Holiday Helpers . In true Lawn Fawn style it is so super cute.   For this card, the front panel was die cut using the new portrait Snowfall Backdrop . Then using dark blue, aqua and green inks and and ink blender, ink was applied to the panel.  I imaging the North Pole has a sky that is super magical, so this is what the sky looks like there in my imagination lol.  The sentiment was stamped at the bottom of the panel in black ink. The panel was adhered to a card using foam adhesive. The images were stamped onto white cardstock with black ink, and then watercolored in. Once the images were dry the images were adhered to the card using foam adhesive. For more great projects and holiday inspiration head on over to the Lawn Fawn Blog !

Scripty Merry & Wishes

Image
Many years ago, I bought several of these kraft coffee bags/treat bags, just to have on hand.  They are great to stamp on, put stickers on or in my case today, alter with pattern paper and die cuts. Using Lawn Fawn Perfectly Plaid Christmas paper, I adhered some 6x6 pattern paper onto the front of the bag.  I then die cut red card stock using the tiny town border die & adhered it to the bottom of the bag.  Next the grey card stock was die cut and adhered to the bag.   I grabbed a sheet of foam adhesive, trimmed it town, peeled on side of the sticker off and applied some red card stock to it.  Next I placed the "merry" & "wishes" dies onto the card stock, and die cut them.  Since they were diecut onto a foam adhesive sheet, when I pulled the diecuts out, foam adhesive was cut perfectly on the back side of the red card stock.  Which made it so easy to adhere to the grey die cut circle. To embellish I added twine onto a clip whic...

Tiny Tags

Image
Hello Friends! Lately I have only wanted to make treat boxes, pillow boxes or altered bags.  Maybe its because the holidays are quick approaching or because you don't have to follow the same design rules at you would if you were making a card. I have a few pillow boxes that I made, using the Tiny Tags Sayings stamp set as well as the Tiny Tag dies.  The two kraft boxes were stamped completely to create a custom pattern paper, and then on the red pillow box, I stamped little hearts inside the plaid boxes.  The heart and star tags were distressed with ink, before stamping the sentiment. Head on over to the Lawn Fawn Blog , to win these products, as well as seeing more wonderful projects!

MFT Card Challenges: Sketch 255

Image
Good Morning! Have you ever been in a creative funk?  I know I have. Where you try to make a project and nothing is turning out?  Well, what I love about sketches, is that it gives you a starting point & direction. My card is based off of the MFT Card Challenges sketch #255 .  I switched a few things around, but thats ok, because there are no rules.  You head on over to the Card Challenges blog , look at this weeks sketch, make a card, link up your project & then you might win!!  How fun and easy is that? Here is this weeks sketch: Here is the card that I created from this sketch.  Instead of using a butterfly, I used a coffee cup.  You can put whatever element you want in that corner.  For this time of year, I think a Pumpkin, snowflake, christmas tree or snowman would be so cute!! Supply list: LLD Hug in a Mug stamp set Die-namics Tag Builder Blueprints 4 Wild Cherry Card Stock Blending Card by X-press It ...

MFT Sketch Challenge 254: Warm Wishes

Image
Hey there! Make sure you head on over to the MFT Card Challenges Blog to play along with this weeks sketch challenge. Here is my take on this weeks sketch. I wanted to create something fun and pretty at the same time.  This is a card that I am sending with my husband, so that he has a pretty card to send to our daughter for Christmas. Air Craft Carriers don't have a Hallmark :)  There is nothing better than getting a card from a loved one. Materials Used: Die-namics Chunky Chevron Cover-Up BB Toasty Greetings Blending Card by X-press it MFT Heavyweight Card Stock Sweet Tooth Foam Tape Small Adhesive Dots Other Supplies: black ink copic markers pink card stock white silk ribbon pink button natural twine

Scrapbook Adhesives by 3L & Penny Black

Image
This week, Scrapbook Adhesives by 3L and Penny Black are having a blog hop.  Head on over to the Scrapbook Adhesives by 3L Blog , to check out beautiful projects, and for a chance to win! Today, I am sharing my project that I created for the blog hop.  For a complete list of directions and supplies head on over .

Lawn Fawn: Snow Day stamps

Image
Today, I am sharing a tag project using the Snow Day stamps & coordinating dies.  There are more projects using this set over on the Lawn Fawn Blog , as well as a giving away. I absolutely love making tags.  They are smaller than a card, making it easier to find balance.  Sometimes cards are just too big for some stamps. I wanted to watercolor different shades of blue onto watercolor paper.  I tend to do this when my husband is watching something uninteresting (like football) on television.  So I watercolor, let it sit overnight, ready for me to use in the morning. The reason why my stamp is smeared...is because I stamped my sentiment, then sprayed the paper with a shimmer spritz, and it totally activated the watercolor & the ink, making it run.  I still like my project.  But I guess the lesson I take away, is spritzing shimmer before you stamp? So far, I have a nice little stash of holiday cards ready to be used for Christmas, which m...

Lawn Fawn: Deck The Halls

Image
Today I am sharing a stamp set called Deck the Halls from Lawn Fawn .  Head on over to the Lawn Fawn Blog for a chance to win this set, as well as, see some really great projects. One of the things that attracted me to stamping, was how I could create so many different backgrounds.  This card is definitely very stampy.  Going back to basics and just creating a project with a few items, always makes me happy. Materials Used: Lawn Fawn Deck The Halls Stamp Set Lawn Fawn peppermint trimmings Lawn Fawn circle/scalloped dies Lawn Fawn Tag You're It dies green cardstock red cardstock white cardstock Scrapbook Adhesives by 3L 3D Foam Squares Scrapbook Adhesives by 3L EZ Runner green ink brown ink red ink

Lawn Fawn: Yeti, Set, Go!

Image
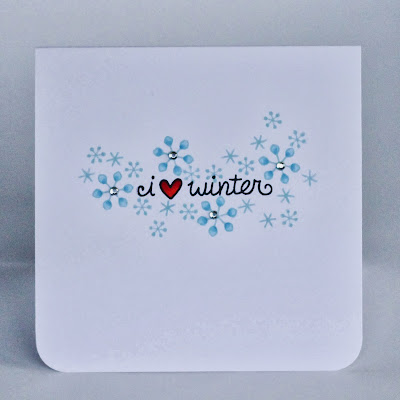
Welcome to the October Inspiration week for Lawn Fawn .  Today, we are showcasing the Yeti, Set, Go stamp set.  I really wanted to try and make a simple snowflake scene using the different snowflake images.  The snowflakes were stamped in a light blue ink, and the larger snowflakes, I colored in using a blue Copic marker.  The sentiment was stamped in black ink, and for a simple embellishment, I added clear bling to the largest snowflakes and rounded the corners.  With postage stamps always on the increase, this is a perfect one layer holiday card! Head on over to the Lawn Fawn blog , for more inspiration and for a chance to win this set!!

Gina K September Release Blog Hop: Day 1

Image
The Design Team for Gina K. Designs welcomes you to another fabulous Inspiration Blog Hop! Gina and the Design Team will inspire you with many beautiful ideas! And as you hop through their blogs, make sure to leave a comment on each of them because we will choose a few random comments and those stampers will each win a grab bag of Gina K. Designs products! To see the full list of winners check the Big News Forum at StampTV a few days after the hops. For my first project I am using the Winter Blocks stamp set.  At first look, this is a set that would make fabulous Christmas Cards.  However is does has great sentiments and the dotted stamp line, that would lend itself to make terrific birthday cards.  I challenged myself to create a card that could be for a male or female.  For some reason making masculine cards is very difficult for me.  But by sticking to a fairly neutral color palette with a pop of red, I was able to create a wonderful gender neutra...

Lawn Fawn: Trim the Tree

Image
Today the designers from Lawn Fawn are showcasing the Trim The Tree stamp set and coordinating dies.  Playing with the Holiday stamps really has me craving some cooler weather.  Nothing crazy cold, but brisk enough to wear a sweater lol.   Head on over to the Lawn Fawn Blog , for a chance to win this stamp & die set! Instructions: 1.  Cut score green card base. 2.  Trim white card stock to size, stamp sentiment in black ink, then adhere to card front using Scrapbook Adhesives by 3L 3D foam squares. 3.  Trim down a piece of Peace Joy Love pattern paper, adhere. 4.  Die cut white cardstock using the tree die cut, adhere with foam squares to the card. 5.  Stamp the tree onto pattern paper, onto two different sheets of pattern paper. 6.  Cut out pattern paper (paper piecing) and adhere with foam squares to the die cut. Materials Used: Lawn Fawn Trim the Tree stamp set and dies Lawn Fawn Peace Joy Love pattern papers Scrap...