Posts

Showing posts from 2008

happy card cuz i'm sick :)

Image
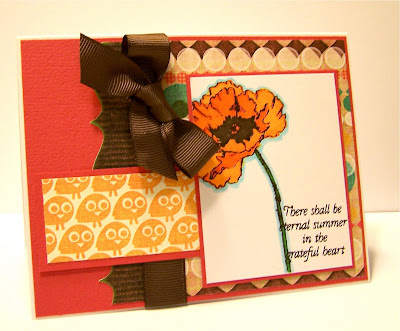
We start our drive to Florida tomorrow (still in a little denial).  My inlaws drove down from N. CA and brought our dog back to us, and have been so helpful the last few days.  Especially because myself, my son and husband are all sick.  I have limited supplies of crafting stuff with me right now so I made this card, while I'm waiting for the medicine to work.  I am trying everything to get better, but I'm just getting worse.  Maybe Jess will let me sleep a lot and not drive too much tomorrow.  So I made a really bright and springy card to make me happy. "poppy" pti stampers select white, pink prism, sassafras paper, Poppy stamp set from Flourishes llc , chocolate chip grosgrain ribbon, copic markers Totally on a side note, but we are staying at a Residence Inn by Marriott and they are really nice.  Its pet friendly, we have a two bedroom suite with a small kitchen and living room, they serve breakfast in the morning and then have a evening cocktail time with food (be

Pop Up Gift Card holder

Image
I needed to send a gift card out before the holidays, and I never got around to share it.  Its actually called a Pop Up gift card holder, and you can find the directions on how to make it here .  It even has a video tutorial as well.  The paper is from the MME Christmas pack, and the stamps are from Verve.  I hope you are all having a wonderful Sunday, I'm still under the weather, but surviving.  I get to do a butt ton of laundry today, pack up my suitcases, get my craft stuff together, and prepare for the movers to come again tomorrow.   I'm still in a little bit of denial about moving :)

December Papertreyink Blog Hop

Image
I had not planned on playing along with this months blog hop, but I'm procrastinating and I got a last minute gift from my Sister, so I had stuff to re-use.  Why am I procrastinating you ask...the movers are starting to pack up our stuff, destination Jacksonville, FL.  To make things even funner I think I might be getting the flu, so nothing too fancy to share today. My Sister sent me some new yummy pj's for Christmas, so I re-purposed the cardboard stuff that is in the center of them when you first buy them, and the ribbon that was wrapped around them. Here is the cardboard stuff I was talking about (its almost like chipboard) and the satin ribbon which was so neatly tied around my new pajamas, even with a cute button. I cut the chipboard/cardboard in strips, and then picked out some of my favorite Spellbinder dies, I cut and embossed them using my Cuttlebug.  From that piece of chipboard, look at all the tags/diecuts I now have. My inlaws arrive on Saturday, to visit with us

Flourishes Christmas card swap

Image
A few weeks ago Julie {Flourishes DT coordinator} asked if any of us would like to participate in a Secret Christmas Card Swap, I said yes of course.  We all are posting the cards we made and sent to our fellow team mate.  The card below is the card that I made for the one and only Cindy Haffner.  She lives in Canada so I was freaking a little worrying if she received it, I hear that she did.  The image is from the Poinsettia & Boxwood stamp set and the sentiment is from the City of David stamp set, both are from Flourishes llc.  I distressed the edges of my back panel and sewed along the edge.  The red and vintage cream card stock was cut and embossed using a Spellbinders Label 2 die.  I colored in the image using copic markers.  The patterned paper is from this years MME Christmas paper pack.  A card wouldn't be perfect without some yummy ribbon, so I used some SU stripped grosgrain ribbon, then using twine I attached a button to the center of the bow.  I hope this brought a

Merry Christmas

Image
I just want to wish all of you a very Merry Christmas!!  Here is a picture of my children from 4 years ago, it was one of the pics that I sent in my 2004 Christmas cards.  My sweet babies are growing up.  I will have a new card to share tomorrow, I hope you all get to relax today!

thank you

Image
I started my thank you cards from my birthday, they will be late but I have to start getting them out.  I pulled out the Thank You set from Flourishes , I just love the background stamp and tulip, they work so perfectly together.  I first stamped the background image in black ink and then using my Tim Holtz distress inks (walnut stain & tea dye) and a dauber, I sponged around the edges and then worked my way toward the center.  Once I was happy with the distressing, I stamped the tulip and colored it in using Copic Markers (R29 & YG17).  This is a 4.25 inch square card. "thank you" materials used white, kraft & poppy card stock Thank You stamp set from Flourishes llc May Arts ribbon scalloped edge punch from SU Copic markers Adirondack black ink Tim Holtz walnut stain and tea dye distress inks sponge daubers

childhood

Image
 I think I'm in major denial that movers are going to be at my house on Friday!!  We had friends some guys over yesterday, so I spent the day entertaining and cleaning.  All of my Christmas shopping is done, so at least I don't have to stress about that.  Except, I am not feeling well at all.  My husband came back with a little cold {big to a man, they are babies when they are sick} and I think I gave him too many hugs and kisses because my body is not happy with me right now, it almost feels like the beginning stages of the flu.  I've been taking airborne but I don't think its worked. Anyhow, here is a super simple card I made to go into my card basket.  With our move coming up, I need lots of cards pre-made for birthdays, get well, just because, etc...  The card base is kraft, then I layered a sheet of Jack's World {cosmo cricket} paper on top, its such a fun design, CC makes the best paper and its double sided!!  So using a scrap from the same sheet of paper, I u

Let Loose

Image
Just an easy and quick card to share today.  This is going to someone very dear to me who lost her husband this year.  This will be her first Christmas without him, so when her family leaves after the holidays, I plan on sending this to her.  You mind can wander into dark places when you are alone, so I hope this will brighten her day.  I'm going grocery shopping today, we have single sailors coming over on Sunday, so I have lots of baking and prep work to get done today, plus I need to help Santa on his gift for the kids, so I feel a trip to Costco coming on.  Have a terrific weekend! "let loose" materials used kraft card base sized 4 1/4 x 5 1/2 inches 1 1/4 x 5 1/2 strip of Basic Grey OffBeat designer paper poppy satin ribbon from PTI Verve Stamps Adirondack black ink basic grey blue button

A little hello

Just a quick note to say "hi".  My hubby finally came home, lets just say he was away at "training"  for those of you who knew what he was doing, he lost 17 lbs and came back with some facial hair.  That freaked the kids out lol, it actually made Jacob cry since he has never seen his Dad with facial hair ever, and Kendall couldn't stop giggling at him (dad).  He got home last night and was gone before I ever got up, but I slept so well last night just knowing he was home.  Its amazing how hard it is to sleep when your husband is gone (especially when he is doing something dangerous), so a big shout out to all my fellow military spouses who do this more than we would like.   I will have something posted later or tomorrow, I hope you all have a wonderful weekend!!

We Care usc17

Image
First off , I completely grossed out right now...I felt something weird on my neck, so I touched it and realized it was a bug, well I grabbed it and let out a little aaack, it fell on my shirt...it was a SPIDER ewe!  I'm not afraid of spiders, but to know it was on my neck, kind of creeps me out.  Sorry I had to share, it just happened. This week for the Unity challenge (USC17) was to create a monochromatic card.  I really have a hard time with monochromatic cards, but I think this turned out okay.  I used all coordinating paper and embellishments, so it made it a lot easier {MM Noteworthy stuff}.  I cut out the center panel using my Slice, used the Noteworthy cartridge, I'm just loving that little machine.  The image and sentiment are both from Unity Stamp Compan y.  I also used the sketch from today sc207. "We Care" materials used: MM Noteworthy paper, ribbon, flowers and button Unity stamps Copic Markers Slice  adirondack ink

Flourishes Twilight Challenge

Image
Every Tuesday there is a chat in the Flourishes forum on Splitcoaststampers, and during the last couple of chats, a few of us have been talking about Twilight {insert grin}...so, last week we decided to have a challenge (flourishes twilight challenge, keyword FTC on scs).  To make a card inspired by the books and to incorporate something sharp on the card.  The something sharp can really be something sharp or a play on words, for instance using a paper piercer tool, a star is sharp, using a sharpy pen,  etc... you get the idea. I took my inspiration from Bella's lullaby that Edward wrote, that is why I used the sheet music paper.  The tulip kind of reminded me of the cover of New Moon and then I added the sentiment Always Be Mine, always and be mine are actually two separate stamps but I combined them for my card.   I'm explaining this for the ladies who have not yet read the book :) all of you Twilighters totally get this card.  Twilight would make an excellent Christmas gift

Wise Men

Image
I'm happy to say, I'm almost done with my Christmas cards.  I spent a long time addressing the cards and writing a note inside, that really takes it out of you.  Needless to say, my right hand is numb and tingling.  Here are a few more cards that I made over the weekend, fairly simple, but post office friendly.  My post men/ladies have told me not to come to the post office on Mondays, its normally the busiest day.  Well I'm going there today, and I will keep them busy for a while, its their own fault really, they must insist on feeling every single envelope and adding extra surcharges.  Most of my out of state cards are going out today and tomorrow. "Wise Men" materials used: poppy & vintage cream card stock copic markers may arts ribbon City of David stamp set from Flourishes llc paper piercing tool corner rounder sakura glitter pen **Edited to add** I got the card of the week over at 2sketches4you this week and won a score-it!!  How cool is that!  If you a

Ode to my friend Erica

Image
This past week one of my oldest and dearest and bestest friends, Erica came to visit along with her husband and almost three year old daughter.  It was an extra special visit because they were on vacation in S. California at Disneyland and came down to San Diego for a night (and stayed with us).  We have been friends since we were 14 years old!  Its really easy to loose touch with friends especially when you move as often as I do, but not us.  One day, week or several weeks can go by without us talking, but when we do catch up its as if not an hour had passed since our last conversation.  We have lots in common, our love of books (I got her hooked on Twilight and we saw the movie together) and paper crafting among other things.  So when she came down I gave her a little one on one stamping class, she is not a card maker, but I think she has huge potential!  I snapped a few shots of her cards, they are posted below.  But first a picture of us at Balboa Park. Erica & T (thats my nick

I got an award :)

Image
So I have been tagged twice now with this Kreativ Blogger Award.  By the ultra talented stamp designer (for Unity) Lisa , and the amazing   Betty (dirty girl alumni).  Thank you to both of you.  I'm supposed to nominate 5 people, but I went Christmas shopping all day and I am fried.  I've been wrapping presents for 3 hours.  I pinky promised Jacob I would play a board game with him, so we played Disney Scene it, that ended around 11pm, I finally got the kids in bed, and then started wrapping.  So now that its 2:30, I'm going to hit the hay. Since its my birthday today I'm going to eat chocolate, maybe go to the Cheesecake Factory with the kids and stamp.  Hubby is away right now, so I'm shopping on him. He got me the Slice (that came last week) and one of my best friends ever, Chris got me a gift card to get the Noteworthy cartridge (plus she sent me chocolate and the swiss dots cb folder) and my inlaws sent me a $50 gc to ellenhutson.com  Well, at Ellen's st

Last Day of Releases and a challenge

Image
Today I'm sharing the third newly released set from Flourishes llc , called Lace and Trim, it has a beautiful vintage feel to it, which I have enjoyed playing with.  The set was inspired by some antique lace that Jan Marie has (an owner of Flourishes), the lace is starting to fall apart, so they made it into a stamp to preserve the image/pattern.  Isn't that just so neat!! For this card, I did very easy stamping (no technique or coloring involved) only using my stamp pad.  The sentiment is stamped on a label, which is a die from Spellbinders.  I added some red satin ribbon at the top and then added some red gems next to the sentiment to tie it all together. Don't forget to stop by DT blogs to check out their creations Julie Koerber Faith Hofrichter Cindy Haffner Laura Fredrickson Cindy Lawrence Christine Okken Festive Flourishes Friday This week I am playing along with the Friends of Flourishes blogging team, and the challenge is all about crisp and clean winter white cards

Thinking of You, Release Day 2

Image
Today I am sharing with you the newly released Thinking of You stamp set from Flourishes llc .  Its from the Simply Sophisticated line of stamps, so they are very easy to work with. For my first card I used some Urban Prairie paper and brads from Basic Grey.  The base is kraft card stock followed by a light teal Prism card stock, then the dp.  I distressed the edges of the teal and urban prairie paper, then sewed them together.  The front panels on which I stamped on were cut and embossed using the Labels 2 dies from Spellbinders.  Oh I forgot to add that I used a scalloped border punch on the teal prism paper.  I punched a hole through the white card stock and ran my ribbon through the holes and tied a bow.  After the bow was tied, I then added dimmensionals on the back side of the kraft paper.  There is very little stamping or technique on this card, it was stamp and go :)  Its all of the embellishments that make it fancy lol.  The paper, brads, ribbon, and Spellbinder dies can all b

New Release from Flourishes llc Day One

Image
This month there are 3 new stamp sets being released from Flourishes llc .  For my international readers, they do ship world wide.  Today I will be showcasing the Rose set.  Shown below is the actual stamp set and you can buy it here .   For my first card I used the long stem rose stamp and stamped it with Adirondack black soot ink.  I used re-inkers and a water brush to color in my rose (pink pirouette, riding hood red & kiwi kiss).  I had really good control over the shading so this technique was perfect for this image.  I cut and embossed my rectangle panels using the large rectangle Nestabilities by Spellbinders.  The patterned paper is Basic Grey from the Infuse line.  Before glueing down my panels I ran green satin ribbon followed by sheer white ribbon around the dp and tied a bow.  Using a glue dot I adhered the button to the ribbon, glue dots are super strong and keep the buttons in place.   For this card I used Kazan's sketch #15 from 2sketches4you "Love" He

Not a Christmas card lol

Image
I needed a little break from my Christmas cards, so I made a birthday card {using some new verve stamps}.  My supply of birthday cards is low, almost non-existent right now, so this can go in the basket now.  I used the color challenge for my inspiration (riding hood red, baja breeze, taken with teal and whisper white).  I love this ribbon, I'm running low and I have it in 3 colors, I probably should go buy more just in case I can't find it when we move to Florida (perfect excuse to go to a craft store!).   I stamped the image in Adirondack ink and then colored in the bird using Copic markers, on the party hat, I used my red Spica Glitter pen and went over the image, so now the hat is sparkly.  The baja breeze and white cardstock were cut and embossed using the Labels 1 die from Spellbinders and the card base is red riding hood card stock.  The little button is from Basic Grey. "special birthday" card stock: riding hood, baja breeze & stampers select white stamps:

Christmas Trio of cards

Image
When you are short on time and need to produce a lot of cards, patterned paper can be your best friend, and boy did I score this year with the My Minds Eye Christmas paper pack!!  I started out my cutting and embossing some vintage cream cardstock, using my Labels 2 die from Spellbinders (love those dies!).  I stamped the same sentiment and image on all three embossed panels and then put them aside.  Since the paper is in a big pack and you get 3 of each pattern, there is no need to hoard.  So I just picked out a few sheets, and cut them down to size.  Just a little tip, I never glue down my paper until I know where and how I'm going to do my ribbon.  Once my paper and ribbon were picked out and ready to assemble, I colored in the ornament to coordinate with the paper.  These are simple cards, but by just adding a bow, distressing the edges, adding a punched decorative border, or sewing on your card, it just gives it that little extra touch that makes it great. This holiday season

Another xmas card done lol

Image
So I got two challenges done in one card (yipee).  The sketch is from  2sketchesforyou , its Laura's sketch #14 and then over on SCS the challenge is to use only to use snowflakes, for stamping, designer paper...everything, but the sentiment could only be one word, oh and glitter has to be somewhere too.  My paper is from MME Christmas pack, it has the pretties paper, its thick and a lot of the pages if not all of them have glitter on them.  I'm loving it!  I apologize that this post is short, I just have company coming for the weekend, and I have a million things to be doing right now!  Oh the sentiment is from Flourishes Holiday Greetings stamp set. "Joy"

Seasons Greetings

Image
At first glance this card may appear to be fancy, but really I did very little stamping.  The paper is from MME holiday pack, so I used todays sketch over on SCS (sc205), by just cutting my paper and then running ribbon around it.  I cut and embossed vintage cream cardstock using my Labels 2 die from Spellbinders, and stamped a sentiment from Flourishes Holiday Greetings stamp set.  I finished off the card by running a hat pin through the bow.  This hat pin is from the Pretties Kit from SU.  The picture doesn't capture it, but the Santa & paper is really sparkly and glittery.  I know its not post office friendly, but its really pretty and was fast to make, and thats what matters when its crunch time lol.  Oh the base of the card is and olive colored paper from Prism (love that paper!) "Seasons Greetings" Labels 2 die from Spellbinders, MME dp, vintage cream cardstock, Holiday Greetings from Flourishes llc, Pretties Kit from SU, Ribbon

Wed Unity Challenge #15

Image
This week Joy challenged us to make a scrapbook page or card etc... something using a photo.  I really almost didn't do it this week, well because I still have more Christmas cards to make, but since I got my slice in the mail, I played along.  I used the distressed dots background stamp from Unity along with the dotted border from them as well.  I used white prism paper and MM patterned paper.  The letters were cut out with my Slice and the #7 is a foam black thicker.  If you decide to play along make sure to post your project in the Unity forum and in the gallery using the key word USC15.

Tuesday post #1...Christmas Joy

Image
Today's color challenge (black, sahara sand, vanilla) gave me a little jump start and I got four more xmas cards done.  This is a Christmas card using non-traditional colors, but I think it works and its post office friendly, the envelope "feelers" will not feel a single bump on this card.  I wanted to add something other than ribbon, and then I remembered my stickles!  I forget how cool stickles are, except that it takes forever to dry. "joy" kraft & vintage cream cardstock, grosgrain ribbon, Labels 2 Nestabilities, stickles, PTI Snowflake Serenade stamp set I didn't stamp at all while I was visiting family so, this week I have many projects to catch up on.  I will post later with my Papercraftplanet 5th day of Christmas card.  Are any of you playing along?  Each day a different sponsor is giving away stuff, and I love any chance at winning free stuff.

Just Rite Winner

I'm still out of town, but I had time to pick a winner before we start our long drive back to San Diego. On Monday or Tuesday I will have a new post. I hope you all had a wonderful weekend and Thanksgiving. My winner is: Great notecards, Latisha! Thanks for the opportunity to win!--Amy November 29, 2008 5:04 PM Amy please email me your address :)

Cute Set & MY BLOG CANDY GIVE AWAY

Image
This is a super quick project to make as a gift, or for even yourself.  I made a set of 6 monogram notecards for my sister, using some Just Rite product and left over scraps that we all have Here are a few of the things that I will be using,  Just Rite Monogram stamp set, I'm using the Curlz set and the mini alpha ribbon left over patterned paper some sort of punch or nesties The note cards are 4 1/4 by 5 1/2 inches, this is just one sheet of paper with those dimmensions.  Next find some scrap paper, I cut mine at 1 1/2 by 4 1/4 and layer it at the top of the cardstock. Next up is tying your ribbon, depending if you are going to just knot your ribbon or tie a bow the length will vary, if you want to conserve ribbon, I suggest just tying a knot.  Using the little Alpha set from Just Rite, I wrote out my sisters name, then using the large curlz alpha, I placed the letter "k" underneath her name (last name starts with a k)  To make it easy, I stamped the entire image in blac

Happy Thanksgiving, burp cloths & blog candy, oh my

Image
Happy Thanksgiving I hope all of you are having a wonderful day! As I said in an earlier post, this is the first time in 10 years that we have made it home for Thanksgiving, due to the fact that my husband is in the military and we have been on the opposite coast (east) from our family, except this year (for a month longer).  So we have made the 10 hour drive to be with my Dad & siblings.  My sister had a baby about 10 days ago, so I decided to make her some burp cloths.  I have seen them in baby boutiques and they were too much money I was will to pay for them, so I just made them myself.  I went and bought a pack of burp cloths and baby safe material, the rest I had at home.  I used a Trajan alphabet set (pti) to monogram my sisters last name.  I didn't use my nephews name just in case they have more children they can use them over or keep them.  The stamp of the baby resting on the moon is from the Rock a Bye stamp set from Flourishes , its a really sweet set & was perfe

Altered journal pad thingy & Blog Candy

Image
I'm sure you have seen these done, on many blogs out there, my friend Chris and I saw them and kind of winged it, on how to make them, so here is a little tutorial to help you out.  Here are the products I used for this project.  You will need the mini legal pads that you can find at your local office supply store, take the pads to the copying/printing center and have them cut your pads in half.  My Office Max charges me 75cents for each cut, and they cut 6 pads at a time so its only $1.50 to cut them.  Your 12 pads are now 24 mini journal pads ready for you to alter. You will need a 5 3/4 inch by  8 1/4 sheet of cardstock score it at 2 11/16 in and then again at 3 inches you will now have something  that looks  like a folder I took some designer paper that I wanted to put on the front, one piece longer than the other and put a piece of adhesive in one spot to hold the paper together, while I stitched along the edge.  You can completely leave this part out, I just liked the way the