Posts

Showing posts from 2011

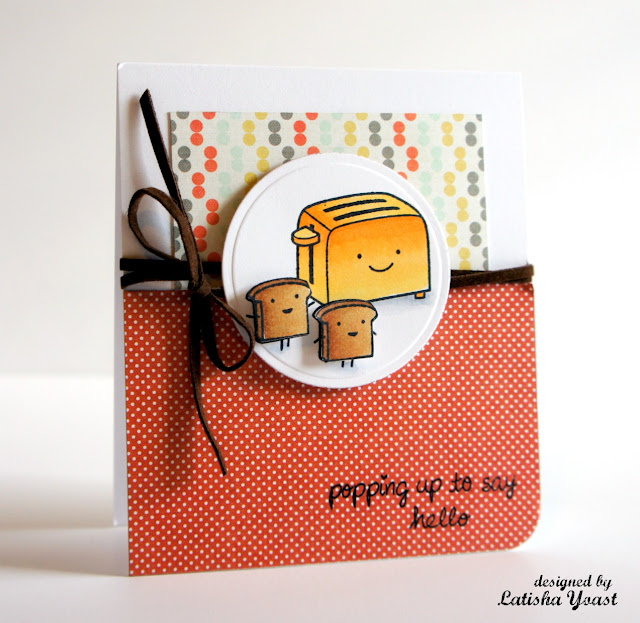
You're my cup of tea...welcome 2012!

Image
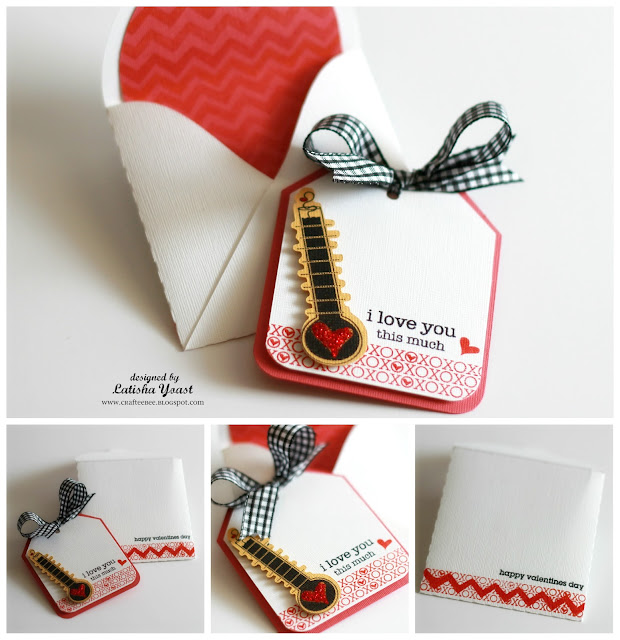
Wow!  Today is January 1, 2012...the first day of the new year.  I wish you all a blessed year, filled with love, good health and happy memories.  As my children get older, I get really sentimental as each year passes, I kind of wish I could freeze time.   I never really knew what people meant, when they would tell me to enjoy my children being little because times goes by so quick.  Now that they are older, I totally get it.   One thing that I learned in 2011, was how much my girlfriends mean to me.  Most, don't even live close to me, but the way they uplift and encourage me, one would think they were sitting right next to me.  There were many lessons and experiences that I will take with me from 2011, but I am excited for what 2012 holds.  I hope this new year is great for all of us! Before I get way off topic lol...I will share my card with you. The Avocado Arts design team, are posting projects made with the Sweet Treat Sweetie set today.  For this card, I knew I wanted it to

Sweet Treat Sweetie tag and envelope set

Image
Here is a fun tag and matching envelope set I created, using the January stamp set from Avocado Arts called, Sweet Treat Sweetie.  I even snuck in some chevrons from the October set...I really like how the envelope liner turned out (I stamped it in Versamark ink).  Did you know Avocado Arts has digi files that coordinate with the stamp sets?  Well they do!  I was able to cut out that little thermometer out on my Cameo, then stamp my image onto it.  If you have a Cricut, Cameo, Robocraft or any other digital cutter and hate fussy cutting around your stamped images, then you might want to consider getting the digi files along with your stamp set. Did you hear Avocado Arts has expanded it's design team?  Four fabulous woman have joined the team...and I'm not just saying that, they are exceptional designers and are sweethearts to boot!  Check out all of the latest happening over on the Avocado Arts blog .  While you are at it, take a little blog stroll to see what the other designe

Cute photo sleeve

Image
This holiday season, I took a lot of pictures...probably too many.  Now that my pictures are developed, I wanted to make a cute photo sleeve to put the pictures in.  It makes for nice presentation when I give them away, and keeps them safe from finger prints. For this project, I used American Crafts pattern paper, Bazzill card stock, Lawn Fawn stamps , Scor tape, and ribbon...I also used a Cameo to cut out the shapes.  Here are a few pictures to help describe how I made this project. Finished photo sleeve, with pictures inside, ready to give as a gift.

Thanks

Image
Now that Christmas is over, it is time to give a few, "thank you" cards.  I like this layout, it would be easy to produce a few cards like it without getting overwhelmed.  Most likely I will change the colors up, so that it flows better.  I think if that green strip of pattern paper was more blue, it would have complimented the red and yellow better...hindsight is 20-20 right?   It is always nice to have extra "thank you" cards on hand, so this week, I plan on making a bunch. For this card, I used what was out and in front of me...yellow card stock, American Crafts pattern paper, Lawn Fawn stamps and a chipboard coaster (that I die cut out).  I have a huge scrap mess to clean up, so a few cards made from left over scraps are in order. Have a great week!

My hero

Image
Just a quick little post to say hello, and hope you all are having a wonderful holiday season with your families.  We enjoyed a nice Christmas yesterday.  It consisted of, sleeping in, eating, going to the movies and eating some more.  It was perfect. While we were together as a family, there are many military members who were away from theirs.  So, I thank them for their service.  If you have a minute during this festive time of year, say a little prayer for those deployed.  Being away from the ones you love the most at Christmastime, is unbearably sad. Here is a little card dedicated to all of the heroes out there. Have a great day!! materials used: kraft cardstock My Minds Eye pattern paper foam tape red buttons twine mini clothes pin

Avocado Arts: Happy Birthday

Image
It is the 15th of the month, that means I get to show a sneak peak of the January stamp set from Avocado Art called Sweet Treat Sweetie.  It has everything you would need to make, from Birthday to Valentine's Day, and I Love You cards. The Happy Birthday sentiment really stood out to me, so I knew I wanted to make a birthday card.  I chose to use the candle stamp to accompany the sentiment (if candles are not your thing, there is a cute cupcake to use instead) .  At first I was going to stamp them onto the kraft card base, but it looked a little plain, or maybe my design was all wrong...or both lol.  So I stamped them onto ivory card stock and die cut it out using a Spellbinders die template.  The hearts in the corners are from the December set.  The die cut is popped up with foam tape, and the bakers twine I believe is from the Twinery. Check out the rest of the designers and what they are sneaking today: BECKY OEHLERS JULIA STAINTON KIMBERLY CRAWFORD AVOCADO ARTS BLOG AVOCADO

Lawn Fawn & Glue Arts

Image
Lawn Fawn is having a product swap with Glue Arts Adhesives this week.  Designers from both companies will be sharing their projects everyday with you.   Today, I am sharing a bright and happy Get Well Soon card.  With it being winter, and prime time for cold/flu season, I need to have a stash of these cards ready to give out.  After I die cut card stock using a Spellbinders die template, I stamped a few images from the On The Mend stamp set .  While I was deciding how to color in my images, I got started on the card base.  The green polka dotted card stock is from Bo Bunny (it seriously is one of my staples), and I adhered the American Crafts pattern paper to the card base using Glue Arts adhesive.  To have a little bit of contrast between the two bright papers, I added a little piece of kraft card stock.  I added some silk May Arts ribbon, and rounded the bottom corner.  Once the card base was done, I just grabbed a few Copic markers that seemed to coordinate with the pattern paper (

Love n Breakfast day 2

Image
Today, I am sneaking another card using the Love n Breakfast set from Lawn Fawn.  I just wanted to make a bright, happy card.   I started by stamping a background onto the card stock, by stamping a row of cups, then hearts in versa mark ink.  The tray was stamped onto white card stock in memento ink, colored in with Copic markers, cut out with scissors and adhered to the card using foam tape.  I originally was going to stamp the image and then die cut it with a shape, but it just didn't look right...so I went to plan "b", which was fussy cutting it out.  The image was stamped onto white card stock, and then adhered to the card.  I think it helps ground the card a little bit.  If I had just stamped the sentiment directly onto the green card stock, the image might look like its floating.  I rounded the bottom corners, added some bling and now I have this super happy card to give away :) Head on over to the Lawn Fawn blog for a chance to win this set! Also don't forget

Lawn Fawn: Love n Breakfast

Image
Today and tomorrow, the Lawn Fawn design team will be showcasing a brand new stamp set called Love n Breakfast.  If you are like me, and love smiley faces on toasters, muffins, toast, salt & pepper shakers and giggle over "punny" sentiments, then you are going to LOVE this set. I mean seriously.  Look at the smiley face on the toaster and toast!  Pure happiness right there. I used the CPS sketch 247 for my layout (switched it a teensy), so it made making this card super easy.  The toaster and toast, are colored in using Copic markers, and the pattern paper is by My Minds Eye.  Is it just me, or is their paper lines getting better and better?  The trim, is actually this suede feeling ribbon from May Arts.  I think I may have found the perfect ribbon to put on a masculine card, other than twine.   Head on over to the Lawn Fawn Blog , for a chance to win this set!   Also, visit the design team to see their fun projects with this set. Chari Moss Julie Campbell Lea Lawson

Warm the heart

Image
Wow, December 1st??  How is it that every year I get older, time goes by so fast?  As a child it seemed as though time stood still.  I find it to be crazy its December, at least I am pretty much done with Christmas shopping, but I do need to work on my Christmas cards.  I don't really have a plan for those yet...I will probably pull out some stamps, holiday papers and stickers and make a grand mess, but it will be fun.   Speaking of Christmas cards, here is a fun little ditty that I made the other day.  I used the December Avocado Arts stamp set.  I plan on sending this out for the holidays, but if I changed out that green strip of paper, it could easily be a general winter card, or even a Valentine's Day card. Head on over to the Avocado Arts blog , to check out all the happenings this month, and visit the other lovely designer too!  Oh, just a little ps...Did you know that Avocado Arts has digi files to match the stamp sets?  If you have a Cricut, Silhouette, Robocraft or any

Snow much nerdy peeps

Image
I have noticed something lately.  I am using red, kraft & stickles a whole lot.  I just can't help it, it's helping me get into the holiday spirit.  I kinda, sorta, really like snowmen this year too?!?  They are just so cute!   Today, I am showing a fun holiday card using the December stamp set from Avocado Arts .  It has a few different snowmen to build, some snowflakes, cute sentiments and a sled (I know I'm forgetting something else, so I apologize in advance) .   To make this card, I stamped the sled in versa mark ink, onto the kraft card base.  While that was drying I cut/embossed card stock, using the Bracket Edgabilities from Spellbinders.  Before adhering the two pieces together, I stamped snowflakes & the sentiment (I added stickles to the center of the snowflakes) .  The snowman was paper pieced together on separate card stock, then adhered with foam tape.  I adhered the pieces together, and then to the card front.  I was going to add twine or something, b

Lawn Fawn & May Arts day 2

Image
This week the Lawn Fawn is teaming up with May Arts ribbon.  Everyday a couple of designers will bring you a fun project.  I created a few Christmas tags, using Lawn Fawn stamps and of course some pretty trims from May Arts.  The candy canes, I plan on putting on a bag or a gift, it is a cheap way to add a little holiday spirit to a gift.  On one of the tags, I used this silvery, sparkly trim, it almost feels like tinsel (its really cool!) , and then on the other candy cane I used the ultra thin silk ribbon, which is so lush.  It is so soft, and really ties the prettiest bows.  On the biggest tag, the trim I used almost feels like yarn (really soft & thick).  It reminds me of bakers twine but super soft and fluffy.  Except for the silk ribbon, I had never used the other two trims before.  When I first opened the box of ribbon/trims that were sent to me, I honestly didn't think I would like the silvery trim, but I'm a fan now.  I'm thinking of a few ways to use it on som

Happy Thanksgiving & a fun holiday card and tag

Image
Happy Thanksgiving to all of my American Friends.  Today, I will enjoy having my children and husband home with me.  Just us four, relaxing, eating, watching tv.  It's the little things that make me happy.  Later tonight, we will have a small dinner.  A Smithfield honey spiral ham, mashed potatoes, sage sausage stuffing, rolls, glazed carrots, steamed asparagus, canned cranberry sauce (request from my husband lol...he likes the canned stuff better than fresh) , then pumpkin and apple pie for dessert.   I try to count my blessing all year long, but today I have been filled to the brim with all that I am thankful for.  I hope all of you have a wonderful Thanksgiving filled with blessings.  I plan on getting my craft on a little later!  It is time to start on holiday cards, tags and presents! I originally was planning on using both of these as tags, but I thought the snowman and the bird label, would look great on a card.   I love, love, love to make tags!  Just grab some scrap cardst

Fall Sneak Peek Blog Hop for Crafters Home, Day Two

Image
Join Spellbinders™ Paper Arts and Crafters Home as we celebrate a Fall Sneak Peek! Spellbinders and  participating stores  in the Crafters Home Buying Group are excited to introduce three new die template sets  sold exclusively  through Crafters Home stores through January! You’ll have to wait until February to find these die template designs in non-member stores.  These new dies are in stock! Get yours now at a participating Crafters Home store!  See the  Spellbinders Blog  for a list of participating stores.   Visit the  Spellbinders Blog  November 14 - 16 to see a new Spellbinders die template revealed each day! Visit designer blogs to enter the daily contests and see inspiring projects using the new releases. Comment on Designers Blogs and the Spellbinders Blog count as entries into daily drawings. Daily winners receive all three of the new designs! Today's new die is S5-068 Dress Forms $19.99 Lattice Dress: 1 7/8 x 2 ¼” Scalloped Hem Dress: 2 1/8 x 2 5/8” Plain Dress Form:

Holiday Hello with the Nerdy Snow Peeps

Image
Today, I get to sneak the December stamp set from Avocado Arts called, Brr! and the Nerdy Snow Peeps (isn't that the coolest stamp name?).  I also mixed in a little bit of the Bring on the Holiday Cheer set too (the sentiment & the grass). I stamped the snowflakes with Versamark onto the kraft card stock, adhered a strip of red card stock, and then stamped the leaves aka mistletoe in green ink above the strip.  Next, I created a circle die cut using a Classic Circle Nestabilities, and created a little snow man scene.  The scarf and hat are popped up with dimensionals, to give the snowman a little depth.  The scarf was colored in with Copics (r24, r27, r29, & r39), and the hat was colored in using red & green Stickles.  To get the sentiment rounded, I placed the stamp onto my clear block, and curve the stamp until I liked the angle. Head on over to the Avocado Arts website for more stampy goodness and visit the other designers to see fun projects using this set. AJ OTTO

A Very Fawny Holiday: Cozy Christmas

Image
Lawn Fawn is having A Very Fawny Holiday Week.  Everyday, the designers are showcasing projects using the Holiday stamp sets.  So head on over to the Lawn Fawn blog to check out some great ideas to put you in that Christmas Spirit. I decided to create a Personalized Christmas Wish list.  The sheet is 5x7 inches, and I used several stamp sets to create it, School House Backdrops, Sally's ABC's, Cozy Christmas and Critter's in the Forrest.  To get the ledger look, I used a notebook punch along the side. Head on over to the rest of the designer's blogs to see what they have created: Chari Moss Julie Campbell Lea Lawson Lynnette Kauffman Nichol Magouirk Teri Anderson Tiffany Johnson

Have a Fawny Holiday, Day 2

Image
This week, the Lawn Fawn design team will be showcasing all of the great holiday stamp sets.  So make sure you visit the Lawn Fawn blog every day, to check out new and fun inspiration to get you ready to creating holiday cards, tags, gifts and more!   Today, I am showing a fun little gift box I made using the Winter Fox stamp set (and a Spellbinders box template).  The glitter cardstock, is a nice thick cardstock perfect for this project and it is made by American Crafts, it comes in a ton of different colors, but I chose a red/green holiday combo.  After I stamped the fox, I colored her in with Copic markers.  The scarf, cup and tail were all colored in using red, green & clear stickles.  For those of you unfamiliar with stickles, it is a glitter glue manufactured by Ranger (very easy to use too).  To get the fox to stand up on the box, I created a little square/cube, by scoring cardstock and glueing it together.  Then adhering it to the back of the fox, then the box.  I stamped

A stamping, paper piecing layout.

Image
Hello there, here is a layout I made as a guest for Nichol Magouirk's November Stamping Scrapbooking Class , over at Two Peas.  The theme for November is paper piecing.  I paper pieced the banners, the ribbon thing in the corner and the polaroid pictures.  I used Lawn Fawn stamps for all of my stamping.  The Amy Tangerine line for American Crafts, worked so perfect for this layout.  It's of Kendall at her locker this year.  Last year she had a bottom locker and hated it, so when she found out she had a top one, she was most excited.   Materials Used: Lawn Fawn Bannerific Lawn Fawn Sally's ABC's Lawn Fawn Say Cheese Lawn Fawn Admit One Lawn Fawn School House Backdrops Ranger white gel pen American Crafts Thickers Spellbinders Classic Squares Sm American Crafts Pattern Paper Chalkstalk cardstock

Holiday Cheer

Image
Happy November 1st!  It seems so crazy to think in just a few weeks it will be Thanksgiving, next month is Christmas and next week my boy will be eleven.  This year has gone by quick like!   Well, I have another Avocado Arts project share to show you today.  I decorated a Maya Road envelope, it is a little on the smaller side, so I think this is the perfect size for a gift card.  My daughter who is 15, really enjoys getting gift cards, so I will need to have a few gift card holders on stand by, ready to use. I started by glueing down the burlap using fabritac, it's a strong liquid glue.  I then paper pieced the Christmas trees, and adhered them to the envelope.  I stamped the sentiment, then hand cut it out, an adhered it using a foam square adhesive.  To finish the gift card holder off, I stamped a star, adhered it to the top and added a few black rhinestones.  This was very quick and easy, and I can see myself using the same sketch for a card. Head on over to the Avocado Arts web

Happy Halloween

Image
Happy Halloween! In my house, today it is going to be crazy busy!  Early dismissal, then an after school dance (his first one) for the boy, soccer scrimmage for the girl, dinner, errands, and then taking the boy trick or treating.  Somewhere in there, I am going to run to Starbucks, because this mama doesn't have time to get tired lol.  I hope you have a fun and festive day today! Here is an elegant and fun Halloween card.  I paired some Lawn Fawn stamps and a few Spellbinders die templates, to create this card.  Sometimes, I forget how fun it can be to make a nice card full of dimension. Materials Used: Lawn Fawn Heebie Jeebies Lawn Fawn Happy Haunting Lawn Fawn Hats off To You Spellbinders Fleur de Lis Squares Spellbinders Pinking Circles sm Spellbinders Standard Circles sm Authentique pattern paper Want2Scrap bling American Crafts this to that foam tape WorldWin black cardstock Colorbox ink

Holiday Cheer

Image
Today, the Avocado Arts designers are doing a project share using the November stamp set called, Bring on The Holiday Cheer.  I wanted to make a fun & trendy card and tag set, so I used the chevrons from the Thankful For You set...don't they look so cute with the pin-wheels (or candy mints).  I didn't use any fancy tools or products to make this, just good ole stamping.   Head on over to the Avocado Arts website to check out this months set. Visit the other designers to see what Holiday fun they are sharing today! AJ OTTO BECKY OEHLERS JULIA STAINTON KIMBERLY CRAWFORD materials used: Avocado Arts stamps (Sept & Nov sets) Red cardstock White cardstock Colorbox ink Want2Scrap black bling Twinery twine

A few Lawn Fawn cards.

Image
It is starting to feel like fall here.  The mornings are crisp and the sun is going down a few hours earlier and Pumpkin Spice lattes are available (my favorite drink at Starbucks) .  I really wish I had more hours in the day to create, spend more time on learning photography and blogging more often.  Actually, that is kind of not true.  Right now, I love doing all of those things, but I love being a Mother more.  So I only create a few days a week when they are at school.  I'm perfectly okay with that. Here are a few Lawn Fawn cards I made this past week.  The first one is is for sketch 240 over at Card Positioning Systems.  I used the On the Mend stamp set, the little smiley faces on everything seriously make me so happy.  I mean a cup of soup and bandaids with smiley faces...adorable!  With cold/flu season coming up, I'm sure this will not be in my card basket for very long. This next card, is a project I did for the A-Z Stamping over at Two Peas in a Bucket.  This was for