Posts

Showing posts from 2018

Hello Friend

Image
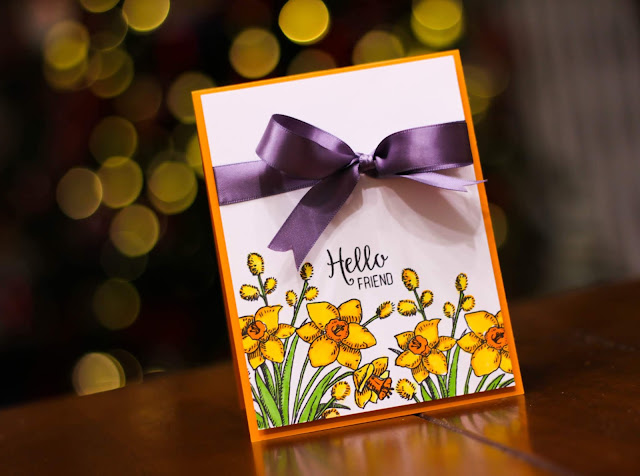
I have been enjoying coloring with my one true love, by beloved copic markers. I dabble in other mediums, but I feel more in control and comfortable with Copics. So for this card I stamped the images from the Beautiful Narcissus stamp set from Technique Tuesday in black ink, then colored in the flowers using copic markers.  I always think orange/yellow go well with purple, so I added a purple satin bow to embellish the card. I hope you all are enjoying your last days of 2018!! Head on over to the Technique Tuesday blog to see the full stamp set!

I'm Bear-y Sorry

Image
Hello friends! We are just a few days away from 2019, and its the very last Saturday of the year. Today I am going to go to brunch with my husband and good friends, do some grocery shopping and hopefully just lounge around the house for a few days. The weather has been very dreary here lately so I like to stay in and read while it rains. Today I am sharing a fun card using a new stamp set from Technique Tuesday called Bobby The Bear. It has a lot of sentiments as well as a honey pot, bear, bee hive and bee images. I was in a coloring mood, so I decided to color a bunch of the honey pots in rainbow order (of course) with Copic markers. This stamp set does have a coordinating die set, but I chose to cut everything out with scissors. To ge the bear to hold the bee hive, I cut along the arm and then tucked the bee hive in the cut line. Head on over to the Technique Tuesday blog to see a full reveal of this stamp set!

XOXO

Image
Hello friends! There is a brand new backdrop die from Lawn Fawn called Polka Dot Heart Backdrop. Its available in two options, landscape and portrait. I created the rainbow background by die cutting white cardstock with the landscape die. then using red, orange, yellow, green, teal and blue inks, blending the ink from red to blue to create a rainbow ombre. The rainbow panel was adhered to a white card base using foam adhesive. The white frame was created using a rectangle stitched frame die. For more details on this new die and more products, head on over to the Lawn Fawn Blog to win these products and to see beautiful inspiration.

Hugs

Image
Hello friends! Boy is it freezing here in Florida! I am currently dreaming of warmer weather but since  it is winter, I have brand new products from Lawn Fawn to share with you.  There is a new die set called Candy Hearts, and they are stitches along the edge and then have cute sayings on the inside and then one of the dies is a solid heart. I started by applying ink onto white cardstock until I was happy with the color. Once the ink dried, using the heart dies, I die cut the card stock and placed the diecuts aside. Using the portrait heart backdrop die, I diecut a piece of vellum. I then used the vellum as a stencil, and applied the same ink to the card front. The stencil was slightly moved, in between applying inks, to get both colors to show up. Head on over to the Lawn Fawn blog, to see all of the wonderful projects using this new product.

I Love You

Image
Hello friends! There is a brand new Lawn Fawn critter and mini stamp set in town.  When you head on over to the Lawn Fawn blog , you are not going to believe all of the variety of cards that can be made with one little stamp set. So this is the I Love You (calyptus) stamp set, its an itty bitty set, but really so versatile.  I stamped the Koala in black ink, and then colored him in with copic markers, as well as the other images. Before I adhered the images to the card panel, I ink blended a few different greens to make it appear the koala was in the bushes somewhere. Then stamped the sentiment in a nice black ink. There are some fun giveaways on the Lawn Fawn blog, so head on over there to check out the inspiration as well as having a chance to win this set!

A Toast To Us

Image
You guys! Lawn Fawn has a super cute new stamp set and coordinating dies called Let's Toast.  It has the most adorable images and sentiments all focusing around toast.  Truly one of my favorite things to eat is avocados, especially in the morning on toast.  So of course I found a way to create my beloved avocado toast onto a card. The images were stamped with black ink, and then colored in with cops markers. The avocado image is one whole image. I just cut it in half and then created slices to place onto the toast. Head on over to the Lawn Fawn Blog to see all of the beautiful projects using this set.

What Wood I Do

Image
Today I am sharing another card using the Beau & Beatrice Beaver stamp set from Technique Tuesday .  This time, I stamped the image onto watercolor, then created a cute and simple watercolored scene.  Just by adding grass and sky, the critter gets grounded, instead of floating around. Head on over to the Technique Tuesday blog , to see the other stamp sets being shown today!

A Good Friend

Image
Hello friends! I hope all of my American readers had a wonderful Thanksgiving holiday! We had a full house of family and friends, too much food, and a lot of laughs. It was perfect.  I took a few weeks off from making anything crafty, I just needed a little quiet time, to reset, relax and rest. Today, I am sharing a card using a new stamp set from Technique Tuesday called Beau & Beatrice Beaver Stamp set. It has two different beaver images, wood stumps, a snail, flower and fun sentiments.  There is also a coordinating die set as well. For this card, I stamped all of the images in black ink, and then colored them in with copic markers. Instead of using the dies to cut out the images, I decided to fussy cut the images with scissors for a closer cut to the image line. I used a few different green oxide inks on the card front, taking my time to blend them together, then spritzed water on top. Once the water was dry, the sentiment was stamped in black ink, and the image

Merry & Bright Tags

Image
Welcome to Day 3 of the Fawny Holiday Week! This week the designers of Lawn Fawn are sharing holiday projects to get you in the holiday spirit and to inspire your creativity.  I decided to create tags, because, who doesn't love a great tag?  I started by trimming red cardstock into tags, then embossing the tags using the Stitched Woodgrain Backdrop.  The sentiment was stamped in white ink, then heat embossed with clear embossing powder.  The sentiment and trees are from one of my favorite Christmas stamp sets called Snow Day, the bold sentiment hooks me in every time! The trees were stamped in assorted green inks, then embellished using Nuvo drops. To make the tags sparkle, chunky glitter was added along the edges. Head on over to the Lawn Fawn Blog , to see all of the great projects!! Plus there are some fun giveaways too!!

25 Days of Christmas Tags, Technique Tuesday

Image
Today is day 13 of the 25 Day of Christmas Tags.  Head on over to Tracey's Blog , for a chance to win a $20 gift certificate from Technique Tuesday, as well as see all of the different tags the design team created.  Every day is a different sponsor and different prize! I decided to watercolor most of my tag, starting with the deer & snowflakes from the Dani The Deer Stamps set and the sentiment from Perfect Poinsettia .

Merry Christmas

Image
Is there anything better than watercolored poinsettias? Very few! They are just a prominent image that reminds me of Christmas. This is a brand new stamp set from Technique Tuesday . I am not even going to lie. It took a few days to color in this panel. I wanted each color to be completely dry before moving on to the next.  This isn't the kind of card where I wanted the colors to blend into each other. So I had to practice patience and take my time. It is really hard to photograph subtle sparkle.  The gold was watercolored with a gold sparkly Gansai gold, which is so glittery in person, it just doesn't show up on camera. However, the Wink Of Stella Clear glitter pen, kind of shows up along the border of the poinsettia blooms. This card was very intensive to color, but it was so relaxing! I love how it turned out! The front panel in Fabriano cold pressed watercolor paper, then the poinsettia was stamped multiple times using VersaFine Onyx Black ink.  The image

Cuddle Weather

Image
Happy Halloween to all of my American friends!  We are experiencing chilly weather here in Florida, so I guess I better go find a comfy sweater to wear later to hand out candy. For my card, the stamp set used is new from Technique Tuesday and its called Hello Winter.  It has a puffy jacket images, some snowflakes, tons of sentiments and it makes it so easy to create a super fun winter card, that isn't holiday related! I stamped the 3 images shown onto Fabriano cold pressed watercolor paper, with VersaFine Onyx black ink. I love this combination between ink and paper, and makes it really easy to watercolor on.  Once the panel was dry from watercoloring, I went in with a orange pen and created some dots. Then using a clear wink of Stella pen, adding sparkle to the images, sentiment as well as over the dots. Head on over to the Technique Tuesday Blog for a full reveal of this set!!

Merry Peppermint

Image
A brand new stamp set called Christmas Cocoa is being released from Technique Tuesday in a few days.  Its a smaller sized stamp set, with so much value. This is a cocoa set, but if you like coffee like me, then its not hard to turn the mugs into coffee. For this card, I repeatedly stamped the cocoa mug onto Fabriano cold press watercolor paper, using Versafine black ink. Then again using one of the heart images. Once the ink was dry, the panel was watercolored with Daniel Smith watercolors.  The watercolored panel was adhered to the card base using foam adhesive to give the card depth. Then layered with a white diecut frame also adhered with foam adhesive.  The sentiment was stamped onto vellum with VersaFine onyx black ink, then heat set with a heat gun. The reason I heat set the image is because vellum is porous and the ink will feather out. To embellish twine was added above the sentiment for added interest. Head on over to the Technique Tuesday Blog , to see the fu

Warm Wishes

Image
Hello friends! Making a shaped card is so much fun! I know it confuses a lot of people on how to make them, but it really is so easy. If shaped cards are not your thing, then you can always make tags, put the dies onto a card, or make a banner. Options are really limitless when it comes to using shaped dies. For todays card, I created the base of the card using the Stitched stackable tree die from lawn fawn. One for the front and the back. For the back of the card, score a line 1.5 inches down from the top of the tree die, and place adhesive above the score line. Adhere the front die. Stamp the sentiment in black ink onto the card front. Next die cut glittered green cardstock using the Stackable tree frame die and wreath. Adhere both to the card front using foam adhesive. Die cut the bow using red cardstock and adhere using the glue tube. Most of this card involves die cutting so it was super quick to create. If shaped cards are not your forte, use the tree di

Seasons Greetings

Image
Hello friends! Today I am showcasing the die set from Lawn Fawn called the Reversed Stitched Scalloped Square Window die (whew that is a mouthful).  Lawn Fawn has these in squares, rectangles and circles.  You place the die onto cardstock, run it through a die cut machine, and what you have is a panel, that has an outside stitch and then a scalloped diecut center.  I love how this adds fun drama to any card and is perfect for creating window cards or shaker cards. This is a fun square card, with a colorful winter scene. The background was watercolored along with the village image. The snowflakes were diecut using white glitter paper for added interest and sparkle, because who doesn't love something sparkly. For more great projects using this die set head on over to the Lawn Fawn blog !!

Deck The Halls

Image
For those of you who love all things Christmas and especially gingerbread men, then you are in luck! Lawn Fawn has created a die set that has a few different sized gingerbread men and all of the accessories to match. I decided to create a gift bag from pattern paper. The gingerbread person was diecut with white cardstock and then using pink ink, I blended the ink onto the diecut for perfect coordination.  The sentiment was stamped onto white glitter paper, and the sentiment and diecut were adhered to the bag using foam adhesive. Head on over to the Lawn Fawn blog to check out all of the projects using this fun die set!

Reveal Wheel Holiday Sentiments

Image
Hello friends! Today the Lawn Fawn Design Team are showcasing projects using the Reveal Wheel Holiday Sentiments. The original Reveal Wheel stamp/die set is an interactive die set. For those of you who have no desire to make an interactive card, I am showing you how to use this stamp set in a traditional way. I started by stamping several sentiments onto white cardstock with white pigment ink, then heat embossing the sentiments using a clear embossing powder. The cardstock was then diecut using a scalloped stitched rectangle. Next using 3 different ink colors, pink, purple, aqua and ink blending tools, ink was applied.  Since the sentiments were heat embossed, ink will not stick to it, it just wipes off and resists. The critters are from the Say What? Christmas Critters stamp set. They were stamped in black ink, colored in with Copic markers, cut out with scissors and then applied to the panel using foam adhesive. White cardstock was die cut with the Quilted Backdrop die, then a

WCMD Owl-some

Image
Happy World Card Making Day!! Are you creating any cards today or have any goals?  I have a list of friends and family that I need to get a card to, so my goal is to get cards into envelopes and put them into the mail. And to just make a card to make a card. That is always a treat. Today the designers of Technique Tuesday along with friends are participating in a blog hop using this fun stamp set! Did you know you can get this stamp for free? Details are in the very last image at the bottom of this post. Also, make sure you leave a comment, because a lucky person will receive a gift card. You have until the 8th to leave a comment, and on the 10th the winner will be announced on the Technique Tuesday blog. Listed below are the links to each blog.  Since I am last on the list, just start from the beginning on the TT blog. Technique Tuesday Amy Kolling Sandy Allnock Daniela Dobson Lisa Spangler Heather Hoffman Dana Kirby Dana Joy Mary-Ann Maldonado    Emi

Gratitude

Image
Hello there! Sometimes you just need a clean card with lots of white space, you know?  Do not get me wrong, I love a good technique as much as anyone else, but you don't need all of those things to make a pretty card. Simple, basic stamping will always produce a happy card that you can mail to a friend. For this card, I stamped the sentiment and then built the images around it. The leaves were easy to place because I could stamp them off the tail of the "e" letter. Then I chose the pumpkin and fruit to go above the sentiment because they were flat on the bottom, and could fit between the G and the D. The images were colored in with copic markers, then to embellish a bow was tied using pretty orange ribbon. This stamp is called Happy Thanksgiving , and you can see the full reveal over on the Technique Tuesday blog !

Thankful

Image
Hello! Technique Tuesday is about to release a stamp set called Luscious Grapes . Its a smaller stamp set that includes a pretty grape image, and then a few bold sentiments.  Today, I am using that set.  First i started by stamping the grapes with a permanent black ink onto watercolor paper. Using watercolor, the image was colored in. I try and let each color family dry before moving on to the next so the colors don't muddle. The thankful sentiment was also stamped in black ink. The panel was diecut with a square die, and then adhered to the card front using foam adhesive. This is such a fun fall image or perfect for anyone who loves wine! Head on over to the Technique Tuesday blog to see the full reveal of this set!

Tangle Free Holiday

Image
Hello Friends! The process of making this card, was extensive, only because I messed up a few times and had to start over.  FYI don't ever put clear glaze on part of a card and then let it stand up, the glaze will drip down the front of your card lol. I started by stamping the String Lights image onto white cardstock, then coloring in the bulbs using red and green copic markers, then coloring around the lights in a blue green. Clear wink of stella was used to put a little bit of shimmer over the lights, and then Nuvo clear glaze was placed on top.  It gives each bulb, a shimmery glaze and a lot of dimmension which is pretty neat for a one stamp card. The front panel was adhered to the red card base using foam adhesive, and Nuvo drops were applied under the string lights for an embellishment. For a full image of this stamp set head on over to the Technique Tuesday blog !

Magical Christmas

Image
Watercoloring can be very intimidating, even for me. But the more I watercolor using good brushes, and watercolor pans, and a watercolor I like, the more it becomes muscle memory.  Using the same materials each time, dramatically helps with consistent results (for me). I began this card by creating a rectangle water wash onto the watercolor. Then dipping into a blue ink, creating a blue background, which is considered a wet on wet technique.  Once dry the snowflakes were stamped on top in a navy ink, and the sentiments were stamped in black ink. Using the same watercolor paper, the foxes from the Winter Skies Stamp set were stamped in black ink onto a separate piece of paper, and then water colored in using, sepia, brown and orange tones.  You cannot tell in the photo but a shimmer watercolor was added to the scarves to make them sparkle. Once dry the foxes were cut out and adhered to the panel using foam adhesive.  The panel was then adhered to navy blue card stock. For

Merry Christmas

Image
The paper collection from Lawn Fawn called Really Rainbow Christmas is so bright, happy and will certainly bring cheer!  Cards that have a lot of white space, and pops of color, are so attractive. So that is what I had in mind when I was designing this card.  The red frame was created by die cutting a piece of red pattern paper, then adhering it to the card using foam adhesive. The banners were created by using the Bunting Borders die set, and petite Really Rainbow papers, some were adhered with foam adhesive and some with just tape runner, to help give the card dimension. The tree was created using the Outside In Stitched Christmas Trees and Stitched Christmas Tree Frames die sets. They layer perfectly and were adhered together using foam adhesive.  The sentiment from Simply Winter Sentiment was stamped using black ink, trimmed to size with scissors and then adhered to the card. To embellish aqua Nuvo drops. Head on over to the Lawn Fawn Blog to see more wonderful pr

Cream To My Coffee

Image
Friends. Like many of you, I love coffee. It is my most desired beverage of choice in the mornings, its just kind of magic. For those of you who do not drink coffee, never fear, there are cocoa and marshmallow sentiments included, you are not forgotten. Just looking at this stamp set, and knowing all of the different ways I can decorate these mugs, makes me insanely happy. This is the Thanks A Latte stamp se t from Lawn Fawn, and I love it. I started by ink blending aqua ink onto the cardbase, then stamping the sentiment in black ink, and the bottom of the card. The images were stamped onto white cardstock, then colored in using Copic Markers. The latte art was created by coloring in the coffee mug with a copic marker then stamping over it with a brown ink.  All of the images were hand cut, and then applied to the card using foam adhesive. To finish the card, red hearts were stamped at a diagonal, and a red satin bow was added.  It is time to bring bows back friends.

Watercolored Seasons Greetings

Image
Hello Friends. The September Inspiration Week from Lawn Fawn continues! Today my card is using the stamp set called Simply Celebrate Winter . The images from Simply Celebrate Winter, are close to 4 inches wide, which makes them perfect to stamp on a card front, as well as the "season's greetings" sentiment. I started by stamping the image and sentiment with black pigmented ink, onto the white woodgrain cardstock. Once the ink was dry, I started to watercolor the trees.  I then did a wash of each of the colors down below the sentiment. Since the color was wet, as well as the cardstock, a wet on wet effect came into play. That is how each of the colors slightly blend into each other. For more great projects and inspiration, as well as a chance to win this stamp set. Head on over to the Lawn Fawn Blog . 

Technique Tuesday Christmas Blog Hop

Image
Welcome to the Technique Tuesday Christmas Blog Hop.  Today I create a card using the Vintage Christmas stamp set. It has great vintage images and sentiments to help you create beautiful holiday cards. The Christmas tree was stamped in clear ink, then heat embossed with clear embossing powder onto water color paper. The tree was colored in with green and red water color pigments, and then left to dry. Next the Santa, bag and gifts were stamped in a black pigment ink, covered in clear embossing powder, then heat set.  The images were colored in using water colors, left to dry then cut out with scissor.  The sentiment was stamped in black ink, then the images were adhered using foam adhesive. to embellish satin ribbon was added then the panel was adhered to a green card. Next up on the hop is Teri . here is the complete blog hop list Daniela Amy Heather Emily Kymona Dana Jill Latisha Teri   Technique Tuesday blog

Have YoursELF a Merry Little Christmas

Image
  Hello friends! The September Lawn Fawn Inspiration Week starts today, and today the focus is on the stamp set called Holiday Helpers . In true Lawn Fawn style it is so super cute.   For this card, the front panel was die cut using the new portrait Snowfall Backdrop . Then using dark blue, aqua and green inks and and ink blender, ink was applied to the panel.  I imaging the North Pole has a sky that is super magical, so this is what the sky looks like there in my imagination lol.  The sentiment was stamped at the bottom of the panel in black ink. The panel was adhered to a card using foam adhesive. The images were stamped onto white cardstock with black ink, and then watercolored in. Once the images were dry the images were adhered to the card using foam adhesive. For more great projects and holiday inspiration head on over to the Lawn Fawn Blog !

I'd Cross an Ocean For You

Image
Hello Friends!! Today I am sharing a card using a stamp set called Wendell the Whale from Technique Tuesday. I watercolored the background as well as the whale image using Daniel Smith and Sennelier water colors. To add a little bit more interest to the whale, white dots were added using a white gel pen. The full reveal of this stamp set is over on the Technique Tuesday blog !

Christmas Planning

Image
  I have more September sneaks from Technique Tuesday .  Today is a planner page, mixing old and new stamps.  I typically like a clean space when decorating my planner. While i appreciate the chunky planner, my daily planners are flat. I used a few different colored ink pads to create a graphic interest, of course red and green for the holiday spirit, and every project can use a pop of black. The two new stamp sets I used are called December Moments and  Story of December . Head on over to the Technique Tuesday blog to see the complete sets.

Just Because

Image
Its sneaky peak time. I am sharing a card today using a few of the latest September products about to hit the Technique Tuesday store. Lovely Lavender stamp and die set, as well as the Mandala crafting die and stamp set. The lavender was stamped and die cut, then colored in with water colors. The water colors used were a combination of Sennelier and Daniel Smith, both extremely pigmented and vibrant.  The mandala die, was die cut onto white card stock. Then all of the circle pieces were water colored and set aside to dry. Once the diecuts were dry, they were adhered to the card front. The sentiment from the Mandala stamp set, was stamped in black ink, and the lavender diecut was adhered using foam tape. For more sneak peaks using these products, head on over to the Technique Tuesday blog!