Posts

Showing posts from August, 2018

Christmas Planning

Image
  I have more September sneaks from Technique Tuesday .  Today is a planner page, mixing old and new stamps.  I typically like a clean space when decorating my planner. While i appreciate the chunky planner, my daily planners are flat. I used a few different colored ink pads to create a graphic interest, of course red and green for the holiday spirit, and every project can use a pop of black. The two new stamp sets I used are called December Moments and  Story of December . Head on over to the Technique Tuesday blog to see the complete sets.

Just Because

Image
Its sneaky peak time. I am sharing a card today using a few of the latest September products about to hit the Technique Tuesday store. Lovely Lavender stamp and die set, as well as the Mandala crafting die and stamp set. The lavender was stamped and die cut, then colored in with water colors. The water colors used were a combination of Sennelier and Daniel Smith, both extremely pigmented and vibrant.  The mandala die, was die cut onto white card stock. Then all of the circle pieces were water colored and set aside to dry. Once the diecuts were dry, they were adhered to the card front. The sentiment from the Mandala stamp set, was stamped in black ink, and the lavender diecut was adhered using foam tape. For more sneak peaks using these products, head on over to the Technique Tuesday blog!

Happy

Image
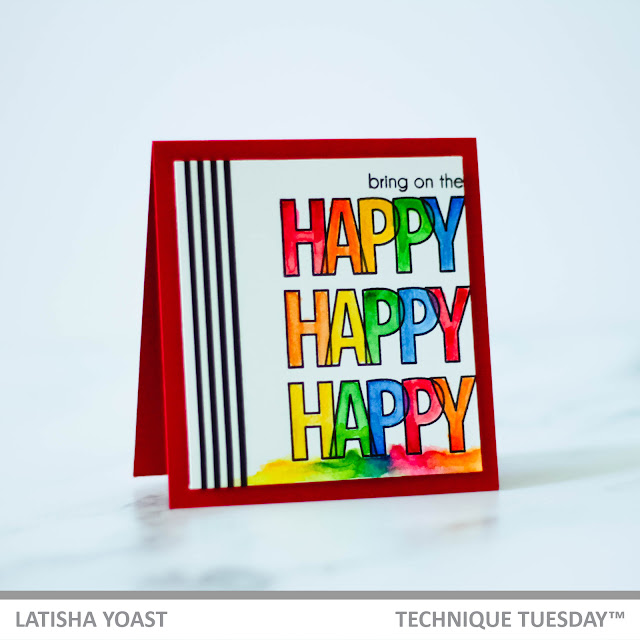
I have so many cards that I need to send out, it is getting ridiculous! Does that ever happen to you? You have well meaning intentions, but fail miserably? Yeah same. Today I am sharing a happy water colored card.   So simple to create this card. I stamped all of the sentiments, then water colored the inside of the "happy" sentiment using Zig water color pens in a rainbow order. (because is there any other order?) On the side of the front panel, black and white washi tape was added, just for added interest. Then the panel was popped up and adhered to the card using foam adhesive. The stamp set that was used is from Technique Tuesday, and its called Happy, Happy, Happy . So fun! Did you know tomorrow, sneaks start for the Technique Tuesday release?  All of the details will be on the TT blog tomorrow!

Sweet Treats

Image
If you head on over to the Fancy Pants Designs Blog , you can get all of the information you need on how I made this sweet treat ensemble, using the Magnolia Moments collection.

Fall is Coming!

Image
Hello friends.  A few projects are on the blog today. Both are showcasing new products from the latest Lawn Fawn release, and very much so fall inspired. First up, is a clean and graphic card using the Caramel Apple stamp and die set.  The apples were stamped in black ink onto white cardstock, colored in with copic markers and then cut out with the coordinating dies. The card base is 4.25 x 5.5 inches using the white woodgrain cardstock from Lawn Fawn.  The sentiment was double stamped since the cardstock is textured, and the apples were adhered using foam adhesive.  I die cut a piece of pattern paper from the Knit Picky Fall collection using the tote bag die. Then using the Mini Box Bat add-on die set, die cut purple glittered cardstock and adhered it to the bag as a fun halloween goody bag. Embellished with twine. The bag was then filled with candy corn and a ghost peep. That peep is giving me so much life lol For more product information, head on over to the Lawn

Happy Fall

Image
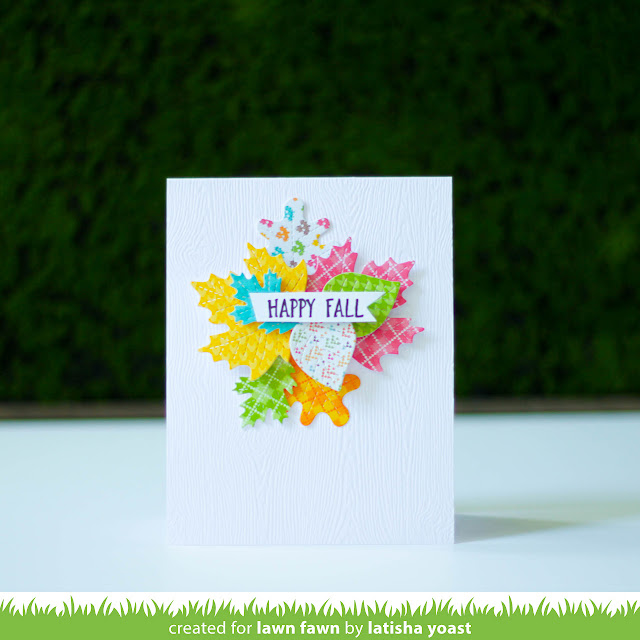
Am I the only one who gets excited over a new pattern paper collection? Especially holiday papers! It is very much still summer, and I am not wishing this warm weather away at all. However, winter holidays (not the cold) are my favorite!   Lawn Fawn created a new pattern paper collection called Knit Picky Fall.  Its a play on the original winter collection. To create this card, I started by making a card base with the new white woodgrain cardstock. This is a top fold card base and measures 4.25 x 5.5 inches. The pattern paper was die cut using the Stitched Leaves die cut set .  Once I had the pattern paper die cut out. The diecuts were adhered to the card using foam adhesive.  To create a cool dimension, the leaves were popped up at different heights.  The sentiment was stamped in black ink, trimmed and adhered to the card front. For more great inspiration using this paper, head on over to the Lawn Fawn Blog .

Thanks Teacher

Image
Hello friends! Today I am sharing a quick DIY lunch bag/treat bag.   I wanted to create a lunch bag with a die cut opening, and then place vellum behind it, to mimic a glassine treat bag. Using scrap pieces of cardstock, I adhered about 4 pieces together to create a thick shim, and then placed it on the inside of the bag. The shim was made so that the die cut would not cut through the back side of the bag. The apple die was placed on the front and held with washi tape, and run through a die cut machine.  Next vellum was adhered on the inside of the bag so the bag would be held intact and ready to hold a treat. The "thanks teacher' border sentiment was cut using the Knit Picky Fall pattern paper, and adhered at a diagonal.  To balance the bag, the same pattern paper was adhered to the bottom of the bag as well as a hand rolled paper straw at the top of the bag. This was very easy to make, and could easily be created using different dies and pattern paper to custom

Thanks For Being My Teacher

Image
I am so excited to share this card with you today.  Making shaped cards is so much fun, and different than the usual square or rectangle card.  Over on the Lawn Fawn Blog , one of the stamp sets they are showcasing is So Owlsome.  I colored in one of the owls with copic markers, then cut it out and placed foam adhesive on the back, as well as the sentiments and set them aside. The card shape was created using the new outside in and apple shape dies from Lawn Fawn .  Instead of using a cardstock behind the frame, the inside of the glittered red frame is vellum.  Using the vellum seemed to soften the card a bit. The stem and leaves were die cut using green glitter and woodgrain cardstock. Once the card was adhered together, the image and sentiment were placed on the front.

Pick Of The Patch

Image
Hi friends! Here in Florida, the kids are back to school.  My son is a senior in high school, and my daughter is a senior in college.  So I am really feeling the nest start to empty and it is a really weird feeling. Hopefully this year, I can start to add more content, including videos.  I am saying it, and writing it down so I am willing it to happen. On to the project! This is a stamp set called Pick of the Patch (the pumpkins and sentiment). This is the August Inspiration Week over at Lawn Fawn .  So there are going to be a lot of cool projects, videos and giveaways. I did share this card before (I think).  I started by ink blending the back ground, I tend to do this technique when I am stressed out or just need to chill, its very therapeutic because you need to focus on a perfect blend.  The house and pumpkins were stamped in black ink and then colored in with copic markers.  Copics are my go to coloring medium tool, and what I feel good at.  For you it could be watercolor

Say Yes To New Adventures

Image
Hello friends! Today I am sharing a card, that is back to basics.  What do I mean by back to basics? Its stamping 101, what you learn to do when you first begin this hobby.  There is stamping to create a custom background, heat embossing and fussy cutting.  This stamp set is called Adventure Awaits from Technique Tuesday .  If you head on over to the Technique Tuesday blog , you can see this full set along with the rest of the August release. I started this card by, stamping the suitcase images with VersaMark ink onto blue cardstock. Applying embossing powder to the image, then heat setting the powder with a heat cut.  I cut the image out with scissors and set it aside.  Next, I randomly stamped the suitcase over the front of a white card base with navy ink. It seemed a little plain, so the airplanes were added. They were stamped in versamark ink, and embossed with the same embossing powder, so everything perfectly coordinated.  The sentiment was stamped, and the cut out suitca