Posts

Showing posts from July, 2009

Happy Birthday Flourishes!!

Image
Are you ready to celebrate? Two years ago (August 1st), a one of a kind stamp boutique opened its doors to a brand new kind of creative expression.  Today, the entire design team cooked up creations to honor Flourishes' special day. We want you to join us! Simply make a birthday creation of your own - link your card to the Flourishes Newsletter post or upload to SCS using the keyword FLLCBDAY. We'll pick one lucky winner with the prize being a stamp set of your choice! So, make time for play time and you might just be a winner! Don't forget to click onto the Flourishes Newsletter tomorrow -- there is a BIG announcement that you won't want to miss!  For my card, I chose to use one of Flourishes older sets, Life is Sweet & then used the happy birthday sentiment from Sweet Violets.  Have you seen the new ribbon they are carrying?  Oh my heavens do I love that gingham ribbon...love it!!  I paired it with some Basic Grey Lemonade designer paper & Flourishes Classic ...

CHA & Latisha in pictures lol

Image
Wow, what a whirlwind of a couple of days!  I am left leaving so grateful and humble to have met so many people I look up to in this industry.  A lot of them I have online friendships with, so to meet in person, hug, laugh and drool over things you love was so so so much fun!!  Since I don't have a project to show, below are some of my favorite pictures of the last few days with my favorite people!  So scroll down if you want to see lots of pictures of me lol. First off, me and Kazan   (one of the owners of 2sketches4you) She is AMAZING and now a wonderful new friend, why does she have to live in Colorado?  Boo I'm going to miss her and her lovely accent! Designer sanwich right there lol me, Nancy Kirk (an owner of Flourishes) and Kimberly Crawford we both design for Flourishes Me & Kristi Ferro Owner of Hanna Stamps She is so nice and friendly...she is good people Me & Kimberly Crawford What can I say I just {{love}} her! We started chatting once she joined Flourishes...

Hi There

Image
For me, when I'm coloring an image with Copic markers, or any kind of coloring medium, the colored image will become the main focal point, if the card has less stuff on it. So after I colored in the owls , (loving the Stampavie whimsy style) I cut it out using a Spellbinders labels die (love those things), I layered it onto kraft card stock.  The vinyl Thicker used to be green, but I wanted it a different color, so I took out my black Copic marker and colored it black, this could be done also using a Sharpie (I have never done this, but I know people who have).  I was at a loss and what kind of ribbon to use, so I went to my old standby, sheer May Arts black ribbon.  I was in a clean and simple mood when I made this, but if I wanted it a little more dressed up, I could of added some bling, paper pierced along the edges, or even added some buttons. "hi there" Edited to add: Highlights from Tuesday at CHA *Meeting Donna Downey *Doing a make and take at Tim Holtz booth...Ju...

Call Me

Here is a clean and simple card that I made a few days ago.  The kraft card base is 4.25 inches by 4.25 inches, I stamped the telephone image onto my cardstock, then again onto some Jenni Bowlin dp.  I cut the image out from the J. Bowlin paper, then adhered it to the kraft, this technique is called paper piecing.  To give it a little bit of extra yumminess, I tied a bow using gingham red and white ribbon.  This really only took maybe 7-8 minutes, easy peasy!!  Right about now, while you are reading this I'm walking the aisles of Summer CHA...so excited!!  I will be posting all my pictures when I get back!! "call me anytime" OUT FOR PUBLICATION materials used: Unity stamps kraft card stock Jenni Bowlin paper red gingham ribbon

Make it a Grande

Image
Hello, hello there!  I hope you all had a great weekend!  I drove to Charleston, SC to attend one of my best friends baby shower, it was a great day.  Anyhow, today I'm sharing my card for this weeks sketch from 2sketches4you (Laura's sketch).  The sponsor this week is Just-Rite, so I used the Just a Little Caffeine borders & centers set.  This set is for a 2 inch circle base, and you can inter-change the center and border to create stamp that you like.  Be sure to play along, you could win a nice prize package if your card happens to be Card of the Week.  Do you see that in the center of the cup I put "latisha's blend" lol, I just couldn't help myself hee hee.  I can't wait to see all of your creations, this is a fun an easy sketch to play with!! "make it a grande" materials used: Just Rite stamps Basic Grey dp Cosmo Cricket dp buttons satin ribbon twine copic markers Spellbinder dies

baby shower gift and card

Image
Well I made it back from Charleston, SC about an hour ago.  I have a cooking class to go to around noon today, but I wanted to get this posted before I forgot (I need to go to bed lol).  Here is the card and basket I gave to my friend along with the diaper cake.  A lot of stuff you cannot see in the basket so here is a summary lol 7 or 8 outfits wipes Johnson & Johnson products Desitin socks hooded towel wash cloths leopard stuffed animal (noah's ark is the theme) stackable toy thing old fashioned pull along phone on wheels the link toys, that you can use to attach toys to stuff $25 gift card to Chili's (date for them before baby comes) uh and I can't remember what else lol before anyone asks I got the ribbon and basket from AC Moore

Diaper Cake

Image
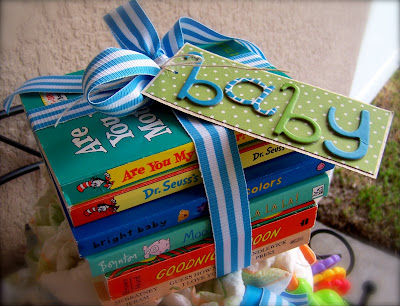
I'm off to one of my best friends baby shower today, its midnight right now but I'm leaving at 7am to drive 4 1/2 hours to Charleston, SC.  I'm so over the moon excited for her, this is her first child, and she (Kelly) is having a boy.  I totally went way overboard, here is one of her gifts, I made a diaper cake using size 1 diapers (fyi don't use size one they are too small lol) there is alot of stuff on the back you cannot see, but the top of the cake has some of my all time favorite books that I read to both of my children when they were babies.  I have a huge basket of clothes, toys, and other fun things that I'm giving her too, I will take a picture of that in the morning before I go.  Its late right now and there is no way I can get a good photograph.  I hope you all have a wonderful Saturday, I'm off to a city I love and have been so lucky to have lived in. ttyl latisha

Picnic, Stampavie style

Image
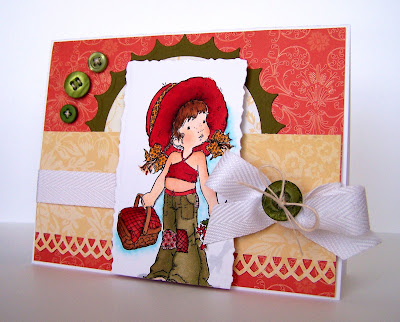
I really really love this image by Sarah Kay for Stampavie, this little lady is just ready to go to a picnic in some park.  For this card I actually used Cindy's sketch for her DTGD challenge over on SCS.  I stamped the image in Palette ink, then once the ink dried I colored her in using Copic markers.  Because I was using a few different red markers, I had to be very conscious of my blending and staying inside the lines, I didn't want the red to bleed into the skin.  This is where really knowing the paper you are working with, I suggest find a paper you like to color on, and then stick with that paper.  Each paper will color, bleed & feather differently, so knowing what you are working with will save you a lot of time and money.  There is nothing worse than just about being finished coloring in an image, then you make a mistake that you cannot fix, this usually happens to me, when I color with a paper that I have not used in a while. Well I hope you all have a wonderful F...

Strawberries and Shimmerz

Image
This week, the Flourishes Design and Blogger teams, got to play with the Shimmerz product.  Are you familiar with this stuff?  If not, basically its this little pot of glittery paint (easiest way to explain it lol).  After I stamped my images, I used the Royal Red and Green Olive Shimmerz to color in the strawberries, and that was it.  Its kind of a two in one product, it paints and makes your stuff sparkly all in one.  Make sure you shake and stir your pot up, just like you would with paint, to make sure your paint brush has an even consistency of glitter.  For more projects using Shimmerz, head on over to the Flourishes blog , the ladies have been using this stuff all week!  Just to be cute, I decorated my envelope too, it packs a big punch when sending someone a card.  Also to keep the flap, of my flap fold card shut I used some Basic Grey magnets found here (best invention ever! they come with a sticky side and everything).

Backyard Blog Hop

Image
If you just came from the Embellish Online  blog you are in the right place.  Today, Tomorrow and Friday the EO Design Team is going to be showing you all things summer.  Think, watermelon, b-b-q's, swimming, sweet tea...you get the idea.  All you need to do is make a card or lay out using the sketch provided and you can win your own July Design Team package (yep what the designers got for July)  we are talking about American Crafts Backyard paper, ribbon, etc... lots of fun stuff!! On to the card, I really love the Stampavie images, so I colored in this sweet girl with Copic markers to coordinate with the American Crafts paper I chose to use.  I was at a loss as what I was going to put where the butterfly is (you don't need to follow the sketch exactly), so I went through my Thickers and found some that matched perfectly, then spelled out "pic-nic"  I love it when things just fall into place.  Do you see that extra large ric rac?  Oh my gosh, I'm thinking I may n...

Thinking of You 2s4y style: Kazan's sketch #31

Image
Today I'm bringing you a card from this weeks sketch over at 2sketches4you.  Its a really fun sketch made to get your mojo flowing!  The sponsor this week is Ampersand , they sell really neat stampbord's, I was a little intimidated at first to work with it, but surprisingly, it was sooo easy!  Not only easy, but it took all different types of ink perfectly!  I stamped the stampbord using Palette Noir ink with the damask stamps, then once the ink dried I went over the "bord" using Tim Holtz distress ink and and a sponge.  The designer paper is by Theresa Collins, all stamps and sentiments are from Papertrey Ink. I hope you decide to play along this week, I cannot wait to see your lovely creations, you all inspire me so much!  Go check out what the rest of the design team did with the Ampersand supplies and sketch, I'm sure you will find some lovely eye candy!

Inksential pen

Image
This week, Faith has challenged us to use and Inksentials pen in a card.   Head on over to the Flourishes Newsletter to check out her tutorial.  I stamped the adirondack chair from the Beach Life stamp set, in Palette ink onto kraft card stock.  Once the black ink dried, I took out my inksentials pen and colored in the chair.  It takes a few minutes for the white ink to dry, so I used some Copic markers and colored in the grass, then stamped the "cherish today" sentiment (found in the strawberries set).  To add a some embellishments, I tied twine through the buttons, then attached the buttons to the cardstock using Zip-Dry.  Its a clean and simple card, that will be sent in the mail. Thank You for all of your well wishes the last few days, I'm starting to feel much better. "Cherish Today" You don't want to miss all of different ways the Design Team has used the inksentials pen, so take a little blog hop to check out their great creations. Christine Okken...

happiness

Happiness (n) state of well being characterized by emotions ranging from contentment to intense, emotions experienced when in a state of well being. Since I spent most of the last few days in bed, I don't have anything crafty to share today, just some words.  Have you ever thought about what makes you happy?   If you strip away the mother, wife, paper crafter title, who are you and what makes you happy?  For me its the very simple and basic things in life that define me and make me happy.   what makes me happy sitting on my children's bed and watching them sleep even though they are not babies anymore a good cup of tea sitting on the beach seeing Mickey Mouse reading documenting my families life chatting with old friends being authentic and real watching elderly couples have date night sleeping in long showers sonic ice Gallo salami being creative watching my children smile hugs from my husband/children road trips choosing to be positive riding my bike having a Mac I think I wi...

A few Stampavie cards

Image
Here are a few cards I have made using the Stampavie stamps , they are so whimsy and cute, not too mention so fun to color (if you like to color lol)  all of the paper used is from American Crafts, and the ribbon is by May Arts.  I know a lot of you do not like to color, but for me its very relaxing.  Does it take a long time, yes it does, however I love the creative process of it all.  I get to escape for a little while, but that comes to a halt when I make a mistake lol, but that normally happens when I'm trying to rush or be in a hurry. I had a rough night last night, I just do not feel well at all this morning.  While, laying on the bathroom floor praying not to be nauseated anymore, I had some deeps conversations with myself, and I thought I would share My children are always listening and watching, so I need to be a role model Whatever stress I'm having, is not my children's burden My husband needs just as much attention as my children do, I forget that sometimes Each...

Laura's skech #30: Happy Holidays

Image
There is a new sketch posted over at 2sketches4you, you must go check it out, I think its pretty fabulous myself.  I flipped the sketch to fit my stamps.  This weeks sponsor, is Purple Onion Stamps.  I really enjoyed the stamps I got to play with, the typography on this stamp (below) is really cool, its called Happy Holidays Noteblock ,  I can see myself using this a ton come around Christmas time.  I just went through their stamps and I have a list so long...one of my favorites is called French Vintage Postmark Set. ..I seriously need it.  I hope you decide to play along, I can't wait to see what you make. "Happy Holiday's"

All Smiles

Image
Is anyone else having problems with blogger?  I set this to post this morning...but it didn't.  Anyhow, here is a layout of the kids, the pictures are a few years old and some of my favorites, they are of a day trip to Cypress Gardens, SC.  I can't believe how fast children grow up, I love the people my children are becoming, however watching them grow up pulls at my heart strings, I just wish time could slow down sometimes.  Do you feel that way too? Onto the layout lol, the white base is textured paper from American Crafts and the designer paper and stickers are also American Crafts from the Backyard collection ...oh the Thickers are American Crafts too.  You can find all of this yummy stuff at Embellish-Online (and they have the new Early Bird stuff too).  The sketch layout I used is not my original design, it was created by Christine . "all smiles"

Sets available

The July stamps that I gave sneak peaks this week are now available, to buy them go to Flourishes and to see what they look like go to the Flourishes Newsletter ! Have fun shopping!!

Day #3: Beach Life

Image
Today is the final day of sneak peeks, and today I'm sharing a few cards from the Beach Life stamp set.  I can see myself using this stamp set for cards as well as scrap book pages, the stamps lend themselves nicely for both.  I love the, "wish you were here" sentiment, I'm always wishing a friend or family was here in Florida with me.  As always, head on over to the Flourishes Newsletter , for your chance to win this set, they are having a one day only blog candy.  Today is the last day, to enter the By the Sea contest (you can win all three new released sets) for more details on that, again go to the Flourishes Newsletter .  I can't wait to chat with all of you at tonight's release party over on SCS . For my first card, I stamped and colored my image onto Flourishes classic white paper & Copic markers, then die cut it using a Spellbinder die & my cuttlebug.  I went through my stash of paper looking for a green to match my grass and settled on this de...

Seaside Life: Day 2 Flourishes sneak

Image
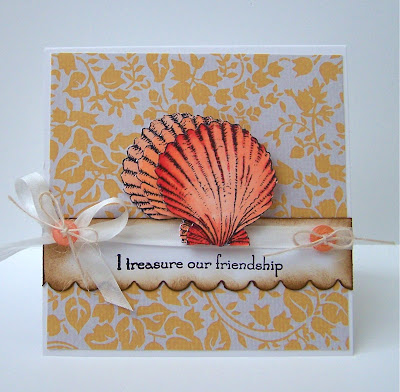
Today I get to give you a sneak peek of the Seaside Life stamp set, that Flourishes is releasing tomorrow.  For your chance to win this stamp set, head on over to the Flourishes Newsletter , they are having a one day only blog candy!! I stamped the shells three times, colored them in with copic markers, cut them out and then layered them using foam tape.  I love the different shells and sentiments in this set, I have another project using this set, but I'm saving it for the release party on Friday!! "friendship" stop by the rest of the Design Team for more sneaks Christine Okken Cindy Lawrence Faith Hofrichter Julie Koerber Laura Fredrickson Leslie Miller Stacy Morgan

Flourishes Sneak: Day one, Strawberries

Image
Hey there!  Today I'm showing you a sneak peek of the newest Flourishes stamp set, Strawberries.  I absolutely love coloring with this set, it is just so fresh!  Make sure you head on over to the Flourishes Newsletter , for a one day only blog candy for your chance to win this set. I used Flourishes new Classic White card stock on both of my cards, its just perfect for coloring with Copic markers. "hello" For this circle card, I scored the card as usual, then got a scalloped circle Spellbinders nestabilitie which I then cut and embossed.  I had the image already colored (used Copic markers), so I grabbed another circle die that would nest in the scalloped card base. To finish off the card I tied a bow using some twill and attached a button to the center. "you're so sweet" For this card, I just wanted a clean and crisp summer card that would show off the basket.  Anytime you use black as a layer or as and embellishment it will make your project pop, so I laye...

Vintage memories

Image
So I have this beautiful background stamp called Tea Time Toile (i think lol) by Unity Stamp Co. and its huge!  So for it to fit on a card and be the focal point, I stamped the image using Vintage Photo ink by Tim Holtz, then, cut and embossed the image using a circle Spellbinder Nestability.  To make the background scene come to life a bit, I used copic markers to color it all in.  The sentiment is from Papertrey Ink.  The stamp reminds me of, picking blackberries in the summer with my brother and sister. "vintage memories"

My bonus sketch

Image
A new sketch is posted over at 2sketches4you , by the lovely Kazan.  I drew up the bonus sketch this week.  This weeks sponsor is Mackenzie Mae Designs .  I was lucky enough to play with the June Card Kit, and boy have I been having fun with it.  You get all different sized cardstock pre scored, with envelopes, tons of designer paper, ribbon, buttons, rub-ons etc..  Since Mackenzie Mae is this weeks sponsor, I'm betting one lucky person who plays along this week is going to get a really fun paper crafting kit!! Latisha's Bonus Sketch The flowers in the center circle, are actually Basic Grey rub-ons (in the kit), and I seriously need to find out where they got that black ribbon...I love it!!  The cool think about this kit, is that your card bases came pre-cut and scored...super cool!! "thank you" Here is another card I made with the kit, the stamp is from Scenic Route (its included in the kit) and the letters are Jenni Bowlin (also in the kit) I colored in the letters...

New Gig for July

Image
For the month the month of July, I get to be the Guest Designer for Embellish Online .  I had a post ready to go yesterday, but there were technical difficulties, so I'm posting today.  Any how, did you see that Embellish Online is now carrying the Early Bird Collection from Cosmo Cricket?  I seriously love that paper!!  A few days ago was my friend Deb's birthday, so I made her a cute little notebook for her purse, and a birthday card using some of the Early Bird paper.  Then took her for Afternoon Tea at the cutest place called the Strawberry Tea Room. Anyhow, do you see those owls?!  Love love love them, they are the cutest little buggers and very easy to color in using Copic markers.  The owl stamp is called Hoo Hoo There by Rachelle Anne Miller.  I'm completely smitten by her designs, they are just so whimsical.  To personalize the notebook, I used some Just-Rite curlz alphabet stamps and border, then colored in the center using the Prawn and Cadmium Red copics. ...

Beach Challenge

Image
Are you ready for a challenge? Summer nights, sunsets, the sound of waves crashing on the shore – what could be more relaxing? Because these are the sights and sounds of life on the beach - what better way to challenge you all to a fun contest than to invite you to bring a taste of of the ocean into your creations!  HOW TO PLAY: Try to incorporate the "feel" of the sea in one of your creations. It could be with a fun embellishment, a photo or even just a color scheme. Link your creation to this post or upload to Splitcoast using the keyword FLLCJULY. You have until Friday, July 10th at 5 PM Eastern to have your creation uploaded! We can't wait to see your creations!  WHAT YOU COULD WIN: All of our new releases that will be revealed starting next Wednesday, July 8th, on the Flourishes Newsletter blog. Here is my card, that I created, I was inspired by the vibrant wildflowers that grow along beaches.  I used the Summer Blossoms stamp set for my card.  I stamped the stems i...