Posts

Showing posts from 2017

25 Days of Christmas Tags

Image
Hello friends, there is something called the 25 Days of Christmas Tags, and today is Day 12 , with Lawn Fawn as the sponsor.  There is a $25 gift certificate up for grabs from Lawn Fawn, but everyday there is a new giveaway.  All of the details are on Tracey's blog post .  Basically you need to create a tag for a chance to win!  How fun!

Trick or Treat

Image
Hello friends! Did you know that Lawn Fawn now has a few different embossing powders as well as glitter?  For my project today, I did a little bit of water coloring.  Let me tell you a little secret.  When you want to water color images, if you heat emboss the image with embossing powder, it makes the water coloring process so much easier! Especially if you are worried about the color going outside of the lines. 1.  Stamp images in versa mark ink. 2.  Apply Lawn Fawn Gold embossing powder onto the image.  Heat set with a heat gun. 3.  Stamp sentiment in versamark ink, apply silver embossing powder. Heat set 4.  Water color the image. 5.  To ground the image so it doesn't look like its floating on the white card stock, add green water color for grass, and blue for the sky. 6.  Die cut the white card stock with a rectangle die. 7.  Apply the diecut to pattern paper with foam adhesive. 8.  Adhere to a whi...

Fairy Winter

Image
Hello friends! The card I am sharing today, is a little more in depth, but I know you are capable of following along :)  This is a shaped card using the Stitched Scalloped Rectangles from Lawn Fawn.  There is a rectangle stitching on the outside of the scalloped cut line, and on the inside.  Only when you cut more than one die together, will you see both stitched lines. 1.  Lay two stitched scalloped rectangle dies, onto white card stock. Run through a die cutting machine.  You will use the outside frame. Apply foam adhesive on the inside of the frame and set aside. 2.  Die cut 2 large die cuts using the larger die with pattern paper. 3.  Place the white frame die cut over one of the pattern paper die cuts.  This will be the front of the card. 4.  Adhere the other pattern paper to the card, by scoring one inch down from the top, putting adhesive above the score line and adhering to the front of the card. 5.  Stamp fairy...

Happy Thanksgiving

Image
Today I am sharing a decorated kraft flat bag (glassine bag).  This is a different way to store a card, give a gift card, put candy into. There are multiple ways to use them. Using the Perfectly Plaid chill paper, I trimmed and scored paper. Then created a paper rosette with them. Adhered a pattern paper circle on top, and then layered a stamped circle as well, with colored in pumpkins.  A strip of pattern paper, was adhered to the bottom of the bag, the sentiment was stamped in black ink, as well as the pumpkin. The pumpkin was colored in using copic markers as well. Head on over to the Lawn Fawn blog , to see how the other designers used this paper collection!

Merry Christmas

Image
Hello friends! One of my favorite ways to challenge myself in card making, is when I use a mini set.  Mini stamp sets are usually 2 x 3 inches, have a main image, a sentiment or two, and maybe smaller images.  It stretches creativity as well as simplifying products used.  A lot of times stampers feel overwhelmed by the amount of choices when starting a card, but I have found less is more a lot of time. First I stamped the otter onto the card front as a mark to where my focal point was going to be.  Using green ink and a blender tool, I applied ink onto the card.  When ink blending, pick up ink onto the blender, then tap the blender onto scratch paper, if there is going to be an ink ring on the blender, this is when the sharpness of the ring will come off.  I then start blending in light circles onto the card, I repeat this over and over until satisfied with the layer and darkness of the ink.  The sentiments were stamped in black ink, the he...

Merry Christmas

Image
Hello friends! How is is mid October already?! We are on the cusp of fall and winter holidays, which means starting to create Christmas cards. Today I am sharing a holiday card using the Stitched Ornament dies from Lawn Fawn .  I started by creating a base of white card stock at 4.25 x 5.5 inches.  I then layered it with cilantro card stock, that had been die cut with foam adhesive. The chili pepper was die cut with a rectangle first, and then I die cut the stitched ornament, because i wanted the outside stitch of the ornament to show up.  Next the ornament were die cut again with white card stock, and then stamped using different "merry christmas" sentiments in green and red ink.  These two layers were adhered to the card using foam adhesive as well.  To finish the card, "love" was stamped in black, and black single cord twine was added to embellish. Head on over to the Lawn Fawn blog to see the rest of the project using this set!

Merry Christmas

Image
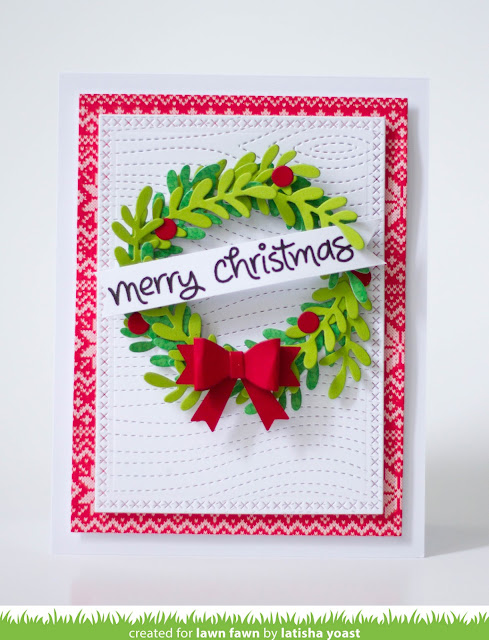
I have to say, seeing the first the images of this die set, and then receiving them, I was so excited!  Wreaths are very seasonal, and you can completely change the look of the wreath by using different papers and elements.  I decided to create a Christmas themed wreath.  I love the classic green wreath and red bow, it just screams holidays. I used a mix of green pattern paper and green card stock to give the wreath some depth.  Using white card stock, the background was embossed first with the woodgrain back drop and then die cut using a rectangle die for added interest.  The sentiment was stamped in black ink, trimmed and then cut the edges off to create a banner on the wreath. The red pattern paper is from the new Lawn Fawn Knit Picky pattern paper collection. Head on over to the Lawn Fawn blog , to see the other great projects using this set as well as a chance to win it. Save Save

Let's Hang Out

Image
Today I am sharing a card using the stamp set called Winter Village from Lawn Fawn.  This is a holiday stamp set, but i wanted to create a card that could be used for any occasion year round.  Head on over to the Lawn Fawn Blog to check out all of the amazing Christmas cards using this set and a chance to win this stamp/die set. Instructions: 1.   Cut/score card stock to form base. 2.   Adhere a strip of red card stock to the bottom. 3.   Die cut a circle using white card stock. 4.   Stamp the images and sentiment. 5.   Color in the images using copic markers. 6.   Die cut a circle using green card stock. 7.   Using the Stitched Tree Borders, die cut onto the green circle, to get the row of trees. 8.   Adhere the tree border using foam adhesive. 9.   Adhere the circle to the card using foam adhesive. 10. Tie a bow with red twine, adhere to the card. Tip Use your border dies in unconventional ways...

Halloween Gift Boxes

Image
Hello friends! How is it the middle of September?  I saw someone the other day talking about only around 100-ish days until Christmas.  I was silently thinking, I just need to get through hurricane season lol.  Anyhow, Lawn Fawn has this cute little die called the Tiny Gift Box. You can create the boxes using pattern paper, or plain cardstock, whatever your preference is.  I die cut white cardstock, and then stamped images onto the die cut before adhering the box together. I enjoy customizing projects, especially for seasons.  Head on over to the Lawn Fawn blog , to see all of the wonderful projects using this die set! 1. Die cut white card stock using the tiny gift box die. 2. Stamp images onto the die cut 3. Color in the images. 4. Adhere the box together using a strong adhesive. 5. Tie twine bow, adhere to the box. Tip Before stamping onto the die cut, figure out what is the front, the top, the sides and bottom...this will help y...

Here We Go A-Waddling

Image
Hello Friends, today I am sharing an easy to make holiday card.  This would also be a great card to create and mass produce for a Christmas card.  That sentiment is so stinking cute, once I saw it I had to use it on this card.  I actually created this while we were waiting for Hurricane Irma to hit Florida. I struggled for a bit, but coloring the images really helped me relax and forget a storm was outside. The die and stamps are from Lawn Fawn , and its called Here We Go A-Waddling.  The September Inspiration Week has started, so head on over to the Lawn Fawn blog today, to see more great samples using this set! Instructions: 1. Cut/score card stock to create base 4.25 xy 5.5 inches. 2. Die cut red pattern paper from rectangle die, and adhere to the card base using foam adhesive. 3. Die cut white card stock from rectangle die, stamp sentiment in black ink, adhere to the card using foam adhesive. Adhere strips of pattern paper to the bottom. 4. S...

Costume Party

Image
The cutest Halloween stamp and die set from Lawn Fawn called Costume Party, will be available next week.  I had so much fun coloring in these images.  For more inspiration using this set, head on over to the Lawn Fawn Blog for the August Inspiration. I started by blending a yellow and orange ink onto the card base using a foam blending tool.  Next I adhered a strip of black card stock & stamped my sentiment in black ink.  The images were stamped in Memento Tuxedo black ink, and colored in with copic markers.  I wanted them to look like they were holding hands, so I cut them out using scissors instead of die cutting them.  For added dimension the images were adhered to the card using foam adhesive. Save Save

Love Ya Bunches

Image
Love Ya Bunches is a limited edition stamp & die set in collaboration with Ellen Hutson's United We Flourish & sold exclusively at EllenHutson .  The stamps and dies come together in a set, so no separate purchase. I decided to create a stamped background using the monkeys, heart and bananas.  I did this for a few reasons, one because creating a custom pattern paper is always fun, and two, not everyone likes to diecut or has access to a die cut machine.  I did die cut the panel using a rectangle stitched die to make the card look professional and finished, however you could just use a paper trimmer.  I used Marvy alcohol markers to color in the images. Head on over to the Lawn Fawn blog to see all of the great projects using this set!

Aloha

Image
Ever since I received this stamp set I have been smitten.  There is nothing about pineapples with smiling faces, that i don't love.  Its just "so cute".   I decided to create a custom stamped background using the pineapples and then colored them in using copic markers. The "aloha" sentiment was cut out using a die and foam adhesive sheets. Make sure you head on over to the Lawn Fawn Blog , to see all of the great projects using this set. Also for a chance to win.  No worries if you don't win, because this stamp set is just a few dollars and so very affordable! Love that!!

Happy Fathers Day

Image
Lawn Fawn is having an inspiration week and showcasing some of the newest stamp sets.  Today I am sharing a Fathers Day Card using the new Pland & Simple stamp set.  Being my husband is an aviator, I am loving all of the different creative combinations I can do with these stamps/dies.  Since Fathers Day is tomorrow, I chose the "you're the best" sentiment for the plane banner and the "happy fathers day" sentiment for the card.  I love the combination of blue and greens, so I colored in the banner and plane to coordinate with the pattern paper. For a chance to win this stamp set, head on over to the Lawn Fawn blog , to see all of the beautiful samples using this set.

Palm Trees & Ocean Waves Accents

Image
Hello Friends and happy Monday!  Today I am sharing a shaped circle card, using a few of the new products from Lawn Fawn.  I live in Florida, so a die set that has a few different sized palm trees...I am totally smitten!  Most of this card, was created using dies.  The stamped sentiment and the twine are the only items that are not from a die. For me, i like to use a lot of foam adhesive when I use dies.  It just makes your project "pop" as well as giving the card dimension. Plus, raised layers make any project look a little more polished. To make sure each layer of die cut, fit perfectly into the circle.  I would die cut the lawn, waves etc, and then get the circle die, and then die cut it again.  You could just use scissors, but I am all about uniformity, so I die cut twice. Head on over to the Lawn Fawn Blog to check out all of the wonderful projects being shown today, as well as a chance to win these products!

You're Claw-some

Image
This coordinating stamp and die set called You're Claw-some reminds me of my childhood, and my children's too.  I don't know how many quarters I wasted trying to win something out of these claw machines.  Occasionally my husband would win one for our children, but man its hard to win! This set is so cute, and has so many great sentiments. It would be great to give to just about anyone! Head on over to the Lawn Fawn blog , to win this set as well as to check out all of the awesome projects from the Lawn Fawn Design team.

Upon A Star

Image
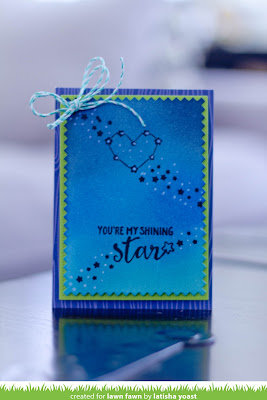
There is just something so adorable about a constellation stamp set, with hearts, constellations and critters looking up to the sky.  Its awesome!  I decided to ink up the card stock with a few different shades of blue ink.  Then I stamped a galaxy/milky way type of stars.  I stacked the layers with foam adhesive to give the card some depth and then added twine.  This was a fairly simple card to create, and I actually will "case" myself and make more! For more wonderful projects with this set, head on over to the Lawn Fawn blog !

Magic Slider Card

Image
Y'all. Lawn Fawn has really hit it out of the park with this die I am about to show you.  It is a magic slider die, with tons of accessories, and it allows you to create a secret/magic image or sentiment. You really need to go over to the Lawn Fawn Blog, to see the video.  It will knock your socks off!! So here is the front of the card. starting to pull the slider out when pulled all the way out, your sentiment and colored in image is revealed!
Image
Hello friends! Today I am sharing a few gift cards that I created for Teacher Appreciation Week.  Now that my youngest is in High School, we give his teachers gift cards to Starbucks. Today, Lawn Fawn is releasing Ahoy, Matey stamp set, Simple Gift Card Slot dies & Lift The Flap dies.  I was able to use all three items to create these gift card holders.  The Lift The Flap die set, is a set of three dies, that creates a flap in any project you create.  The Gift Card Slot dies, keeps you gc in place. Head on over to the Lawn Fawn blog , to see a video of how all of these new items work as well as a chance to win these products!! Here is an up close picture of how the flip dies work in combination with the gift card slot dies. the sentiments in the Ahoy, Matey stamp set worked perfectly for a teachers gift

Bun In The Oven

Image
Hi Friends! Just a clean and simple card today, with a technique.  I used 3 different inks and a mini blending tool, to create the background. The trick is to use the ink lightly and to keep building it up until you like the color.  This does take a little bit of time to create a seamless blend, but its worth it.  I stamped the sentiment in black ink, as well as the images.  I colored the images in with copic markers, cut them out and then adhered them to the card using foam adhesive.  To embellish, I added some twine in the corner. Head on over to the Lawn Fawn Blog , to look at more great projects as well as a chance to win this stamp set!

I Love You Sew Much

Image
Hello Friends! Welcome to the April Inspiration Week for Lawn Fawn.  The designers are using the Stamp and Die set Sewn With Love today.  Its a set with sewing element images and perfect "pun" sentiments.  Head on over to the Lawn Fawn Blog to check out all of the projects created as well have a chance to win this set. I started by blending Merman ink onto the card front with a mini blending tool, once the ink was blended and dried, I stamped my sentiment.  The images were stamped onto white cardstock, colored in with copic markers and then cut out with coordinating dies.  I adhered the diecuts to the card using Scrapbook Adhesives by 3L 3D Foam squares, and added the twine bow using an adhesive dot.  To ground the card a little bit, I adhered a strip of yellow cardstock, to the bottom of the card.

Bicycle Built For You & Road Borders

Image
Welcome to the March Inspiration Week for Lawn Fawn, today I am sharing a card using a stamp/die set called Bicycle Built For You and the Road Borders die set. I love how easy it was to use both of these sets together seamlessly.  There are so many different images and sentiments that the amount of cards and combinations you can create are endless.  For more great inspiration and a chance to win this set, head on over to the Lawn Fawn Blog

Lawn Fawn Inspiration Week

Image
Here are a few cards from the Lawn Fawn March Inspiration Week . There are still three more days of inspiration, so head on over to the blog to see great projects, and for a chance to win product! Fab Flowers blog post Hang In There Blog post Happy Happy Happy blog post

Wonderful Window

Image
Hello friends!  Today I am sharing an interactive card using the Wonderful Window die and Meow You Doin stamp/die set from Lawn Fawn.  The window die, will come in 3 pieces, the flowers, the window and the flower pot that the flowers can easily slide into. What makes this interactive, is that the windows can open (if you choose). I paired the window scene with this adorable cat from the Meow You Doin stamp set.  Many Lawn Fawn customers and fans have long requested a cat set, and now there is one.  There are several cat images and sentiments in this set, to keep all of the cat lovers satisfied! I stamped and colored in the cat image with copic markers, before die cutting out the image with a coordinating die, and adhering it to the card.  To give a little contrast to the flowers, i colored the tips of the tulips with a red copic marker.  I was running out of room to stamp a sentiment, so I thought I would stamp the sentiment onto the flower pot. To g...

Perfectly Plaid Rainbow & Fancy Box

Image
Creating boxes and bags from pattern paper, has great satisfaction for me.  I love being able to make a cute container without having to go to the store and buy it.  Both of these projects were created using Lawn Fawn Dies as well as the latest Perfectly Plaid Rainbow pattern paper collection. This Fancy Box is the perfect way to give a gift card! I have teenagers, so I will be using this a lot!  The Lawn Fawn Design Team has created so many fun versions using this Fancy Box, head on over to the Lawn Fawn Blog to check them all out, as well as get a chance to win these products!

Out of This World

Image
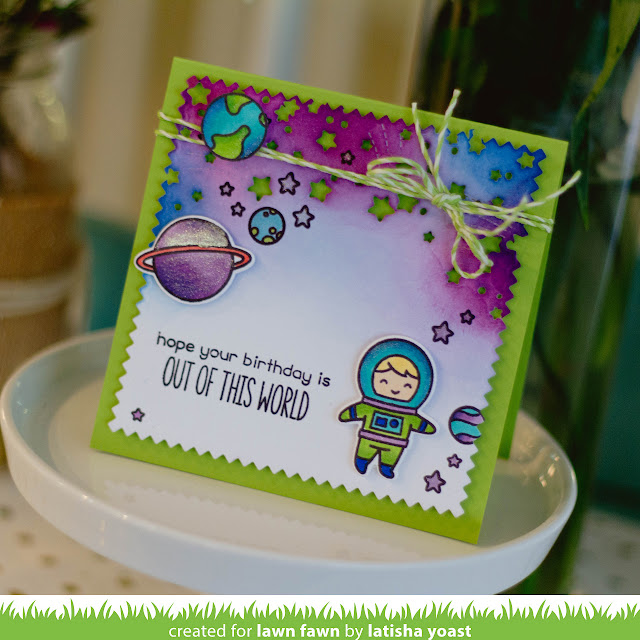
This is a 100% stamping and inking card.  There is some die cutting involved, but when I created this card, I was all about the ink.  Its so therapeutic to just have fun, not think and make something pretty!  It is a plus when you get to use super fun product!  This stamp set is called Out of This World by Lawn Fawn, and it is perfect for the space lover.  It is a new stamp/die set released at Winter CHA in January.  If you would like to see more project using this set, head on over to the Lawn Fawn Blog .

Hoppy Easter

Image
Isn't it crazy how fast holidays approach?  Maybe I am just getting older, and realize that time on earth isn't finite.  I remember being a kid an it taking FOREVER between holidays lol. Today I am sharing a card using new Winter CHA 2017 product from Lawn Fawn.  I used the Hoppy Easter stamp and dies, as well as the Happy Hatchling dies, to create this fun scene. For a chance to win all of these products and to see many more project head on over to the Lawn Fawn blog. Save Save

Floral Pop Up Box Card

Image
Lawn Fawn has created the coolest die!  Its a card, that pops up into a box!  I don't know how to adequately explain its awesome, so you need to head on over to the Lawn Fawn Blog , to see how this is created.  I had so much fun creating this project.

Elphie Selphie

Image
Hello Friends! Long time no blog!!  I was sick for about a month with viral bronchitis, and it was horrible.  So glad i have stopped coughing! Today, I am sharing a fun card using the latest die/stamp set from Lawn Fawn called Elphie Selphie.  I mean how freaking cute is that name?  Love it! I used quite a bit of new product on this card.  Making it brought me so much joy.  Look at those colors! I die!  The birthday cakes were stamped using Versa Mark ink to create a watermark effect.  The balloons were colored with Copic markers (elephant too) and then I put a clear glitter ink over the tops. Super simple, but oh so cute!! Head on over to the Lawn Fawn Blog for a chance to win this set as well as see all of the fantastic projects today!

Winners!

The winners of the Seasons Givings Prizes are: Giveaway #1 Lisa H (henke) Giveaway #2 Kim Ross please email me at  tishayoast@gmail.com so i can get your home address