Posts

Congrats Grad

Image
Hello friends, I am back on this lovely Tuesday with a few graduations cards. Taylored Expressions is having a Grad and Teacher release, with all of the goodies to create cards for your favorite teachers and grads.  There are a few cards, that mean more than sending someone a congratulations on your graduation card. It is typically a very pivotal moment in time for that person.  For this congrats card, blueberry ink was blended onto blueberry cardstock using the Grad Cap Layering stencil. For added dimension and break of pattern, diecuts were added to the top center of the card. The congrats was diecut using a die and white cardstock and adhered using glue. The sentiment Let's Celebrate  was stamped, diecut and adhered to the card using foam adhesive. To embellish gold bits and pieces were added with glue.  To fully customize a graduation card, use the colors of the school that the grad attends.  Again, using a simple design helps immensely when mass produci...

Hello & Thinking of You

Image
Hello friends! Taylored Expressions is releasing new stencils and blender brushes today! The blender brushes are smaller, to fit into all the nooks and crannies of your stencils. Which is perfect for stencils where you use a multitude of colors.  Sometimes when creating a stenciled background, I want a muted color and not something as bold and bright as white cardstock. Once the card base and diecut "hello" were created using plum punch cardstock. The process of going through my TE cardstock to find a color that coordinated, started. From past cards, plum punch & peaches and cream go so well together and have been some of my personal favorites, it was an easy decision to make. The stencil was secured over the panel using purple tape. Then using a variety of ink colors and blender brushes, the gradient rainbow was created. Once finished inking a background, the "hello" diecut was adhered to the card using foam adhesive. The crystals were added for a final embell...

Butterfly Wishes Kit

Image
Hello friends! I am so excited to share these cards with you. When initially seeing this kit, I was so happy. This kit is called Butterfly Wishes, retails for $55, from Taylored Expressions and here is what comes in it. Butterflies Stamp & Stencil Combo set Butterflies die collection Clearly Crafty Butterfly Wishes stamp set Clearly Crafty Sweet Sentiments stamp set Diamond Jewels 6 Custom Envelope Seals 6 Toffee A2 Envelopes Packaged in a zippered pouch with a custom kit label Limited quantity available. Most items not available to purchase individually For this first card, I knew I wanted to do a rainbow of butterflies in a gradient kind of way. The body of the butterflies was stamped in Oreo ink. Then using the stencils and a blender brushes, inking the butterflies in the red, orange, yellow, green, blue, purple order . I saw that one of the envelope seals matched perfectly, so I put some foam tape on the back, trimmed it a little bit and placed it on the card for my sentiment....

Background Stamps oh my!

Image
  Hello friends! It is April 6th and here we are on another Tuesday and I have some fun cards to share with you today. Taylored Expressions is bringing you some incredible stamp sets this month. Y'all they are soooo good! For this On The Block Mom card, I started by stamping the lollipop card base with the In Bloom background stamp in Cherry Pop ink, using a MISTI tool. On the top left and bottom right using the clear stamps from In Bloom, the flowers and leaves were stamped with lollipop and cherry pop ink. On white cardstock the "mom" was stamped and then die cut using the On The Block stamp and coordinating die and adhered using a foam adhesive for added dimension. The bottom sentiment was created with the You're the Best mini strips stamp and die. By using a bright and colorful card base it elevates the card but also while being a really simple card to create! I love the stamp and stencil combos, they really elevate a card in a simple way, especially if coloring...

Hello Cutie Pie

Image
Hello friends! Just a few more days of March. I'm still in shock that we are almost 4 months into 2021. Today, I am showcasing the Happy Hex stamps/kit from Taylored Expressions . It was released a while back as a kit, and now that you can buy in bits and pieces. But honestly, you will want this kit in its entirely. My favorite is this background (there is a coordinating stencil too). I love how you can create a fun background, add a bold sentiment and be done.   I started by placing the red rubber background stamp into my MISTI, and securing the mini slim card base in place. To create the rainbow background, multiple ink colors were inked onto the stamp and then stamped onto the card base. Wiping and cleaning excess ink off between colors. The Hello and cutie pic sentiments were stamped in Oreo, and the hearts were stamped in coordinating rainbow inks as the background. This is a perfect card to mass produce! Here are a few older cards using this same set.

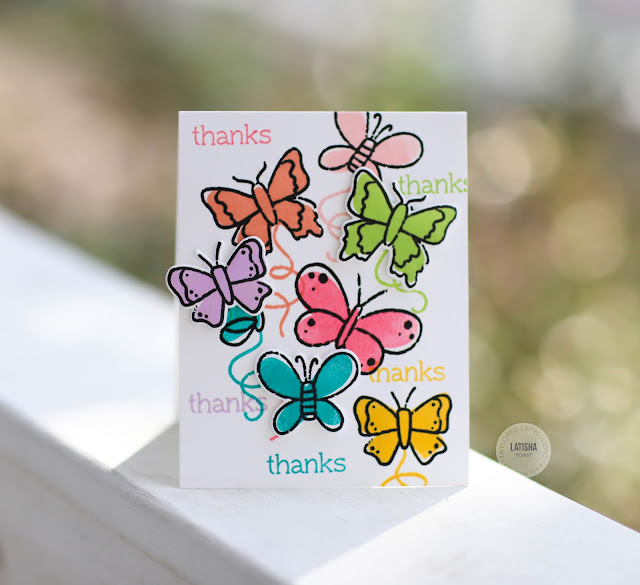
Social Butterflies

Image
Stamp Joy is a multi day stamping and card making event hosted by Taylored Expressions . Attendees receive a goody bag, and some of the items are exclusive to Stamp Joy, meaning they are not available for purchase. Today, TE is opening up the vault so to speak and releasing previous Stamp Joy exclusive stamps and dies. How cool is that?!  This stamp set is called Social Butterflies. The set comes with red rubber images and sentiments as well as clear stamps. There is also a coordinating die set that is available as well.  To start, the butterfly outline images were stamped in black ink, then stamped again with the coordinating clear stamp that fills in the outline. I used several different colors to create a rainbow of butterflies. For added dimension, some butterflies were stamped onto a separate piece of white cardstock, then diecut with the coordinating die, and adhered to the card using foam adhesive.  Head on over to the Taylored Expressions site today, click on wha...

Masking Stencils

Image
Hello friends! I hope you are all doing well. Spring is well on its way where I live in North Florida. I love everything about this season except for the pollen. It is brutal this year.  Our friends over at Taylored Expressions have some new masking stencils that are scalloped that can now be layered with the original shape. I started by blending guava ink onto peaches n cream cardstock using the square masking stencil. Then using the negative piece from the stencil, I covered up my freshly blended square. Then I placed the scalloped square stencil onto the cardstock, secured it and then blended the scalloped border with fruit punch ink. The floral image was stamped using a Misti, for perfect placement and to have a nice solid image. At first glance the "thanks" looks like a die cut, but it was stamped multiple times in black ink. Very carefully, I cut the entire square and flowers out with scissors. If you look in the corner of the floral leaves you can see the peaches n cr...