Posts

Showing posts with the label thanks

A2 & MSL Thanks

Image
  With all of the different sizing of cards out there. Today I am sharing an A2 card, measuring 4.25 x 5.5 inches, and a mini slim card, measuring 3.5 x 6 inches. The exact same products and design were used on both cards. Its super fun to have them side by side like this.  Mini slim line cards are a smaller working space, but not as intimidating as a full sized slim line card. It can feel overwhelming to fill up all of that space, especially if you are not into making scenes.  Some don't desire to make anything other than a traditional A2 card, and that is perfectly fine. For both cards, the dahlia was stenciled in blue, in the left corner. The sentiment was stamped in black, and the flowers were diecut using orange and yellow cardstock with green leave. To embellish the black bits and pieces were added with glue.  Head on over to the Taylored Expressions website today as all Mini Slim items are 30% off. 
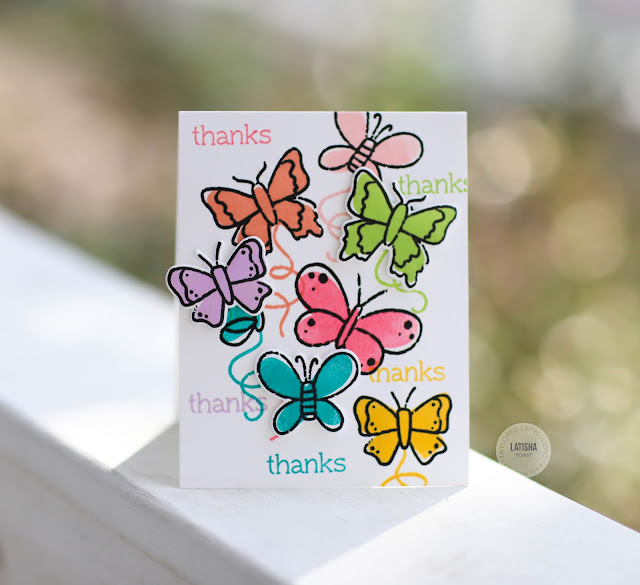
Social Butterflies

Image
Stamp Joy is a multi day stamping and card making event hosted by Taylored Expressions . Attendees receive a goody bag, and some of the items are exclusive to Stamp Joy, meaning they are not available for purchase. Today, TE is opening up the vault so to speak and releasing previous Stamp Joy exclusive stamps and dies. How cool is that?!  This stamp set is called Social Butterflies. The set comes with red rubber images and sentiments as well as clear stamps. There is also a coordinating die set that is available as well.  To start, the butterfly outline images were stamped in black ink, then stamped again with the coordinating clear stamp that fills in the outline. I used several different colors to create a rainbow of butterflies. For added dimension, some butterflies were stamped onto a separate piece of white cardstock, then diecut with the coordinating die, and adhered to the card using foam adhesive.  Head on over to the Taylored Expressions site today, click on wha...

Masking Stencils

Image
Hello friends! I hope you are all doing well. Spring is well on its way where I live in North Florida. I love everything about this season except for the pollen. It is brutal this year.  Our friends over at Taylored Expressions have some new masking stencils that are scalloped that can now be layered with the original shape. I started by blending guava ink onto peaches n cream cardstock using the square masking stencil. Then using the negative piece from the stencil, I covered up my freshly blended square. Then I placed the scalloped square stencil onto the cardstock, secured it and then blended the scalloped border with fruit punch ink. The floral image was stamped using a Misti, for perfect placement and to have a nice solid image. At first glance the "thanks" looks like a die cut, but it was stamped multiple times in black ink. Very carefully, I cut the entire square and flowers out with scissors. If you look in the corner of the floral leaves you can see the peaches n cr...

Thanks So Much

Image
Are you following along with the Summer release from Lawn Fawn? Do you have a favorite so far? I am loving all the stamp/dies that are beach related! Today my card is using a brand new die called Tropical Backdrop.  I know a lot of cardmakers, do not like to color. So this project is a great example of how you can achieve a fun and colorful background by just using pattern paper.  I have seen some of the projects that the other designers have created and they are incredible! Head on over to the Lawn Fawn blog to check them out!

Thanks Teacher

Image
Hello friends! Today I am sharing a quick DIY lunch bag/treat bag.   I wanted to create a lunch bag with a die cut opening, and then place vellum behind it, to mimic a glassine treat bag. Using scrap pieces of cardstock, I adhered about 4 pieces together to create a thick shim, and then placed it on the inside of the bag. The shim was made so that the die cut would not cut through the back side of the bag. The apple die was placed on the front and held with washi tape, and run through a die cut machine.  Next vellum was adhered on the inside of the bag so the bag would be held intact and ready to hold a treat. The "thanks teacher' border sentiment was cut using the Knit Picky Fall pattern paper, and adhered at a diagonal.  To balance the bag, the same pattern paper was adhered to the bottom of the bag as well as a hand rolled paper straw at the top of the bag. This was very easy to make, and could easily be created using different dies and pattern paper to c...

Floral Thanks

Image
Hello friends! Another floral watercolored card today.  I am really loving the experimentation with different forms of watercolor. Whether its, traditional watercolors, or ink pads or pens, water based techniques are a lot of fun! I started by stamping the flowers in a pigmented black ink, once the ink was dry, I watered in the flowers and leaves.  Once the images were completely dry, they were cut out with scissors and set aside. The sentiment was stamped onto water color paper, as well as a few additional flowers.  The flowers were watercolored with Zig pens, and a brush.  The cut out flowers and leaves were adhered to the card using foam tape. This is a brand new stamp set from Technique Tuesdays April release .  Its called, Flowers For Her.  The full reveal is on the TT blog .

Gina K: December Hop Day 3

Image
The Design Team for Gina K. Designs welcomes you to another fabulous Inspiration Blog Hop! Gina and the Design Team will inspire you with many beautiful ideas! And as you hop through their blogs, make sure to leave a comment on each of them because we will choose a few random comments and those stampers will each win a grab bag of Gina K. Designs products! To see the full list of winners check the Big News Forum at StampTV a few days after the hops. A few days ago, I went to mail a card and was very surprised at the cost.  So today I am sharing one layered cards. The Lots of Thanks stamp set is the perfect stamp set to create stationery sets.  With the classic fonts and swirls it tugs at the part of me, who loves stationery stores. If you are wondering why my pictures are taken differently today, its because of this Celebration Diva's fault lol.  It was too windy and cold outside, and she demanded to be in front of our Christmas tree.  After I s...

Moxie Fab Thanks

Image
In my 7 year relationship with Paper Crafts, I have never known a time without Cath.  There are not enough words to describe my adoration of her, and this is actually a lot harder to write than I thought.  So, I will just say I will miss you so very much Cath, and I am so happy there is Facebook!!  Thank You so much Cath for everything!!! To the 285 designers who are taking part of this hop, you all rock, and are so Moxie Fab! If you just came from Jennie's blog you are in the right spot! Next up is Ang !  Then after Ang is Danielle !! The complete list of hoppers, are at the very bottom of this post!! Cath, Thanks Love!! Link List  Our Moxie Fab Thanks to You, Cath! 1.  Moxie Fab World    96.  Anieszka Malyszek    191.  Jimmi Mayo    2.  Keren Baker    97.  Kate from i {heart} papers    192.  Julie Overby    3.  Jennifer Ingle ...