Posts

Showing posts with the label copic

Thank You

Image
  Hello there! Today I am sharing an extra special card with you all. My friend Lori Craig has designed a new kit along with Taylor from Taylored Expressions . There are stamps, dies, envelopes, foil panels and more. Lori lives in the midwest where sunflowers and wheat are abundant, and if I had to guess, inspired her to illustrate this set.  The two sunflowers to the left were stamped onto white cardstock and colored in with copic markers. The images were cut out with scissors and set aside. A card base was cut and trimmed to 4.25 x 5.5 inches, then a panel was trimmed to 3.75 x 5 inches.  On the bottom left of the panel, a sunflower was stamped and colored in with copic markers. The "thank you" sentiment was stamped in black ink just slightly right of the sunflower, and then the panel was adhered to the card front using foam adhesive. The cut sunflowers were adhered to the cardfront using foam adhesive for a little dimension and to for an embellishment and balance a twi...

Taylored Expressions Valentines Release!

Image
Its January 5th, 2021...its freaking 2021! How wild is that? I am ready for a fresh new year, and I am promising myself, to be excited about it. I am ready for all of the good 2021 has to offer. And speaking of excitement & good, I am sharing some fun new products from Taylored Expressions today.  I am loving that all of the stamp companies are on board with stencils right now, they create an awesome back drop to images, especially when using colored cardstock. I used the Heart of Hearts Layered Stencil to create this red background. Its a stencil set that includes 2 stencils that can be used together or separate. Once my background was inked the images from Love From Max & Millie were stamped in Oreo ink. The hot air balloon and cute little kitty cat were colored in using copic markers, then die cut using the coordinating dies. For added dimension and interest the die cut and sentiment were adhered to the card using foam adhesive.  There is a set of scalloped treat...

TE Like Gnome Other Kit

Image
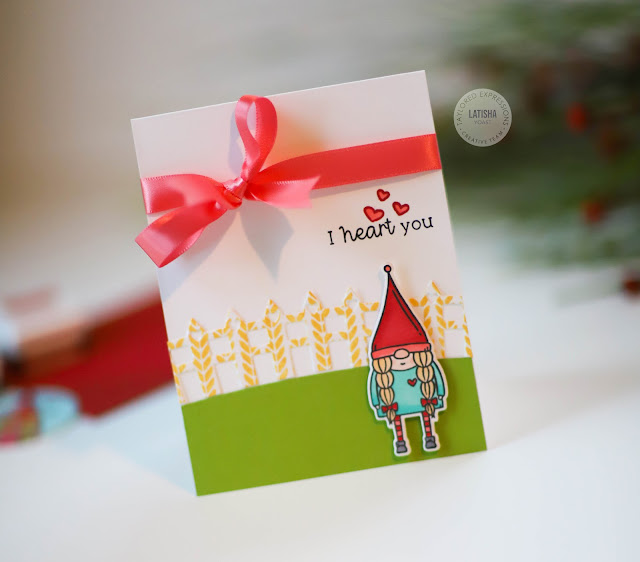
 I am so excited to share with you a brand new kit from Taylored Expressions called Like Gnome Other. If you love gnomes like I do, you are going to want to pick up this kit. It comes in a super cute bag as always. Then included are stamps, dies, envelopes, stickers & more. For this first card, I stamped the background using pinapple ink and then die cut it using the fence die. So that the fence and hill/grass area matched, the lime zest card stock was cut using the rounded die included. The girl gnome was stamped in Oreo ink, colored in with copic markers, die cut out and then adhered to the card using foam adhesive. The sentiment and hearts were added and colored in. To embellish I tied a pretty bow with satin ribbon.  For this next card, I started off with a toffee card base and then stamped the sentiment and hearts in cherry ink. The images were stamped on sugar cube cardstock, colored in with copic markers and then diecut using the coordinating dies before adhering ...

Lawn Fawn October Inspiration Week Recap

Image
  \ Hello Friends! Have you been following along this week for the October Inspiration Week over at Lawn Fawn? Head on over to the Lawn Fawn Blog for all of the details on how to win fun giveaways and all of the inspiration in one spot.  The first card shown just makes me happy or should I say hap-pea! A rainbow Christmas scene is just pure smiles. I started by stamping the mountains, coloring them in, stamping and coloring the peas and then stenciling. I wanted all of my stamping and coloring done before adding glitter gel over the snowflakes.  For this card I used the Let It Shine Patterned Paper and the Poinsettia die set to create a layered poinsettia card. Using the patterned paper was perfect as it made the process so quick. No need to color anything in. This shaped card uses the Snowglobe Magic Iris Die add on. I wanted to create a shaped card, so a little bit of engineering went into this. If anyone is wondering if they can do something different with this add on...

Lawn Fawn June Release Recap

Image
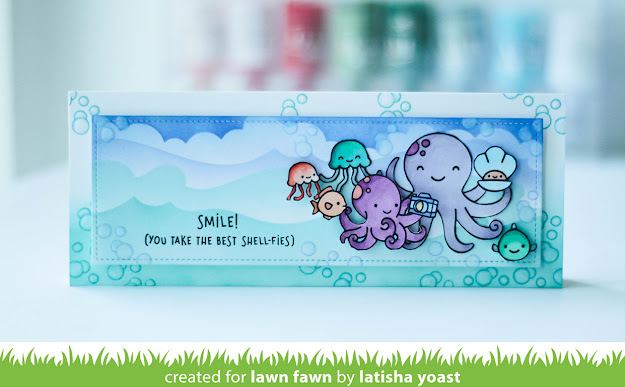
Hello friends! I feel like the worst blogger in the world right now. I was so sick in April and May. Around 6 weeks to be exact. I did not have Covid that I am aware of, just a lot of the same symptoms. Needless to say I didn't want to be on my computer so I just used social media to share my projects instead. I hope you are all doing well in your neck of the woods.  Now onto the Lawn Fawn Release. This is the summer release which means everything is brand, brand new! I hope you all followed along on social media and on the Lawn Fawn blog. Was this a fun release or what?!  All of the products will go live on the Lawn Fawn website at midnight tonight.  Ocean Shell-fie is a super cut underwater stamp set. Its a great addition to your critters collection. This is a  slim line card and the background was created using a wave and cloud stencil so it looked like the critters were at the ocean.  Crazy Antics stamp set has images and sentiments to create a cute picnic...

Happy Easter

Image
This scalloped treat bag is one of my favorite stand alone dies from Lawn Fawn. It is the perfect die to pair with patterned paper. Today, I am sharing this bag created out of the Dandy Day patterned paper with some of the Say What Spring Critters. The critters were stamped in black ink, colored in with copic markers then cut out and adhered to the bag.  Twine was added to the top for an embellishment.  Cute little Easter bags are a great way to package small treats.

Welcome Little One

Image
Hello friends! I am in the process of figuring out where the last few months of blog posts went. But for now I have a  card welcoming a little one. This stamp set is called Swan Soiree from Lawn Fawn .  To get the clouds look like a gradient. I masked off the edges of the white cardstock. Then ink blended the panel using very light blue inks. The bottom has more of a blue green hue. Using the Cloud stencil from Lawn Fawn, rotating it in a different direction and applying a darker blue hue. I like to use the ink blending brushes from Taylored Expressions, but you can use your favorite to achieve the same look.  The swan and duck were stamped in black ink onto white cardstock and colored in with copic markers, and then set aside.  The sentiment was stamped in black ink, the pond was stamped in a turquoise ink, and the plants were stamped in green ink.  To finish the card, twine was tied around the front panel then adhered to the card front us...

Thankful For You

Image
Hello Friends! I hope you all have had a wonderful summer so far! Today I am sharing a fun new die from Lawn Fawn called Flippin Awesome. It is the easiest interactive die that I have ever used! Some of those dies, make you feel like you need to me a mathematician who went back to school to be a magician. They are hard lol. Anyhow, this new die, paired with the Fall Fling pattern paper, has me wishing for Pumpkin Spice Lattes, and I don't even really like fall! (not a fan of things dying lol) I live in Florida, I can't help it for loving perpetual summer weather, its not my fault hahaha.  But back to this die, and these papers. They are absolute magic together. The Fall Fling paper might be my favorite new product of this fall/winter release. Its that amazing.  I hope you all are following along with the August Inspiration Week on the Lawn Fawn Blog . I might be biased, but the designers are sooo good! Make sure you leave a comment on the LF blog if you ...

Smooth Sailing

Image
After living in Florida for over 10 years, and my husband being in the Navy, its easy to say I love all things nautical. This Smooth Sailing stamp set from Lawn Fawn has anchors, sailboats, lighthouses, and wonderful sentiments.  There is something really eye catching when you use pink/orange/yellow together. It kind of reminds me of a sunset. That is the inspiration from this card, is the cotton candy sunset you see when visiting the coast of California. The sailboat and anchors were stamped in black ink, and then colored in using Copic markers. The banners and the images were all adhered to the card with foam adhesive for added dimension. Head on over to the Lawn Fawn blog for projects using this stamp set!

Let's Hang Out

Image
Today I am sharing a card using the stamp set called Winter Village from Lawn Fawn.  This is a holiday stamp set, but i wanted to create a card that could be used for any occasion year round.  Head on over to the Lawn Fawn Blog to check out all of the amazing Christmas cards using this set and a chance to win this stamp/die set. Instructions: 1.   Cut/score card stock to form base. 2.   Adhere a strip of red card stock to the bottom. 3.   Die cut a circle using white card stock. 4.   Stamp the images and sentiment. 5.   Color in the images using copic markers. 6.   Die cut a circle using green card stock. 7.   Using the Stitched Tree Borders, die cut onto the green circle, to get the row of trees. 8.   Adhere the tree border using foam adhesive. 9.   Adhere the circle to the card using foam adhesive. 10. Tie a bow with red twine, adhere to the card. Tip Use your border dies in unconventional ways...

Lawn Fawn: Party Animal

Image
Lawn Fawn is releasing new stamps, dies & inks this week.  If you visit the blog everyday, they have daily giveaways as well as one big prize at the end of the week.  You don't want to miss beautiful projects or a chance to win stuff, so check it out!! What I instantly was drawn to when I first saw this stamp set, was the size of the sentiments.  These sentiments are a bit larger than what you are used to seeing from Lawn Fawn, and I am LOVING this size.  Its in a nice font too.  This party animal critter themed set, really is genius.  Plus there are coordinating dies to match the stamps. Here is my card that I made using this set.  See that blue ink at the top.  That is a new dye ink color from Lawn Fawn, called Fish Tank. Instructions: 1. Score card base. 2. Diecut pattern paper, adhere to the card base using foam squares. 3. Trim white cardstock, adhere to the pattern paper. 4. Diecut white cardstock, stamp the sentiment...

Lawn Fawn: Year 5

Image
The next few days I will be sharing some fun projects I have made for the Lawn Fawn March Inspiration Week.  Today I have a cupcake topper & wrapper using some Lawn Fawn die along with the Year 5 stamp/die set. Make sure to head on over to the Lawn Fawn blog to see how the other designers using this stamp set as well. I am loving the Pint Size patterns paper collection.  It has all of the colors that just make me happy.  So when I was looking at using the Year 5 set, and making a party ensemble, I knew I had to use these paper along with it. What is so great about coordinating dies/stamps is that it really finishes your project and gives it that little extra professional looking touch. Materials Used: Lawn Fawn Year 5 stamp/dies Lawn Fawn Pint Size Patterns paper collection Lawn Fawn twine Lawn Fawn stitched circle dies Lawn Fawn scalloped circle die Lawn Fawn scaalloped cupcake topper

Lawn Fawn: On the Mend with dies

Image
Today over on the Lawn Fawn Blog , we are showcasing a few favorite stamp sets that now have coordinating dies!! For my card today, I used the On The Mend Stamp set with the matching dies.  After each was stamped, and die cut out, I colored them in using Copic Markers.  I then stamped my sentiment in black ink and adhered the die cuts to the card using 3D foam squares. Head on over to the Lawn Fawn Blog to see more inspiration and for a chance to win some great die sets!! Materials Used: Lawn Fawn On The Mend stamp set and dies Scrapbook Adhesives by 3L 3D foam squares Copic Markers Memento tuxedo black ink corner rounder white card stock