Posts

Taylored Expressions Pastel Blender Brushes & New Stencils

Image
  Hello! I cannot believe it is October 20, 2020! I honestly did not thing that the pandemic and shut downs would last this long. Does anyone else feel exhausted and fatigued from this year? I am hoping the holidays bring me more joy as I finish out the year. One can never have too much joy and happiness. Speaking of joy and happiness, I get to share a few new products with you today from Taylored Expressions. They are releasing new stencils and PASTEL BLENDER BRUSHES! I mean come on!! It doesn't get better than that. I love a good tool. Head on over to the Taylored Expressions website for more info on this release!! So, For this first card I used the stencil called A New Leaf. To me, the image looks similar to hops. Its a plant that grows hops for beer, which looks close to wheat. Anyhow, they are beautiful. So with the hops/wheat in mind I wanted to use yellow tones as a blended background. For added interest I did not blend the entire card. This is a perfect masculine card in m...

Taylored Expressions October Christmas Release

Image
  Hello friends! Today I am sharing with you my October Christmas Projects from Taylored Expressions!  There is just something so pretty about holly berries. For this card I stamped the Seasonal Sprig stamp onto watercolor paper, then using the coordinating die, die cut it out. The image was colored in using Karin ProBrush markers fo a soft watercolor effect. I put foam adhesive on the back of the front panel and set it aside. The card base is Early grey. The sprig was stamped again in black ink along with the sentiment and the front panel was adhered on top.  I am obsessed with rainbows, especially on cards. If 2020 has taught be anything its to lean in more to things that bring me joy. This card has a few different TE stamps and stencils but it all works together to create a rainbow snowflake scene. The Let It Snow layering trio stencils, are 3 different stencils. From left to right I used pink, reds, orange, yellow, green, blue and purple inks along with the blender...

Lawn Fawn October Inspiration Week Recap

Image
  \ Hello Friends! Have you been following along this week for the October Inspiration Week over at Lawn Fawn? Head on over to the Lawn Fawn Blog for all of the details on how to win fun giveaways and all of the inspiration in one spot.  The first card shown just makes me happy or should I say hap-pea! A rainbow Christmas scene is just pure smiles. I started by stamping the mountains, coloring them in, stamping and coloring the peas and then stenciling. I wanted all of my stamping and coloring done before adding glitter gel over the snowflakes.  For this card I used the Let It Shine Patterned Paper and the Poinsettia die set to create a layered poinsettia card. Using the patterned paper was perfect as it made the process so quick. No need to color anything in. This shaped card uses the Snowglobe Magic Iris Die add on. I wanted to create a shaped card, so a little bit of engineering went into this. If anyone is wondering if they can do something different with this add on...

Taylored Expressions Hey There

Image
  Hello there friends! There is a new kit from Taylored Expressions and I have a few samples to share with you. In the kit there is a sun ray stencil with an opening that fits the "hey there" sentiment perfectly.  I started by stamping the "hey there" sentiment, coloring it in with copic markers and then ink blending around the sentiment using the stencil. Its not showing up in the photo, but there is glossy accents over the sentiment. To embellish I added a few pink enamel dots.  For this next card, I used the "hey there" stencil and die using several different ink onto toffee cardstock. Then layering it onto a white car base and adding coordinating cardstock stripes underneath.  For the last card, I took the "good vibes" sentiment from the kit and stamped it over and over again using different colored inks. This created a custom background as well as a sentiment. The diecut circle sentiment and stamped panel were adhered using foam adhesive...

Taylored Expressions Happy Fall

Image
  Hello friends! I am sharing a few projects with you today, from the Tayloreed Expressions Fall/Thanksgiving release.  I peeked into the design team photos, and wow! There are so many beautiful projects going to be shown today. The A game was brought for sure. This first card looks fairly simple, but a lot of love, time and math went into it.  I stamped the background stamp onto a white panel, which has the leave stems. The stencils are created so that you can have an array of leaf colors on the stems. I wanted an ombre fall card, so as I layered each stencil, I only applied each ink color in a third of the card. Once the stenciling was complete I used the same inks to blend on the edges so the white wasn't so bright. Once the ink was dry, I took a white gel pen and went over the edges of each leaf.  The "happy fall y'all" stamp was stamped multiple times with the same inks, then diecut out with the coordinating die. Twine was added to embellish.  For my s...

Happy Birthday Taylored Expressions!!

Image
  Friends!! Today Taylored Expressions turns 12!! Happy Birthday TE! I am so excited to share my first projects being on the TE Design Team.  There is a lot to share, so buckle up and lets get started.  First up is a bright & fun, happy birthday card. I started by stenciling the background with the new Bokeh Layered Stencils. Its a stencil set that has three different stencils that creates a bokeh effect.  Once the background was completed, I took the On The Block "happy" die, placed it at a diagonal and diecut it in the center of the panel. On a separate piece of white cardstock, I stamped the "happy" sentiment from On The Block Happy and used foam adhesive to place the stenciled panel over the stamped sentiment.  The cute party animals (giraffe and monkey) are from the Life Of The Party Set. They were stamped in black ink, and then colored in with copic markers, fussy cut and adhered to the card using foam adhesive. The "birthday" sentiment is from t...

Hello, friend

Image
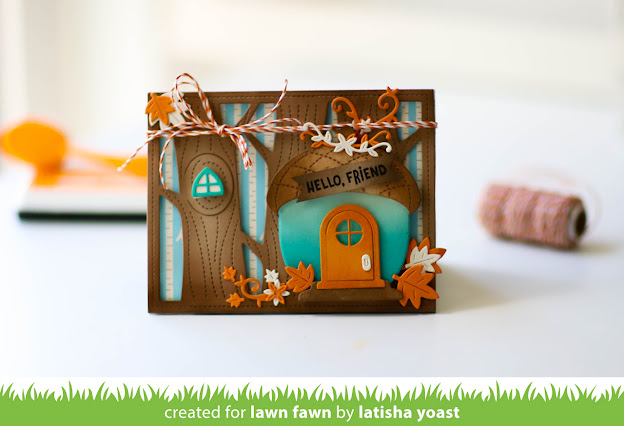
 Hello, friends! Are you ready for cuteness overload? The Acorn House die set from Lawn Fawn, is ridiculously cute! There are so many scenes in my head that I cannot wait to create using this die. For this card the base< trees and top of the acorn were diecut with Kraft cardstock. To get a richer color I ink blended brown onto the edges for contrast. I did this this the acorn house as well. Behind the backdrop is a trimmed down piece of Into The Woods Remix patterned paper. Except for the "hello, friend" above the door, this is primarily a no stamping card. Are you following along with this release? What is your favorite stamp set or die so far? Head on over to the Lawn Fawn blog, to see new inspiration everyday and also have a chance to win new items from this release!