Posts

25 Days of Christmas Tags

Image
Hello friends, there is something called the 25 Days of Christmas Tags, and today is Day 12 , with Lawn Fawn as the sponsor.  There is a $25 gift certificate up for grabs from Lawn Fawn, but everyday there is a new giveaway.  All of the details are on Tracey's blog post .  Basically you need to create a tag for a chance to win!  How fun!

Trick or Treat

Image
Hello friends! Did you know that Lawn Fawn now has a few different embossing powders as well as glitter?  For my project today, I did a little bit of water coloring.  Let me tell you a little secret.  When you want to water color images, if you heat emboss the image with embossing powder, it makes the water coloring process so much easier! Especially if you are worried about the color going outside of the lines. 1.  Stamp images in versa mark ink. 2.  Apply Lawn Fawn Gold embossing powder onto the image.  Heat set with a heat gun. 3.  Stamp sentiment in versamark ink, apply silver embossing powder. Heat set 4.  Water color the image. 5.  To ground the image so it doesn't look like its floating on the white card stock, add green water color for grass, and blue for the sky. 6.  Die cut the white card stock with a rectangle die. 7.  Apply the diecut to pattern paper with foam adhesive. 8.  Adhere to a whi...

Fairy Winter

Image
Hello friends! The card I am sharing today, is a little more in depth, but I know you are capable of following along :)  This is a shaped card using the Stitched Scalloped Rectangles from Lawn Fawn.  There is a rectangle stitching on the outside of the scalloped cut line, and on the inside.  Only when you cut more than one die together, will you see both stitched lines. 1.  Lay two stitched scalloped rectangle dies, onto white card stock. Run through a die cutting machine.  You will use the outside frame. Apply foam adhesive on the inside of the frame and set aside. 2.  Die cut 2 large die cuts using the larger die with pattern paper. 3.  Place the white frame die cut over one of the pattern paper die cuts.  This will be the front of the card. 4.  Adhere the other pattern paper to the card, by scoring one inch down from the top, putting adhesive above the score line and adhering to the front of the card. 5.  Stamp fairy...

Happy Thanksgiving

Image
Today I am sharing a decorated kraft flat bag (glassine bag).  This is a different way to store a card, give a gift card, put candy into. There are multiple ways to use them. Using the Perfectly Plaid chill paper, I trimmed and scored paper. Then created a paper rosette with them. Adhered a pattern paper circle on top, and then layered a stamped circle as well, with colored in pumpkins.  A strip of pattern paper, was adhered to the bottom of the bag, the sentiment was stamped in black ink, as well as the pumpkin. The pumpkin was colored in using copic markers as well. Head on over to the Lawn Fawn blog , to see how the other designers used this paper collection!

Merry Christmas

Image
Hello friends! One of my favorite ways to challenge myself in card making, is when I use a mini set.  Mini stamp sets are usually 2 x 3 inches, have a main image, a sentiment or two, and maybe smaller images.  It stretches creativity as well as simplifying products used.  A lot of times stampers feel overwhelmed by the amount of choices when starting a card, but I have found less is more a lot of time. First I stamped the otter onto the card front as a mark to where my focal point was going to be.  Using green ink and a blender tool, I applied ink onto the card.  When ink blending, pick up ink onto the blender, then tap the blender onto scratch paper, if there is going to be an ink ring on the blender, this is when the sharpness of the ring will come off.  I then start blending in light circles onto the card, I repeat this over and over until satisfied with the layer and darkness of the ink.  The sentiments were stamped in black ink, the he...

Merry Christmas

Image
Hello friends! How is is mid October already?! We are on the cusp of fall and winter holidays, which means starting to create Christmas cards. Today I am sharing a holiday card using the Stitched Ornament dies from Lawn Fawn .  I started by creating a base of white card stock at 4.25 x 5.5 inches.  I then layered it with cilantro card stock, that had been die cut with foam adhesive. The chili pepper was die cut with a rectangle first, and then I die cut the stitched ornament, because i wanted the outside stitch of the ornament to show up.  Next the ornament were die cut again with white card stock, and then stamped using different "merry christmas" sentiments in green and red ink.  These two layers were adhered to the card using foam adhesive as well.  To finish the card, "love" was stamped in black, and black single cord twine was added to embellish. Head on over to the Lawn Fawn blog to see the rest of the project using this set!

Merry Christmas

Image
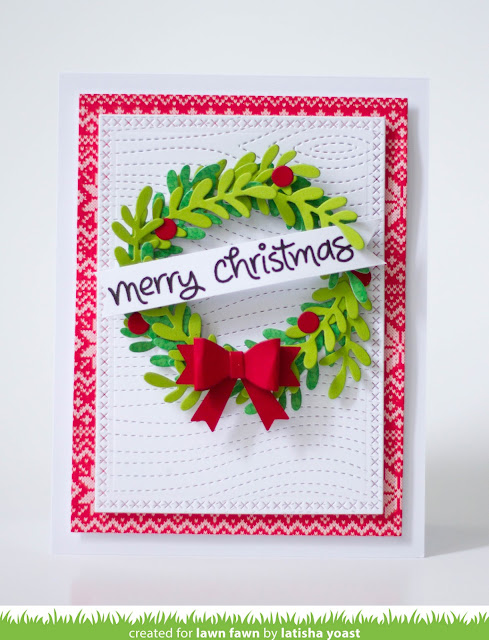
I have to say, seeing the first the images of this die set, and then receiving them, I was so excited!  Wreaths are very seasonal, and you can completely change the look of the wreath by using different papers and elements.  I decided to create a Christmas themed wreath.  I love the classic green wreath and red bow, it just screams holidays. I used a mix of green pattern paper and green card stock to give the wreath some depth.  Using white card stock, the background was embossed first with the woodgrain back drop and then die cut using a rectangle die for added interest.  The sentiment was stamped in black ink, trimmed and then cut the edges off to create a banner on the wreath. The red pattern paper is from the new Lawn Fawn Knit Picky pattern paper collection. Head on over to the Lawn Fawn blog , to see the other great projects using this set as well as a chance to win it. Save Save