Posts

Merry Christmas

Image
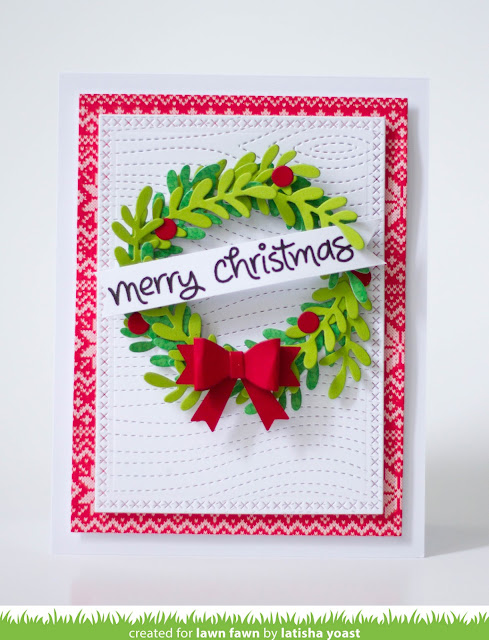
I have to say, seeing the first the images of this die set, and then receiving them, I was so excited!  Wreaths are very seasonal, and you can completely change the look of the wreath by using different papers and elements.  I decided to create a Christmas themed wreath.  I love the classic green wreath and red bow, it just screams holidays. I used a mix of green pattern paper and green card stock to give the wreath some depth.  Using white card stock, the background was embossed first with the woodgrain back drop and then die cut using a rectangle die for added interest.  The sentiment was stamped in black ink, trimmed and then cut the edges off to create a banner on the wreath. The red pattern paper is from the new Lawn Fawn Knit Picky pattern paper collection. Head on over to the Lawn Fawn blog , to see the other great projects using this set as well as a chance to win it. Save Save

Let's Hang Out

Image
Today I am sharing a card using the stamp set called Winter Village from Lawn Fawn.  This is a holiday stamp set, but i wanted to create a card that could be used for any occasion year round.  Head on over to the Lawn Fawn Blog to check out all of the amazing Christmas cards using this set and a chance to win this stamp/die set. Instructions: 1.   Cut/score card stock to form base. 2.   Adhere a strip of red card stock to the bottom. 3.   Die cut a circle using white card stock. 4.   Stamp the images and sentiment. 5.   Color in the images using copic markers. 6.   Die cut a circle using green card stock. 7.   Using the Stitched Tree Borders, die cut onto the green circle, to get the row of trees. 8.   Adhere the tree border using foam adhesive. 9.   Adhere the circle to the card using foam adhesive. 10. Tie a bow with red twine, adhere to the card. Tip Use your border dies in unconventional ways...

Halloween Gift Boxes

Image
Hello friends! How is it the middle of September?  I saw someone the other day talking about only around 100-ish days until Christmas.  I was silently thinking, I just need to get through hurricane season lol.  Anyhow, Lawn Fawn has this cute little die called the Tiny Gift Box. You can create the boxes using pattern paper, or plain cardstock, whatever your preference is.  I die cut white cardstock, and then stamped images onto the die cut before adhering the box together. I enjoy customizing projects, especially for seasons.  Head on over to the Lawn Fawn blog , to see all of the wonderful projects using this die set! 1. Die cut white card stock using the tiny gift box die. 2. Stamp images onto the die cut 3. Color in the images. 4. Adhere the box together using a strong adhesive. 5. Tie twine bow, adhere to the box. Tip Before stamping onto the die cut, figure out what is the front, the top, the sides and bottom...this will help y...

Here We Go A-Waddling

Image
Hello Friends, today I am sharing an easy to make holiday card.  This would also be a great card to create and mass produce for a Christmas card.  That sentiment is so stinking cute, once I saw it I had to use it on this card.  I actually created this while we were waiting for Hurricane Irma to hit Florida. I struggled for a bit, but coloring the images really helped me relax and forget a storm was outside. The die and stamps are from Lawn Fawn , and its called Here We Go A-Waddling.  The September Inspiration Week has started, so head on over to the Lawn Fawn blog today, to see more great samples using this set! Instructions: 1. Cut/score card stock to create base 4.25 xy 5.5 inches. 2. Die cut red pattern paper from rectangle die, and adhere to the card base using foam adhesive. 3. Die cut white card stock from rectangle die, stamp sentiment in black ink, adhere to the card using foam adhesive. Adhere strips of pattern paper to the bottom. 4. S...

Costume Party

Image
The cutest Halloween stamp and die set from Lawn Fawn called Costume Party, will be available next week.  I had so much fun coloring in these images.  For more inspiration using this set, head on over to the Lawn Fawn Blog for the August Inspiration. I started by blending a yellow and orange ink onto the card base using a foam blending tool.  Next I adhered a strip of black card stock & stamped my sentiment in black ink.  The images were stamped in Memento Tuxedo black ink, and colored in with copic markers.  I wanted them to look like they were holding hands, so I cut them out using scissors instead of die cutting them.  For added dimension the images were adhered to the card using foam adhesive. Save Save

Love Ya Bunches

Image
Love Ya Bunches is a limited edition stamp & die set in collaboration with Ellen Hutson's United We Flourish & sold exclusively at EllenHutson .  The stamps and dies come together in a set, so no separate purchase. I decided to create a stamped background using the monkeys, heart and bananas.  I did this for a few reasons, one because creating a custom pattern paper is always fun, and two, not everyone likes to diecut or has access to a die cut machine.  I did die cut the panel using a rectangle stitched die to make the card look professional and finished, however you could just use a paper trimmer.  I used Marvy alcohol markers to color in the images. Head on over to the Lawn Fawn blog to see all of the great projects using this set!

Aloha

Image
Ever since I received this stamp set I have been smitten.  There is nothing about pineapples with smiling faces, that i don't love.  Its just "so cute".   I decided to create a custom stamped background using the pineapples and then colored them in using copic markers. The "aloha" sentiment was cut out using a die and foam adhesive sheets. Make sure you head on over to the Lawn Fawn Blog , to see all of the great projects using this set. Also for a chance to win.  No worries if you don't win, because this stamp set is just a few dollars and so very affordable! Love that!!