Posts

Lawn Fawn: Let's Bokeh
Image
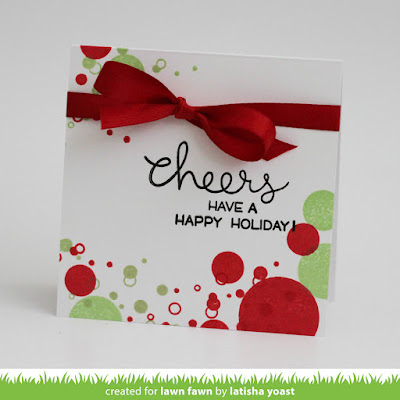
Hello there! I have a one layer holiday card that I am sharing today using the Let's Bokeh stamp set from Lawn Fawn.  Bokeh is a word a lot of photographers use, its to get that nice blurred background that creates circles of light. This stamp set has a ton of different sized silhouette circles as well as outlined circles to create to many fun bokeh inspired projects.  By using different colored ink it creates a little bit of depth which is so cool, especially if you are making a one layer card. Make sure you head on over to the Lawn Fawn Blog , to see more projects using this set, as well as a chance to win some new product!

Lawn Fawn: Lets Bokeh in the Snow

Image
Hello there! I have a quick and easy project to show you today, using the Let's Bokeh in the Snow pattern paper collection from Lawn Fawn.  I used the Goodie Bag die template to create these cute little bags. To create these bags, all you do is die cut pattern paper or cardstock twice, then adhere together.  Lawn Fawn makes the packaging dies so easy to work with.  For those of you who are visual learners just search the Lawn Fawn YouTube archives and there is a video on how to use this die set! After I diecut the stitches circle die with white cardstock, I stamped the sentiment and images using the Trim the Tree stamp set, and adhered using foam adhesive. Materials Used: Lawn Fawn Let's Bokeh in the Snow pattern paper Lawn Fawn Goodie Bag die Lawn Fawn stitched circle die Lawn Fawn trimmings Lawn Fawn Trim the Tree stamp set Lawn Fawn ink Scrapbook adhesives by 3L

Lawn Fawn: Winter Alpaca

Image
Hello there! I know you might be a little tired of me making these pillow boxes, but they make me so happy.  Not to mention you can put candy, money, a gift card or anything else you may think of. Today over at the Lawn Fawn Blog , there are tons of projects showcasing the Santa's Belly die attachment for the pillow box, Stitched Circle Tags & Winter Alpaca (I think a few border dies too)!  Head on over there because a lot of product is going to be given away, and who doesn't like free stuff!. I wanted to make a project coordinating some of the new product together.  Once I diecut the pillow box, I stamped the (alpaca my scarf) sentiment with a few snowflakes, adhered the pillow box shut.  Die cut some green felt using one of the dies from the Santa's Belly set that coordinates with the pillow box.  I really love the added touch the scalloped ends make.  I then die cut white cardstock using the middle sized stitched tag die, stamped the Alpaca...

Lawn Fawn: Ready Set Snow

Image
Hello there! Today I am sharing a felted ornament that I made using the Ready Set Snow stamp set and dies from Lawn Fawn.  Since this is the Inspiration Week for September, that means you can win a ton of product.  So be sure to pay a visit every day this week over at the Lawn Fawn Blog . Since this is a shaker card set, I encourage you to pay a visit to the Lawn Fawn blog and watch the video on how to use this set. I didn't have a video to watch and I was able to figure it out pretty easily.  However I know so many of you are visual learners, and the Lawn Fawn Videos are always so educational!

Lawn Fawn: Toboggan Together

Image
Hello there! Happy Friday!! Today I am sharing a one layered card, perfect for sending around the holidays, using the Toboggan Together stamp set from Lawn Fawn. Make sure you head on over to the Lawn Fawn Blog , to see more projects using this stamp set, as well as a chance to win some great product!! Instructions: 1.  First, I stamped the deer in black ink onto the card front. 2.  I then stamped it again onto scrap paper, and laid it over the image on the card front. 3.  Using the pigment white ink from lawn fawn and a sponge, I inked up the area around the deer. 4.  I heat set the white ink (because I am too impatient to wait lol) 5.  Stamped the sentiment in a black pigment ink. 6. Stamped the snow flakes. 7.  Colored in the deer using colored pencils, copics and white opaque pens. 8.  To finish I added some twine.

Lawn Fawn: Happy Harvest

Image
Hello there! I know lots of you out there are sending your children off to school this week (and last), well in the south at least.  That means fall is right around the corner!  Living in Florida means summer kind of drags out to October, so fall here is just a few weeks.  But it truly is fantastic!  Warm days, cooler nights and no humidity. Anyhow, fall means fall projects.  Like Halloween, back to school, Thanksgiving, celebrating the harvest! Lawn Fawn is in the middle of August Inspiration Week, and everything has been fall themed.  Today is no different, as I am showcasing a stamp/die set called Happy Harvest.  Again don't hate me, I'm seriously addicted to this pillow box die, but I made a few pillow boxes using the Happy Harvest stamp set. Make sure you head on over to the Lawn Fawn Blog , to see some fabulous projects by the design team, and for a chance to win this set!! There are so many fun images in this set.  I couldn't d...

Lawn Fawn: Lets Polka In The Dark

Image
One of the newest pattern paper collections from Lawn Fawn is now available, and its called Let's Polka In The Dark.  It has deep fall colors, like green, black, purple etc... Perfect for all of your Fall/Halloween/Thanksgiving projects! Head on over to the Lawn Fawn Blog , where they are showing off this fun collection.  There are gifts, cards & scrapbook pages.  Plus you can comment to win a fabulous collection prize! All of this week I have been using the Let's Polka In The Dark pattern paper on my projects.  However, here is another way to use the collection.  At first it appears to be for fall projects.  But with the red pattern paper, I turned it into a Christmas project.  So versatile for sure. Instructions: 1. Diecut pattern paper using the Lawn Fawn pillow box die. 2. Adhere together with red line adhesive. 3. Diecut white cardstock using the small stitched dies. 4. Distress the leaves with ink. Adhere with foam squares....